6.2. Spring Securityチュートリアル
Caution
本バージョンの内容は既に古くなっています。最新のガイドラインはこちらからご参照ください。
6.2.1. はじめに
6.2.1.1. このチュートリアルで学ぶこと
- Spring Securityによる基本的な認証・認可
- データベース上のアカウント情報を使用したログイン
- 認証済みアカウントオブジェクトの取得方法
6.2.1.2. 対象読者
- チュートリアル(Todoアプリケーション)を実施ずみ
- Mavenの基本的な操作を理解している
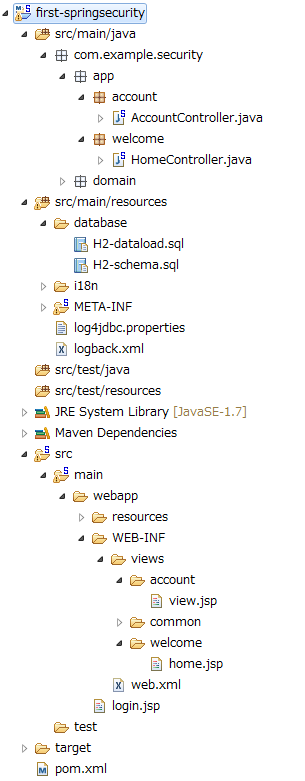
6.2.2. 作成するアプリケーションの説明
6.2.2.1. アプリケーションの概要
- ログインできる。ログインのためのアカウント情報はデータベース上に格納されている。
- Welcome画面、アカウント情報表示画面があり、ログインしないと閲覧できない。
- ログアウトできる。
アプリケーションの概要を以下の図で示す。
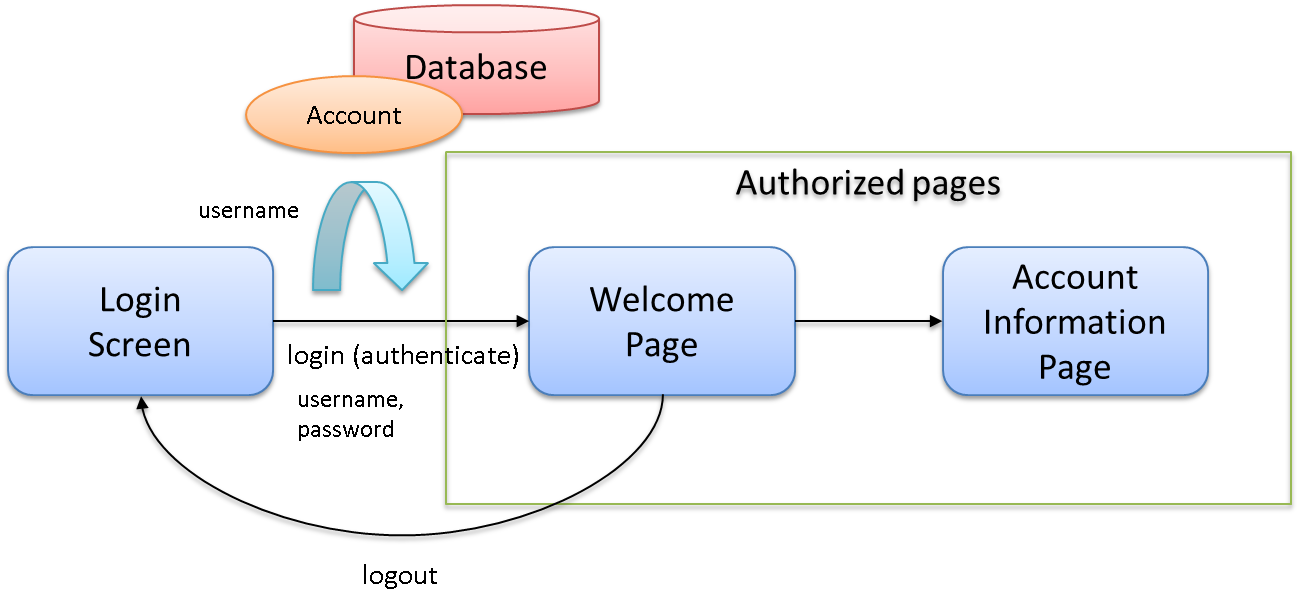
URL一覧を以下に示す。
| 項番 | プロセス名 | HTTPメソッド | URL | 説明 |
|---|---|---|---|---|
| 1 | ログインフォーム表示 | GET | /login.jsp | ログインフォームを表示する |
| 2 | ログイン | POST | /authentication | ログインフォームから入力されたユーザ名、パスワードを使って認証する(Spring Securityが行う) |
| 3 | ウェルカムページ表示 | GET | / | ウェルカムページを表示する |
| 4 | アカウント情報表示 | GET | /account | ログイン中のアカウント情報を表示する |
| 5 | ログアウト | GET | /logout | ログアウトする(Spring Securityが行う) |
6.2.3. 環境構築
6.2.3.1. プロジェクトの作成
mvn archetype:generate -B^
 -DarchetypeCatalog=http://repo.terasoluna.org/nexus/content/repositories/terasoluna-gfw-releases^
 -DarchetypeGroupId=org.terasoluna.gfw.blank^
 -DarchetypeArtifactId=terasoluna-gfw-web-blank-mybatis2-archetype^
 -DarchetypeVersion=1.0.5.RELEASE^
 -DgroupId=com.example.security^
 -DartifactId=first-springsecurity^
 -Dversion=1.0-SNAPSHOT
コンソール上に以下のようなログが表示されれば、ブランクプロジェクトの作成は成功となる。
C:\work>mvn archetype:generate -B^
More?  -DarchetypeCatalog=http://repo.terasoluna.org/nexus/content/repositories/terasoluna-gfw-releases^
More?  -DarchetypeGroupId=org.terasoluna.gfw.blank^
More?  -DarchetypeArtifactId=terasoluna-gfw-web-blank-mybatis2-archetype^
More?  -DarchetypeVersion=1.0.5.RELEASE^
More?  -DgroupId=com.example.security^
More?  -DartifactId=first-springsecurity^
More?  -Dversion=1.0-SNAPSHOT
[INFO] Scanning for projects...
[INFO]
[INFO] ------------------------------------------------------------------------
[INFO] Building Maven Stub Project (No POM) 1
[INFO] ------------------------------------------------------------------------
[INFO]
[INFO] >>> maven-archetype-plugin:2.2:generate (default-cli) @ standalone-pom >>>
[INFO]
[INFO] <<< maven-archetype-plugin:2.2:generate (default-cli) @ standalone-pom <<<
[INFO]
[INFO] --- maven-archetype-plugin:2.2:generate (default-cli) @ standalone-pom ---
[INFO] Generating project in Batch mode
[INFO] Archetype repository missing. Using the one from [org.terasoluna.gfw.blank:terasoluna-gfw-web-blank-mybatis2-archetype:1.0.0.RELEASE -> http://repo.terasoluna.org/nexus/content/repositories/terasoluna-gfw-releases] found in catalog http://repo.terasoluna.org/nexus/content/repositories/terasoluna-gfw-releases
[INFO] ----------------------------------------------------------------------------
[INFO] Using following parameters for creating project from Archetype: terasoluna-gfw-web-blank-mybatis2-archetype:1.0.5.RELEASE
[INFO] ----------------------------------------------------------------------------
[INFO] Parameter: groupId, Value: com.example.security
[INFO] Parameter: artifactId, Value: first-springsecurity
[INFO] Parameter: version, Value: 1.0-SNAPSHOT
[INFO] Parameter: package, Value: com.example.security
[INFO] Parameter: packageInPathFormat, Value: com/example/security
[INFO] Parameter: package, Value: com.example.security
[INFO] Parameter: version, Value: 1.0-SNAPSHOT
[INFO] Parameter: groupId, Value: com.example.security
[INFO] Parameter: artifactId, Value: first-springsecurity
[INFO] project created from Archetype in dir: C:\work\first-springsecurity
[INFO] ------------------------------------------------------------------------
[INFO] BUILD SUCCESS
[INFO] ------------------------------------------------------------------------
[INFO] Total time: 10.207s
[INFO] Finished at: Wed Aug 27 14:14:48 JST 2014
[INFO] Final Memory: 9M/23M
[INFO] ------------------------------------------------------------------------
C:\work>
6.2.4. アプリケーションの作成
6.2.4.1. ドメイン層の実装
Spring Securityの認証処理は基本的に以下の流れになる。
- 入力された
usernameからユーザー情報を検索する。 - ユーザー情報が存在する場合、そのユーザー情報がもつパスワードと入力されたパスワードをハッシュ化したものを比較する。
- 比較結果が一致する場合、認証成功とみなす。
ユーザー情報が見つからない場合やパスワードの比較結果が一致しない場合は認証失敗である。
ドメイン層ではユーザー名からAccountオブジェクトを取得する処理が必要となる。以下の順に進める。
- Domain Object(Account)の作成
- AccountRepositoryの作成
- AccountServiceの作成
Accountテーブルは次のものを使用する(DDLスクリプトは後程作成する)。
CREATE TABLE account(
    username varchar(128),
    password varchar(128),
    first_name varchar(128),
    last_name varchar(128),
    constraint pk_tbl_account primary key (username)
);
6.2.4.1.1. Domain Objectの作成
次のAccountクラスを用意する。このクラスが認証情報(ユーザー名とパスワード)を持つ。
src/main/java/com/example/security/domain/model/Account.java
package com.example.security.domain.model;

import java.io.Serializable;

public class Account implements Serializable {
    private static final long serialVersionUID = 1L;

    private String username;

    private String password;

    private String firstName;

    private String lastName;

    public String getUsername() {
        return username;
    }

    public void setUsername(String username) {
        this.username = username;
    }

    public String getPassword() {
        return password;
    }

    public void setPassword(String password) {
        this.password = password;
    }

    public String getFirstName() {
        return firstName;
    }

    public void setFirstName(String firstName) {
        this.firstName = firstName;
    }

    public String getLastName() {
        return lastName;
    }

    public void setLastName(String lastName) {
        this.lastName = lastName;
    }

    @Override
    public String toString() {
        return "Account [username=" + username + ", password=" + password
                + ", firstName=" + firstName + ", lastName=" + lastName + "]";
    }
}
6.2.4.1.2. AccountRepositoryの作成
AccountRepositoryにはユーザー名からAccountオブジェクトを取得するデータアクセス処理を実装する。
src/main/java/com/example/security/domain/repository/account/AccountRepository.java
まずはインタフェースを定義する。ユーザー名からAccountオブジェクトを取得する
findOne(username)を定義する。package com.example.security.domain.repository.account; import com.example.security.domain.model.Account; public interface AccountRepository { Account findOne(String username); }
src/main/java/com/example/security/domain/repository/account/AccountRepositoryImpl.java
データアクセス処理を
AccountRepositoryImplに実装する。package com.example.security.domain.repository.account; import javax.inject.Inject; import org.springframework.stereotype.Repository; import jp.terasoluna.fw.dao.QueryDAO; import com.example.security.domain.model.Account; @Repository public class AccountRepositoryImpl implements AccountRepository { @Inject QueryDAO queryDAO; @Override public Account findOne(String username) { Account account = queryDAO.executeForObject("account.findOne", username, Account.class); return account; } }
src/main/resources/META-INF/mybatis/sql/account-sqlmap.xml
Accountを1件取得するためのSQLID"account.findOne"に対応するSQLをSQLMapファイルに定義する。<?xml version="1.0" encoding="UTF-8" ?> <!DOCTYPE sqlMap PUBLIC "-//ibatis.apache.org//DTD SQL Map 2.0//EN" "http://ibatis.apache.org/dtd/sql-map-2.dtd"> <sqlMap namespace="account"> <resultMap id="account" class="com.example.security.domain.model.Account"> <result property="username" column="username" /> <result property="password" column="password" /> <result property="firstName" column="first_name" /> <result property="lastName" column="last_name" /> </resultMap> <select id="findOne" parameterClass="java.lang.String" resultMap="account"><![CDATA[ SELECT username, password, first_name, last_name FROM account WHERE username = #value# ]]></select> </sqlMap>
6.2.4.1.3. AccountServiceの作成
src/main/java/com/example/security/domain/service/account/AccountService.java
AccountServiceにはユーザー名からAccountオブジェクトを取得する業務処理を実装する。この処理は後ほどSpring Securityの認証サービスから利用されるので、クラス名は
AccountSharedServiceとする。package com.example.security.domain.service.account; import com.example.security.domain.model.Account; public interface AccountSharedService { Account findOne(String username); }
src/main/java/com/example/security/domain/service/account/AccountServiceImpl.java
データアクセスの結果、該当する
Accountが存在しない場合は、ResourceNotFoundExceptionをスローする。package com.example.security.domain.service.account; import javax.inject.Inject; import org.springframework.stereotype.Service; import org.terasoluna.gfw.common.exception.ResourceNotFoundException; import com.example.security.domain.model.Account; import com.example.security.domain.repository.account.AccountRepository; @Service public class AccountSharedServiceImpl implements AccountSharedService { @Inject AccountRepository accountRepository; @Override public Account findOne(String username) { Account account = accountRepository.findOne(username); if (account == null) { throw new ResourceNotFoundException("The given account is not found! username=" + username); } return account; } }
6.2.4.1.4. 認証サービスの作成
Spring Securityで使用する認証ユーザー情報はorg.springframework.security.core.userdetails.UserDetailsインタフェースを実装する。
ここではUserDetailsを実装したorg.springframework.security.core.userdetails.User クラスを継承し、本プロジェクト用のUserDetailsクラスを実装する。
src/main/java/com/example/security/domain/service/userdetails/SampleUserDetails.java
package com.example.security.domain.service.userdetails;

import java.util.Collection;
import java.util.Collections;

import org.springframework.security.core.GrantedAuthority;
import org.springframework.security.core.authority.SimpleGrantedAuthority;
import org.springframework.security.core.userdetails.User;

import com.example.security.domain.model.Account;

public class SampleUserDetails extends User {
    private static final long serialVersionUID = 1L;

    private final Account account; // (1)

    public SampleUserDetails(Account account) {
        super(account.getUsername(), account.getPassword(), createRole(account)); // (2)
        this.account = account;

    }

    private static Collection<? extends GrantedAuthority> createRole(
            Account account) {
        // sample role
        return Collections
                .singletonList(new SimpleGrantedAuthority("ROLE_USER")); // (3)
    }

    public Account getAccount() { // (4)
        return account;
    }
}
項番 説明 (1)Springの認証ユーザークラスに、本プロジェクトのアカウント情報を保持させる。(2)Userクラスのコンストラクタを呼び出す。第1引数はユーザー名、第2引数はパスワード、第3引数は権限リストである。(3)簡易実装として、"ROLE_USER"というロールのみ持つ権限を作成する。(4)アカウント情報のgetterを用意する。これにより、ログイン中のAccountオブジェクトを取得することができる。src/main/java/com/example/security/domain/service/userdetails/SampleUserDetailsService.java
package com.example.security.domain.service.userdetails;

import javax.inject.Inject;

import org.springframework.security.core.userdetails.UserDetails;
import org.springframework.security.core.userdetails.UserDetailsService;
import org.springframework.security.core.userdetails.UsernameNotFoundException;
import org.springframework.stereotype.Service;
import org.terasoluna.gfw.common.exception.ResourceNotFoundException;

import com.example.security.domain.model.Account;
import com.example.security.domain.service.account.AccountSharedService;

@Service
public class SampleUserDetailsService implements UserDetailsService {
    @Inject
    AccountSharedService accountSharedService; // (1)

    @Override
    public UserDetails loadUserByUsername(String username) throws UsernameNotFoundException {
        try {
            Account account = accountSharedService.findOne(username); // (2)
            return new SampleUserDetails(account); // (3)
        } catch (ResourceNotFoundException e) {
            throw new UsernameNotFoundException("user not found", e); // (4)
        }
    }

}
項番 説明 (1)AccountSharedServiceをインジェクションする。本ガイドラインでは、ServiceからはServiceの呼び出しは非推奨であり、AccountServiceではなく、AccountSharedServiceという名前にしている。(2)usernameからAccountオブジェクトを取得する処理をAccountSharedServiceに委譲する。(3)取得したAccountオブジェクトを使用して、本プロジェクト用のUserDetailsオブジェクトを作成する。(4)UserDetailsServiceは対象のユーザーが見つからない場合にはUsernameNotFoundExceptionがスローされる仕様となっている。
6.2.4.2. アプリケーション層の実装
6.2.4.2.1. Spring Securityの設定
spring-security.xmlにSpring Securityによる認証・認可の設定を行う。
特にURLに関する設定項目を以下に再掲する。
設定項目名
|
設定値
|
|---|---|
ログインフォームのURL
|
/login.jsp
|
認証失敗時に遷移するURL
|
/login.jsp?error=true
|
認証処理のURL
|
/authenticate
|
ログアウトのURL
|
/logout
|
ログアウト後に遷移するURL
|
/
|
blankプロジェクトからの差分のみ説明する。
src/main/resources/META-INF/spring/spring-security.xml
 <?xml version="1.0" encoding="UTF-8"?>
 <beans xmlns="http://www.springframework.org/schema/beans"
     xmlns:xsi="http://www.w3.org/2001/XMLSchema-instance" xmlns:sec="http://www.springframework.org/schema/security"
     xmlns:context="http://www.springframework.org/schema/context"
     xsi:schemaLocation="http://www.springframework.org/schema/security http://www.springframework.org/schema/security/spring-security.xsd
         http://www.springframework.org/schema/beans http://www.springframework.org/schema/beans/spring-beans.xsd
         http://www.springframework.org/schema/context http://www.springframework.org/schema/context/spring-context.xsd">

     <sec:http pattern="/resources/**" security="none" />
     <sec:http auto-config="true" use-expressions="true">
         <sec:form-login login-page="/login.jsp"
             authentication-failure-url="/login.jsp?error=true"
             login-processing-url="/authenticate" /><!-- (1) -->
         <sec:logout logout-url="/logout" logout-success-url="/"
             delete-cookies="JSESSIONID" /><!-- (2) -->

         <sec:intercept-url pattern="/login.jsp"
             access="permitAll" /><!-- (3) -->
         <sec:intercept-url pattern="/**" access="isAuthenticated()" /><!-- (4) -->

         <sec:custom-filter ref="csrfFilter" before="LOGOUT_FILTER" />
         <sec:custom-filter ref="userIdMDCPutFilter"
             after="ANONYMOUS_FILTER" />
         <sec:session-management
             session-authentication-strategy-ref="sessionAuthenticationStrategy" />
     </sec:http>


     <sec:authentication-manager>
         <!-- com.example.security.domain.service.userdetails.SampleUserDetails
             is scaned by component scan with @Service -->
         <sec:authentication-provider
             user-service-ref="sampleUserDetailsService"><!-- (5) -->
             <sec:password-encoder ref="passwordEncoder" /><!-- (6) -->
         </sec:authentication-provider>
     </sec:authentication-manager>

     <!-- CSRF Protection -->
     <bean id="csrfTokenRepository"
         class="org.springframework.security.web.csrf.HttpSessionCsrfTokenRepository" />

     <bean id="csrfFilter" class="org.springframework.security.web.csrf.CsrfFilter">
         <constructor-arg index="0" ref="csrfTokenRepository" />
         <property name="accessDeniedHandler">
             <bean
                 class="org.springframework.security.web.access.AccessDeniedHandlerImpl">
                 <property name="errorPage"
                     value="/WEB-INF/views/common/error/csrfTokenError.jsp" />
             </bean>
         </property>
     </bean>

     <bean id="sessionAuthenticationStrategy"
         class="org.springframework.security.web.authentication.session.CompositeSessionAuthenticationStrategy">
         <constructor-arg index="0">
             <list>
                 <bean
                     class="org.springframework.security.web.authentication.session.SessionFixationProtectionStrategy" />
                 <bean
                     class="org.springframework.security.web.csrf.CsrfAuthenticationStrategy">
                     <constructor-arg index="0"
                         ref="csrfTokenRepository" />
                 </bean>
             </list>
         </constructor-arg>
     </bean>

     <!-- Put UserID into MDC -->
     <bean id="userIdMDCPutFilter"
         class="org.terasoluna.gfw.security.web.logging.UserIdMDCPutFilter">
         <property name="removeValue" value="true" />
     </bean>

 </beans>
項番 説明 (1)<sec:form-login>タグでログインフォームに関する設定を行う。login-page属性にログインフォームのURL、authentication-failure-url属性に認証失敗時に遷移するURL、login-processing-url属性に認証処理のURLを設定する。(2)<sec:logout>タグでログアウトに関する設定を行う。logout-url属性にログアウトのURL、logout-success-url属性にログアウト後に遷移するURLを設定する。またdelete-cookies属性にログアウト時に削除するCookie名を指定できる。(3)<sec:intercept-url>タグでURLレベルでの認可設定を行う。ログインフォームは全ユーザーのアクセスを許可するpermitAllを指定する。(4)この設定より上に設定されている/resources/**、/login.jspを除くすべてのURLに対し、認証済みユーザーのみアクセスを許可するisAuthenticated()を指定する。(5)<sec:authentication-provider>タグで認証処理を実施するorg.springframework.security.authentication.AuthenticationProviderの設定を行う。デフォルトでは、UserDetailsServiceを使用してUserDetailsを取得し、そのUserDetailsが持つハッシュ化済みパスワードと、フォームから入力されたパスワードをorg.springframework.security.crypto.password.PasswordEncoderを使用してハッシュ化したものを比較してユーザー認証を行うorg.springframework.security.authentication.dao.DaoAuthenticationProviderが使用される。(6)PasswordEncoderの設定を行う。ここではapplicationContext.xmlに定義されているorg.springframework.security.crypto.bcrypt.BCryptPasswordEncoderを参照する。
6.2.4.2.2. 起動時に実行されるSQLスクリプトの設定
src/main/resources/META-INF/spring/first-springsecurity-env.xml
SQLスクリプトの設定を追加する。
 <?xml version="1.0" encoding="UTF-8"?>
 <beans xmlns="http://www.springframework.org/schema/beans"
     xmlns:xsi="http://www.w3.org/2001/XMLSchema-instance" xmlns:jdbc="http://www.springframework.org/schema/jdbc"
     xsi:schemaLocation="http://www.springframework.org/schema/jdbc http://www.springframework.org/schema/jdbc/spring-jdbc.xsd
         http://www.springframework.org/schema/beans http://www.springframework.org/schema/beans/spring-beans.xsd">

     <bean id="dateFactory" class="org.terasoluna.gfw.common.date.DefaultDateFactory" />

     <bean id="realDataSource" class="org.apache.commons.dbcp.BasicDataSource"
         destroy-method="close">
         <property name="driverClassName" value="${database.driverClassName}" />
         <property name="url" value="${database.url}" />
         <property name="username" value="${database.username}" />
         <property name="password" value="${database.password}" />
         <property name="defaultAutoCommit" value="false" />
         <property name="maxActive" value="${cp.maxActive}" />
         <property name="maxIdle" value="${cp.maxIdle}" />
         <property name="minIdle" value="${cp.minIdle}" />
         <property name="maxWait" value="${cp.maxWait}" />
     </bean>

     <bean id="dataSource" class="net.sf.log4jdbc.Log4jdbcProxyDataSource">
         <constructor-arg index="0" ref="realDataSource" />
     </bean>

     <bean id="transactionManager"
         class="org.springframework.jdbc.datasource.DataSourceTransactionManager">
         <property name="dataSource" ref="dataSource" />
     </bean>

     <jdbc:initialize-database data-source="dataSource"
         ignore-failures="ALL"><!-- (1) -->
         <jdbc:script location="classpath:/database/${database}-schema.sql" /><!-- (2) -->
         <jdbc:script location="classpath:/database/${database}-dataload.sql" /><!-- (3) -->
     </jdbc:initialize-database>
 </beans>
項番 説明 (1)<jdbc:initialize-database>タグで初期化SQLスクリプトの設定を行う。この設定は通常、開発中のみでしか使用しないため、xxx-env.xmlに定義する。(2)DDLを設定する。雛形の設定ではxxx-infra.propertiesにdatabase=H2と定義されているため、H2-schema.sqlが実行される。(3)DMLを設定する。雛形の設定ではxxx-infra.propertiesにdatabase=H2と定義されているため、H2-dataload.sqlが実行される。
今回はインメモリのH2データベースを利用する。DDLとDMLを以下のように用意する。
src/main/resources/database/H2-schema.sql
CREATE TABLE account(
    username varchar(128),
    password varchar(128),
    first_name varchar(128),
    last_name varchar(128),
    constraint pk_tbl_account primary key (username)
);
src/main/resources/database/H2-dataload.sql
username=demo、passowrd=demoでログインできるテストユーザーを追加する。
INSERT INTO account(username, password, first_name, last_name) VALUES('demo', '$2a$10$oxSJl.keBwxmsMLkcT9lPeAIxfNTPNQxpeywMrF7A3kVszwUTqfTK', 'Taro', 'Yamada'); -- (1)
COMMIT;
項番 説明 (1)雛形の設定ではapplicationContext.xmlにパスワードハッシュ化のためにorg.springframework.security.crypto.bcrypt.BCryptPasswordEncoderが設定されている。テストデータとして、BCryptアルゴリズムでハッシュ化された”demo”という文字列を投入する。
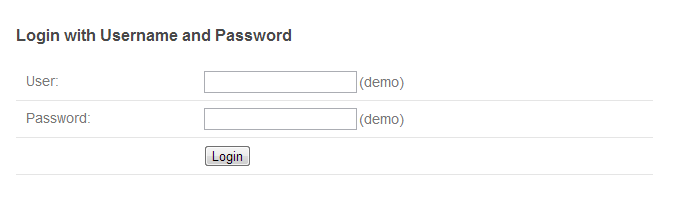
6.2.4.2.3. ログイン画面の作成
src/main/webapp/login.jsp
<!DOCTYPE html> <html> <head> <title>Login Page</title> <link rel="stylesheet" href="${pageContext.request.contextPath}/resources/app/css/styles.css"> </head> <body> <div id="wrapper"> <h3>Login with Username and Password</h3> <c:if test="${param.error}"><!-- (1) --> <t:messagesPanel messagesType="error" messagesAttributeName="SPRING_SECURITY_LAST_EXCEPTION" /><!-- (2) --> </c:if> <form action="${pageContext.request.contextPath}/authenticate" method="POST"><!-- (3) --> <table> <tr> <td><label for="j_username">User:</label></td> <td><input type="text" id="j_username" name="j_username" value='demo'>(demo)</td><!-- (4) --> </tr> <tr> <td><label for="j_password">Password:</label></td> <td><input type="password" id="j_password" name="j_password" value="demo" />(demo)</td><!-- (5) --> </tr> <tr> <td> </td> <td><input type="hidden" name="${f:h(_csrf.parameterName)}" value="${f:h(_csrf.token)}" /> <input name="submit" type="submit" value="Login" /></td><!-- (6) --> </tr> </table> </form> </div> </body> </html>
項番 説明 (1)認証が失敗した場合は”/login.jsp?error=true”が呼ばれるように設定した。この場合にのみエラーメッセージが表示されるように<c:if>タグを使用する。(2)認証が失敗した場合はセッションスコープに例外オブジェクトが属性名"SPRING_SECURITY_LAST_EXCEPTION"で格納される。ここでは<t:messagesPanel>タグを使用してエラーメッセージを表示する。(3)認証処理のURLを”/authenticate”と設定した。認証するためのこのURLでユーザー名とパスワードをPOSTする。(4)ユーザー名のリクエストパラメータ名はデフォルトでj_usernameである。(5)パスワードのリクエストパラメータ名はデフォルトでj_passwordである。
ブラウザのアドレスバーにhttp://localhost:8080/first-springsecurity/を入力し、表示しようとすると未ログイン状態のため、 Spring Securityの設定 の(1)の定義によりhttp://localhost:8080/first-springsecurity/login.jspにアクセスとなり、下の画面が表示される。
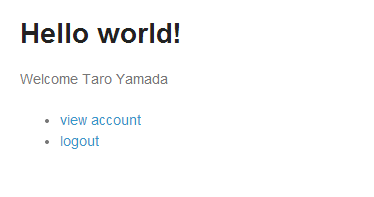
6.2.4.2.4. JSPからログインアカウント情報にアクセスする
src/main/webapp/WEB-INF/views/welcome/home.jsp
以下のコードを追加する。
 <!DOCTYPE html>
 <html>
 <head>
 <meta charset="utf-8">
 <title>Home</title>
 <link rel="stylesheet"
     href="${pageContext.request.contextPath}/resources/app/css/styles.css">
 </head>
 <body>
     <div id="wrapper">
         <sec:authentication property="principal.account" var="account" /><!-- (1) -->
         <h1>Hello world!</h1>
         <p>Welcome ${f:h(account.firstName)} ${f:h(account.lastName)}</p><!-- (2) -->

         <ul>
             <li><a href="${pageContext.request.contextPath}/account">view account</a></li>
             <li><a href="${pageContext.request.contextPath}/logout">logout</a></li>
         </ul>
     </div>
 </body>
 </html>
項番 説明 (1)<sec:authentication>タグで、ログイン中のorg.springframework.security.core.Authenticationオブジェクトにアクセスできる。property属性で.Authenticationオブジェクトの任意のプロパティにアクセスでき、var属性で任意のスコープに設定できる。デフォルトではpageスコープの設定され、このJSP内のみで参照可能である。ここではログイン中のAccountオブジェクトを変数名accountに格納する。(2)ログイン中のAccountオブジェクトにアクセスしてfirstNameとlastNameを表示する。
LoginページのLoginボタンを押下することにより、Welcomeページが表示される。
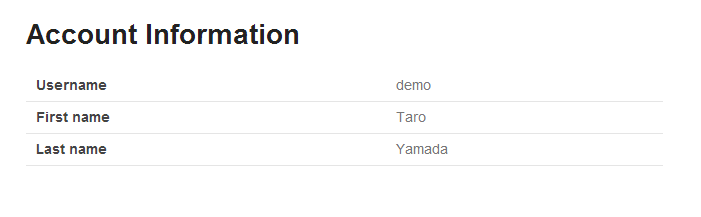
6.2.4.2.5. ログインアカウント情報表示ページの作成
src/main/java/com/example/security/app/account/AccountController.java
ログイン済みの
UserDetailsオブジェクトはjava.security.Principalオブジェクト内に格納されている。Controllerの処理メソッドの引数でPrincipalオブジェクトを受け取ることにより、Controller内でログイン済みのUserDetailsオブジェクトにアクセスすることができる。package com.example.security.app.account; import java.security.Principal; import org.springframework.security.core.Authentication; import org.springframework.stereotype.Controller; import org.springframework.ui.Model; import org.springframework.web.bind.annotation.RequestMapping; import org.springframework.web.bind.annotation.RequestMethod; import com.example.security.domain.model.Account; import com.example.security.domain.service.userdetails.SampleUserDetails; @Controller @RequestMapping("account") public class AccountController { @RequestMapping(method = RequestMethod.GET) public String view(/* (1) */ Principal principal, Model model) { // get login user information Authentication authentication = (Authentication) principal; // (2) // get UserDetails SampleUserDetails userDetails = (SampleUserDetails) authentication .getPrincipal(); // (3) // get account object Account account = userDetails.getAccount(); // (4) model.addAttribute(account); return "account/view"; } }
項番 説明 (1)ログイン中のUserDetailsオブジェクトを格納したPrincipalオブジェクトを受け取る。(2)org.springframework.security.core.AuthenticationはPrincipalインタフェースでもあり、コントローラに渡るPrincipalオブジェクトは実際はAuthenticationオブジェクトである。UserDetailsオブジェクトにアクセスするために、Authenticationクラスにキャストする。(3)Authentication.getPrincipal()メソッドにより、ログイン中のUserDetailsオブジェクトを取得できる。ここでは、本プロジェクト用のSampleUserDetailsクラスにキャストする。(4)SampleUserDetailsオブジェクトからログイン中のAccountオブジェクトを取得する。
src/main/webapp/WEB-INF/views/account/view.jsp
Modelに設定された
Accountオブジェクトの各プロパティを出力するだけであるので説明は省略する。<!DOCTYPE html> <html> <head> <meta charset="utf-8"> <title>Home</title> <link rel="stylesheet" href="${pageContext.request.contextPath}/resources/app/css/styles.css"> </head> <body> <div id="wrapper"> <h1>Account Information</h1> <table> <tr> <th>Username</th> <td>${f:h(account.username)}</td> </tr> <tr> <th>First name</th> <td>${f:h(account.firstName)}</td> </tr> <tr> <th>Last name</th> <td>${f:h(account.lastName)}</td> </tr> </table> </div> </body> </html>
Welcomeページのview accountリンクを押下することにより、Account Informationページが表示される。
6.2.5. おわりに
本チュートリアルでは以下の内容を学習した。
- Spring Securityによる基本的な認証・認可
- 認証ユーザーオブジェクトのカスタマイズ方法
- RepositoryおよびServiceクラスを用いた認証処理の設定
- JSPでログイン済みアカウント情報にアクセスする方法
- Controllerでログイン済みアカウント情報にアクセスする方法