6.3. 認証
Caution
本バージョンの内容は既に古くなっています。最新のガイドラインはこちらからご参照ください。
目次
6.3.1. Overview
本節では、Spring Securityで提供している認証機能を説明する。
Spring Securityでは、設定ファイルの記述のみで、ユーザ認証を実装することができる。 Spring Securityで提供している認証方式として、DB認証、LDAP認証、CAS認証、JAAS認証、X509認証、Basic認証がサポートされているが、本ガイドラインでは、DB認証についてのみ説明する。
Tip
DB認証以外の詳細は、各認証方式の公式ドキュメントを参照されたい。
6.3.1.1. Login
Spring Securityによるログイン処理の流れを以下に示す。
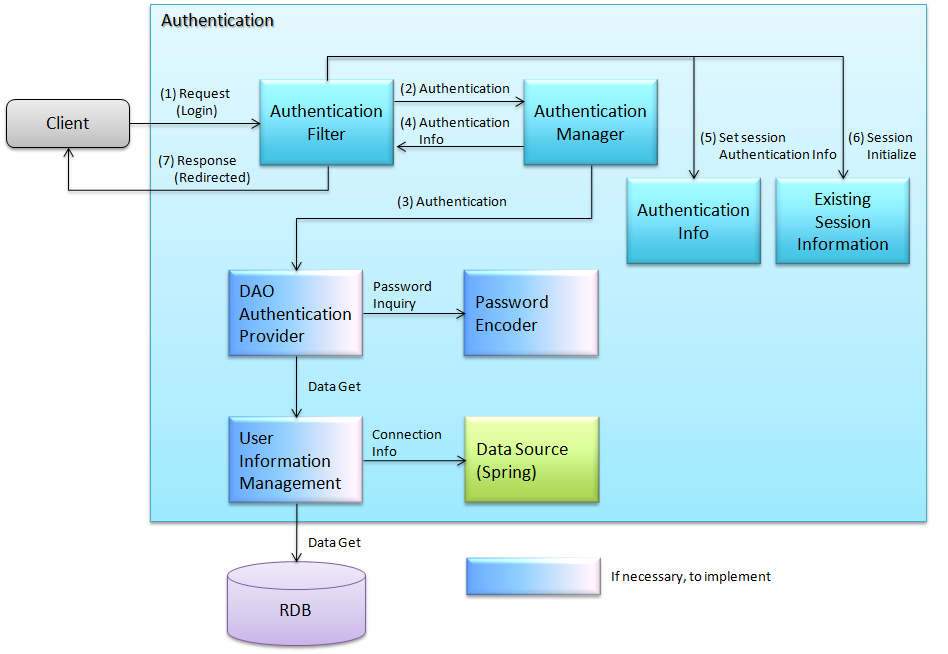
- 認証処理を指定したリクエストを受信すると、認証フィルタが起動する。
- 認証フィルタは、リクエストからユーザ、パスワードを抽出し、認証情報を生成する。 生成した認証情報をパラメータとし、認証マネージャの認証処理を実行する。
- 認証マネージャは、指定された認証プロバイダの認証処理を実行する。 認証プロバイダは、データソース(DBやLDAP)からユーザ情報を取得し、パスワード照合等のユーザ認証を行う。 認証成功時には、認証済みの情報を保持する認証情報を作成し、 認証マネージャに返す。認証失敗の場合は、認証失敗例外を送出する。
- 認証マネージャは、受け取った認証情報を認証フィルタに返す。
- 認証フィルタは、受け取った認証情報(認証済み)をセッションに格納する。
- 認証成功時は、認証前のセッション情報を初期化し、新たにセッション情報を作成する。
- 指定された認証成功/失敗時のパスへリダイレクトする。セッションIDをクライアントに返却する。
6.3.1.2. Logout
Spring Securityによるログアウト処理の流れを以下に示す。
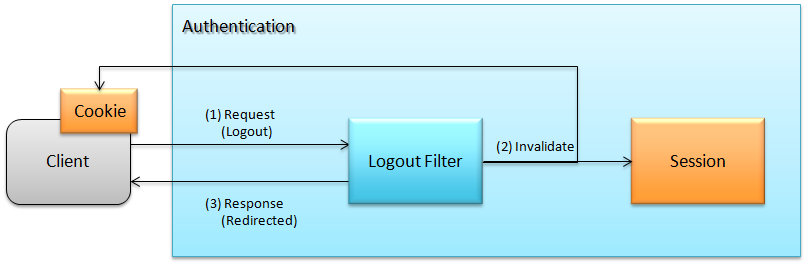
- 指定されたログアウト処理へのリクエストを受信すると、ログアウトフィルタが起動する。
- ログアウトフィルタはセッション情報を破棄する。 また、クライアントのクッキー(図中のCookie)を破棄するようなレスポンスを設定する。
- 指定されたログアウト時のパスへ、リダイレクトする。
Note
ログアウト後、残存するセッション情報が第三者に利用されることによるなりすましを防ぐため、 セッション情報は、ログアウト時に
org.springframework.security.web.session.ConcurrentSessionFilterで破棄される。
6.3.2. How to use
6.3.2.1. <sec:http>要素の設定
<http>要素のauto-config属性をtrueとすることで、<beans xmlns="http://www.springframework.org/schema/beans"
xmlns:xsi="http://www.w3.org/2001/XMLSchema-instance"
xmlns:sec="http://www.springframework.org/schema/security"
xmlns:context="http://www.springframework.org/schema/context"
xsi:schemaLocation="http://www.springframework.org/schema/security
http://www.springframework.org/schema/security/spring-security.xsd
http://www.springframework.org/schema/beans
http://www.springframework.org/schema/beans/spring-beans.xsd
http://www.springframework.org/schema/context
http://www.springframework.org/schema/context/spring-context.xsd">
<sec:http auto-config="true" use-expressions="true"> <!-- (1) -->
<!-- omitted -->
</sec:http>
</beans>
| 項番 | 説明 |
|---|---|
(1)
|
auto-config="true"と設定することで、<form-login>、<http-basic>、<logout>要素を設定しなくても有効になる。 |
Note
<form-login>、<http-basic>、<logout>要素について説明する。
要素名 説明 <form-login>org.springframework.security.web.authentication.UsernamePasswordAuthenticationFilterが有効になる。UsernamePasswordAuthenticationFilterは、ユーザ名、パスワードをPOST時に、リクエストから取り出し、認証を行うFilterである。詳細は、<sec:form-login>要素の設定を参照されたい。<http-basic>org.springframework.security.web.authentication.www.BasicAuthenticationFilterが有効になる。BasicAuthenticationFilterは、Basic認証の処理を実施するFilterであり、RFC1945に準拠して実装されている。詳細な利用方法は、BasicAuthenticationFilter JavaDocを参照されたい。<logout>org.springframework.security.web.authentication.logout.LogoutFilter,org.springframework.security.web.authentication.logout.SecurityContextLogoutHandlerが有効になる。LogoutFilterは、ログアウト時に呼ばれるFilterであり、org.springframework.security.web.authentication.rememberme.TokenBasedRememberMeServices(Cookieの削除) や、SecurityContextLogoutHandler(セッションの無効化)を呼び出している。詳細は、<sec:logout>要素の設定を参照されたい。
6.3.2.2. <sec:form-login>要素の設定
<sec:form-login>要素の設定方法を説明する。spring-security.xml
<beans xmlns="http://www.springframework.org/schema/beans"
    xmlns:xsi="http://www.w3.org/2001/XMLSchema-instance"
    xmlns:sec="http://www.springframework.org/schema/security"
    xmlns:context="http://www.springframework.org/schema/context"
    xsi:schemaLocation="http://www.springframework.org/schema/security
        http://www.springframework.org/schema/security/spring-security.xsd
        http://www.springframework.org/schema/beans
        http://www.springframework.org/schema/beans/spring-beans.xsd
        http://www.springframework.org/schema/context
        http://www.springframework.org/schema/context/spring-context.xsd">
  <sec:http auto-config="true" use-expressions="true">
    <sec:form-login login-page="/login"
        default-target-url="/"
        login-processing-url="/authentication"
        always-use-default-target="false"
        authentication-failure-url="/login?error=true"
        authentication-failure-handler-ref="authenticationFailureHandler"
        authentication-success-handler-ref="authenticationSuccessHandler" /> <!-- 属性の指定順番で(1)~(7) -->
  </sec:http>
</beans>
| 項番 | 説明 |
|---|---|
(1)
|
login-page属性にログインフォーム画面のパスを指定する。指定がない場合、「/spring_security_login」がデフォルトのパスになり、Spring Securityが用意しているログイン画面が使用される。
「未認証ユーザ」が「認証ユーザ」しかアクセスできないページにアクセスした際に、本パスにリダイレクトされる。
本ガイドラインでは、上記のデフォルト値「/spring_security_login」を使用せず、システム独自の値に変更することを推奨する。この例では”/login”を指定している。
|
(2)
|
default-target-url属性に認証成功時の遷移先パスを指定する。指定がない場合、「/」が、デフォルトのパスになる。
authentication-success-handler-ref属性の指定がある場合、本設定は使用されない。 |
(3)
|
login-processing-url属性に認証処理を行うパスを指定する。指定がない場合、「/j_spring_security_check」がデフォルトのパスになる。
本ガイドラインでは、上記のデフォルト値「/j_spring_security_check」を使用せず、システム独自の値に変更することを推奨する。この例では”/authentication”を指定している。
|
(4)
|
always-use-default-target属性に、ログイン成功後にdefault-target-urlに指定したパスに常に遷移するかどうかを設定する。trueが指定されている場合、default-target-urlに指定したパスに常に遷移する。false(デフォルト)が指定されている場合、「ログイン前にアクセスしようとした保護ページを表示するためのパス」又は「default-target-urlに指定したパス」のいずれかに遷移する。authentication-success-handler-ref属性の指定がある場合、本設定は使用されない。 |
(5)
|
authentication-failure-urlに認証失敗時の遷移先を設定する。指定がない場合、
login-page属性に指定したパスが適用される。authentication-failure-handler-ref属性の指定がある場合、本設定は使用されない。 |
(6)
|
authentication-failure-handler-ref属性に認証失敗時に呼ばれる、ハンドラクラスを指定する。詳細は、認証エラー時のハンドラクラスの設定を参照されたい。
|
(7)
|
authentication-success-handler-ref属性に認証成功時に呼ばれる、ハンドラクラスを指定する。 |
上記以外の属性については、Spring Securityのマニュアルを参照されたい。
Warning
Spring Security のデフォルト値「/spring_security_login, /j_spring_security_check」の使用を推奨しない理由
デフォルト値を使用している場合、そのアプリケーションが、Spring Securityを使用していることについて、露見してしまう。 そのため、Spring Securityの脆弱性が発見された場合、脆弱性をついた攻撃を受けるリスクが高くなる。 前述のリスクを避けるためにも、デフォルト値を使用しないことを推奨する。
6.3.2.2.1. ログインフォームの作成
src/main/webapp/WEB-INF/views/login.jsp
<form:form action="${pageContext.request.contextPath}/authentication" method="post"><!-- (1) -->
    <!-- omitted -->
    <input type="text" id="username" name="j_username"><!-- (2) -->
    <input type="password" id="password" name="j_password"><!-- (5) -->
    <input type="submit" value="Login">
</form:form>
項番 説明 (1)formのaction属性に認証処理を行うための遷移先を指定する。遷移先のパスはlogin-processing-url属性で指定した、/authentication を指定すること。${pageContext.request.contextPath}/authenticationにアクセスすることで認証処理が実行される。HTTPメソッドは、「POST」を指定すること。(4)認証処理において、「ユーザID」として扱われる要素。name属性には、Spring Securityのデフォルト値である「j_username」を指定すること。(5)認証処理において、「パスワード」として扱われる要素。name属性には、Spring Securityのデフォルト値である「j_password」を指定すること。認証エラーメッセージを表示する場合は以下の追加する
<c:if test="${param.error}"><!-- (1) -->
    <t:messagesPanel
        messagesAttributeName="SPRING_SECURITY_LAST_EXCEPTION"/><!-- (2) -->
</c:if>
項番 説明 (1)リクエストパラメータに設定されたエラーメッセージの判定を行う。form-login要素のauthentication-failure-url属性に設定された値や、認証エラーハンドラの”defaultFailureUrl”に設定された値によって、判定処理を変更する必要があるので注意すること。本例では、authentication-failure-url=”/login?error=true”のような設定がある場合の、例を示している。(2)認証エラー時に出力させる例外メッセージを出力する。共通ライブラリで提供しているorg.terasoluna.gfw.web.message.MessagesPanelTagを指定して出力させることを推奨する。「<t:messagesPanel>」タグの使用方法は、メッセージ管理を参照されたい。
Note
認証エラーの例外オブジェクトにJSPからアクセスする際に必要な設定について
認証エラーの例外オブジェクトは、セッションスコープに
"SPRING_SECURITY_LAST_EXCEPTION"という属性名で格納されている。 JSPからセッションスコープに格納されているオブジェクトにアクセスするためには、JSPのpageディレクティブのsession属性をtrueにする必要がある。
src/main/webapp/WEB-INF/views/common/include.jsp<%@ page session="true"%>ブランクプロジェクトのデフォルト設定では、JSPからセッションスコープにアクセスできないようになっている。 これは、安易にセッションが使用されないようにするためである。
spring-mvc.xml
ログインフォームを表示するControllerを定義する。
<mvc:view-controller path="/login" view-name="login" /><!-- (1) -->
項番 説明 (1)“/login”にアクセスされたら、view名として”login”を返却するだけのControllerを定義する。InternalResourceViewResolverによってsrc/main/webapp/WEB-INF/views/login.jspが出力される。この単純なコントローラはJavaによる実装が不要である。Tip
上記の設定は次のControllerと同義である。
@Controller
@RequestMapping("/login")
public class LoginController {

    @RequestMapping
    public String index() {
        return "login";
    }
}
単純にview名を返すだけのメソッドが一つだけあるControllerが必要であれば、
<mvc:view-controller>を使用すればよい。
6.3.2.2.2. ログインフォームの属性名変更
「j_username」、「j_password」は、Spring Securityのデフォルト値である。<form-login>要素の設定で、任意の値に変更することができる。
spring-security.xml
username、passwordの属性<sec:http auto-config="true" use-expressions="true"> <sec:form-login username-parameter="username" password-parameter="password" /> <!-- 属性の指定順番で(1)~(2) --> <!-- omitted --> </sec:http>
項番 説明 (1)username-parameter属性でusernameの入力フィールドのname属性を、「username」に変更している。(2)password-parameter属性でpasswordの入力フィールドのname属性を、「password」に変更している。
6.3.2.3. 認証処理の設定
Spring Securityで認証処理を設定するために、AuthenticationProviderとUserDetailsServiceを定義する。
AuthenticationProviderは、次の役割を担う。
- 認証に成功した場合、認証ユーザー情報を返却する
- 認証に失敗した場合、例外をスローする
UserDetailsServiceは、認証ユーザー情報を永続化層から取得する役割を担う。
それぞれデフォルトで用意されているものを使用してもよいし、独自拡張して使用しても良い。 組み合わせも自由である。
6.3.2.3.1. AuthenticationProviderクラスの設定
AuthenticationProviderの実装として、DB認証を行うためのプロバイダorg.springframework.security.authentication.dao.DaoAuthenticationProviderを使用する方法を説明する。spring-security.xml
<sec:authentication-manager><!-- (1) -->
    <sec:authentication-provider user-service-ref="userDetailsService"><!-- (2) -->
        <sec:password-encoder ref="passwordEncoder" /><!-- (3) -->
    </sec:authentication-provider>
</sec:authentication-manager>
項番 説明 (1)<sec:authentication-manager>要素内に<sec:authentication-provider>要素を定義する。複数指定して、認証方法を組み合わせることが可能であるが、ここでは説明しない。(2)<sec:authentication-provider>要素でAuthenticationProviderを定義する。デフォルトで、DaoAuthenticationProviderが有効になる。これ以外のAuthenticationProviderを指定する場合はref属性で、対象のAuthenticationProviderのBean IDを指定する。user-service-ref属性に、認証ユーザ情報を取得するUserDetailsServiceのBean Idを指定する。DaoAuthenticationProviderを使用する場合、この設定は必須である。詳細は、UserDetailsServiceクラスの設定を参照されたい。(3)パスワード照合時に、フォームから入力されたパスワードのエンコードを行うクラスのBean IDを指定する。指定がない場合に、「平文」でパスワードが扱われる。詳細は、パスワードハッシュ化を参照されたい。
DaoAuthenticationProviderを使用すれば良い。UserDetailsServiceで決める。6.3.2.3.2. UserDetailsServiceクラスの設定
AuthenticationProviderのuserDetailsServiceプロパティに指定したBeanを設定する。UserDetailsServiceは次のメソッドをもつインタフェースである。
UserDetails loadUserByUsername(String username) throws UsernameNotFoundException
このインタフェースを実装すれば、任意の保存場所から認証ユーザー情報を取得することができる。
ここでは、JDBCを使用して、DBからユーザ情報を取得する org.springframework.security.core.userdetails.jdbc.JdbcDaoImplを説明する。
JdbcDaoImplを使用するにはspring-security.xmlに以下のBean定義を行えば良い。
<!-- omitted -->

<bean id="userDetailsService"
  class="org.springframework.security.core.userdetails.jdbc.JdbcDaoImpl">
  <property name="dataSource" ref="dataSource"/>
</bean>
JdbcDaoImplは、認証ユーザー情報と認可情報を取得するためのデフォルトSQLを定義しており、これらに対応したテーブルが用意されていることが前提となっている。前提としているテーブル定義はSpring Securityのマニュアルを参照されたい。ユーザ情報取得クエリに合致するテーブルを作成することで、後述する設定ファイルへのクエリ指定が不要となる。「username」、「password」、「enabled」フィールドは必須であるが、後述する設定ファイルへのクエリ指定で、別名を付与することにより、テーブル名、カラム名が一致しなくても問題ない。例えば次のようなSQLを設定すれば「email」カラムを「username」として使用することができ、「enabled」は常にtrueとなる。SELECT email AS username, pwd AS password, true AS enabled FROM customer WHERE email = ?ログインフォームの作成で前述した、「ユーザID」がクエリのパラメータに指定される。
-
ユーザに対する認可情報を取得するクエリである。
-
ユーザーが所属するグループの認可情報を取得するクエリである。グループ権限はデフォルトでは無効になっており、本ガイドラインでも扱わない。
テーブル名: account
| 論理名 | 物理名 | 型 | 説明 |
|---|---|---|---|
| ユーザID | username | 文字列 | ユーザを一意に識別するためのユーザID。 |
| パスワード | password | 文字列 | ユーザパスワード。ハッシュ化された状態で格納する。 |
| 有効フラグ | enabled | 真偽値 | 無効ユーザ、有効ユーザを表すフラグ。「false」に設定されたユーザは無効ユーザとして、認証エラーとなる。 |
| 権限名 | authority | 文字列 | 認可機能を必要としない場合は不要。 |
JdbcDaoImplをカスタマイズして設定する例を以下に示す。
<!-- omitted -->

<bean id="userDetailsService"
  class="org.springframework.security.core.userdetails.jdbc.JdbcDaoImpl">
  <property name="rolePrefix" value="ROLE_" /><!-- (1) -->
  <property name="dataSource" ref="dataSource" />
  <property name="enableGroups" value="false" /><!-- (2) -->
  <property name="usersByUsernameQuery"
    value="SELECT username, password, enabled FROM account WHERE username = ?" /><!-- (3) -->
  <property name="authoritiesByUsernameQuery"
    value="SELECT username, authority FROM account WHERE username = ?" /><!-- (4) -->
</bean>
| 項番 | 説明 |
|---|---|
(1)
|
権限名のprefixを指定する。DB上に格納されている権限名が”USER”の場合、この認証ユーザーオブジェクトが持つ権限名は”ROLE_USER”になる。
認可機能と命名規則を合わせて設定する必要がある。認可機能の詳細は、認可を参照されたい。
|
(2)
|
認可機能において、「グループ権限」の概念を用いる場合に指定する。
本ガイドラインでは扱わない。
|
(3)
|
ユーザ情報を取得するクエリを設定する。取得するデータは、「ユーザID」、「パスワード」、「有効フラグ」の順とする。
「有効フラグ」による認証判定を行わない場合には、「有効フラグ」のSELECT結果を「true」固定とする。
なお、ユーザを一意に取得できるクエリを記述すること。複数件数取得された場合には、1件目のレコードがユーザとして使われる。
|
(4)
|
ユーザの権限を取得するクエリを設定する。取得するデータは、「ユーザID」、「権限ID」の順とする。
認可の機能を使用しない場合は、「権限ID」は任意の固定値でよい。
|
Note
クエリを変更するだけでは実現できない認証を行う場合、UserDetailsServiceを拡張して実現する必要がある。
拡張方法については、UserDetailsServiceの拡張を参照されたい。
6.3.2.4. UserDetailsクラスの利用方法
UserDetailsServiceが作成したUserDetailsの利用方法について、説明する。6.3.2.4.1. JavaクラスでUserDetailsオブジェクトを利用する
UserDetailsクラスはorg.springframework.security.core.context.SecurityContextHolderに格納される。SecurityContextHolderからUserDetailsを取得する例を示す。
public static String getUsername() {
    Authentication authentication = SecurityContextHolder.getContext()
            .getAuthentication(); // (1)
    if (authentication != null) {
        Object principal = authentication.getPrincipal(); // (2)
        if (principal instanceof UserDetails) {
            return ((UserDetails) principal).getUsername(); // (3)
        }
        return (String) principal.toString();
    }
    return null;
}
| 項番 | 説明 |
|---|---|
(1)
|
SecurityContextHolderからorg.springframework.security.core.Authenticationオブジェクトを取得する。 |
(2)
|
AuthenticationオブジェクトからUserDetailsオブジェクトを取得する。 |
(3)
|
UserDetailsオブジェクトから、ユーザ名を取得する。 |
SecurityContextHolderからUserDetailsオブジェクトを取得する方法は、どこからでもstaticメソッドで利用可能であり、
便利な反面、モジュール結合度を高めてしまう。テストも実施しづらい。
UserDetailsオブジェクトはjava.security.Principalオブジェクトからも取得可能であるため、Spring MVCのController内では以下のようにSecurityContextHolderを使用せずにUserDetailsオブジェクトを取得できる。
@RequestMapping(method = RequestMethod.GET)
public String view(Principal principal, Model model) {
    // get Authentication
    Authentication authentication = (Authentication) principal; // (1)
    // get UserDetails
    UserDetails userDetails = (UserDetails) authentication.getPrincipal(); // (2)
    // omitted ...
}
| 項番 | 説明 |
|---|---|
(1)
|
java.security.Principalオブジェクトをorg.springframework.security.core.Authenticationクラスにキャストする。 |
(2)
|
AuthenticationオブジェクトからUserDetailsオブジェクトを取得する。 |
Controller内でUserDetailsオブジェクトにアクセスする場合はこちらの方法を推奨する。
Note
ServiceクラスではControllerが取得したUserDetailsオブジェクトの情報を使用し、SecurityContextHolderは使用しないことを推奨する。
SecurityContextHolderはjava.security.Principalオブジェクトにアクセスできないメソッド内でのみ利用することが望ましい。
6.3.2.4.2. JSPでUserDetailsにアクセスする
<%@ taglib uri="http://www.springframework.org/security/tags" prefix="sec"%>
Note
TERASOLUNA Global Frameworkの雛形を使用している場合はWEB-INF/views/common/include.jspに設定済みである。
<sec:authentication property="principal.username" /><!-- (1) -->
| 項番 | 説明 |
|---|---|
(1)
|
<sec:authentication> タグでAuthenticationオブジェクトにアクセスでき、property属性に指定したプロパティアクセスできる。この例ではgetPrincipal().getUsername()の結果を出力する。 |
<sec:authentication property="principal" var="userDetails" /> <!-- (1) -->

${f:h(userDetails.username)} <!-- (2) -->
| 項番 | 説明 |
|---|---|
(1)
|
property属性に指定したプロパティをvar属性にした名前で変数に格納できる。 |
(2)
|
(1)で変数に格納した後はJSP内で
UserDetailsにアクセスできる。 |
Note
Controller内でUserDetailsを取得してModelに追加することもできるが、JSPに表示する際はJSPタグを使用すればよい。
Note
UserDetailsServiceクラスの設定で説明したJdbcDaoImplが生成するUserDetailsは「ユーザーID」や「権限」といった最低限の情報しか保持していない。
画面の表示項目として「ユーザー姓名」など他のユーザー情報が必要な場合はUserDetailsと UserDetailsServiceを拡張する必要がある。
拡張方法については、UserDetailsServiceの拡張を参照されたい。
6.3.2.5. Spring Securityにおけるセッション管理
<session-management>タグを指定することで、セッションの管理方法をカスタマイズする事ができる。<sec:http auto-config="true" create-session="ifRequired" ><!-- (1) -->
<!-- omitted -->
<sec:session-management
invalid-session-url="/"
session-authentication-error-url="/"
session-fixation-protection="migrateSession"
session-authentication-strategy-ref="sessionStrategy" /><!-- 属性の指定順番で(2)~(5) -->
<!-- omitted -->
</sec:http>
| 項番 | 説明 |
|---|---|
(1)
|
<http>タグのcreate-session属性には、セッションの作成方針を指定する。以下の値を指定することができる。
|
(2)
|
invalid-session-url属性には、無効なセッションIDがリクエストされた場合に遷移するパスを指定する。指定しない場合、セッションの存在チェックは実行されずに後続処理が呼び出される。
|
(3)
|
session-authentication-error-url属性には、org.springframework.security.web.authentication.session.SessionAuthenticationStrategyで例外が発生した場合に遷移するパスを指定する。指定しない場合、レスポンスコードに「401 Unauthorized」が設定され、エラー応答が行われる。
本設定は、
<form-login>タグを使用して認証を行う場合は使用されない。SessionAuthenticationStrategyで発生した例外は、<form-login>タグのauthentication-failure-url属性 又はauthentication-failure-handler-ref属性の定義に応じてハンドリングされる。 |
(4)
|
session-fixation-protection属性には、認証成功時のセッション管理方式を指定する。以下の値を指定することができる。
本機能の目的は、新しいセッションIDをログイン毎に割り振ることで、セッション・フィクセーション攻撃を防ぐことにある。そのため、明確な意図がない限り、デフォルト値を使用することを推奨する。
|
(5)
|
session-authentication-strategy-ref 属性でセッションチェックの振る舞いを決めるorg.springframework.security.core.Authentication.SessionAuthenticationStrategyクラスのBean IDを指定する。 |
6.3.2.5.1. SessionAuthenticationStrategyの設定
SessionAuthenticationStrategyの設定例を以下に示す。
<bean id="sessionStrategy"
    class="org.springframework.security.web.authentication.session.CompositeSessionAuthenticationStrategy">  <!-- (1) -->
    <constructor-arg index="0">
        <list>
            <bean
                class="org.springframework.security.web.authentication.session.SessionFixationProtectionStrategy" />
            <bean class="org.springframework.security.web.csrf.CsrfAuthenticationStrategy">  <!-- (2) -->
                <constructor-arg index="0" ref="csrfTokenRepository" />
            </bean>
        </list>
    </constructor-arg>
</bean>
<!-- omitted -->
| 項番 | 説明 |
|---|---|
(1)
|
org.springframework.security.web.authentication.session.CompositeSessionAuthenticationStrategyのコンストラクタの引数に、listで指定する。
|
(2)
|
本例では、CSRFチェックを行う
org.springframework.security.web.csrf.CsrfAuthenticationStrategyを指定している。CSRF対策については、CSRF対策を参照されたい。
|
6.3.2.5.2. 同時セッション数の制御
Authentication.getPrincipal()で取得される、認証ユーザーオブジェクトのことである。Note
この機能はアプリケーションサーバが1台構成、またはセッションサーバやクラスタによるセッションレプリケーションを実施している(つまり、全てのアプリケーションが同じセッション領域を利用している)場合に有効である。 複数台または複数インスタンスで構成していて、セッション領域が別々に存在する場合は、本機能では同時ログインを制御できないので注意すること。
- 1ユーザの最大セッション数を超過した場合、最も使用されていないユーザを無効にする (後勝ち)
- 1ユーザの最大セッション数を超過した場合、新規ログインを受け付けない (先勝ち)
どちらの場合も、この機能を有効にするためにはweb.xmlに以下の設定を追加する必要がある。
<listener>
  <listener-class>org.springframework.security.web.session.HttpSessionEventPublisher</listener-class><!-- (1) -->
</listener>
| 項番 | 説明 |
|---|---|
(1)
|
Concurrent Session Control を使用するに当たり、
org.springframework.security.web.session.HttpSessionEventPublisherを、listenerに定義する必要がある。 |
- 最も使用されていないユーザを無効にする場合
spring-security.xmlに以下の設定を追加する。
<sec:http auto-config="true" >
  <!-- omitted -->
  <sec:custom-filter position="CONCURRENT_SESSION_FILTER" ref="concurrencyFilter" />  <!-- (1) -->

  <sec:session-management
    session-authentication-strategy-ref="sessionStrategy" />
  <!-- omitted -->
</sec:http>

<bean id="concurrencyFilter"
   class="org.springframework.security.web.session.ConcurrentSessionFilter">  <!-- (2) -->
   <constructor-arg index="0" ref="sessionRegistry" />  <!-- (3) -->
   <constructor-arg index="1" value="/" />  <!-- (4) -->
</bean>

<bean id="sessionStrategy"
    class="org.springframework.security.web.authentication.session.CompositeSessionAuthenticationStrategy">
    <constructor-arg index="0">
        <list>
            <!-- omitted -->
            <bean class=
                "org.springframework.security.web.authentication.session.ConcurrentSessionControlStrategy">  <!-- (5) -->
                <constructor-arg index="0" ref="sessionRegistry" />  <!-- (6) -->
                <property name="maximumSessions" value="1" />  <!-- (7) -->
            </bean>
        </list>
    </constructor-arg>
</bean>

<bean id="sessionRegistry" class="org.springframework.security.core.session.SessionRegistryImpl" />  <!-- (8) -->
<!-- omitted -->
項番 説明 <custom-filter>要素の、position属性にCONCURRENT_SESSION_FILTERを指定する。org.springframework.security.web.session.ConcurrentSessionFilterクラスをBean定義する。org.springframework.security.core.session.SessionRegistryImplを参照指定する。org.springframework.security.web.authentication.session.ConcurrentSessionControlStrategyを指定する。org.springframework.security.core.session.SessionRegistryImplを参照指定する。maximumSessions属性に、1ユーザが許容する最大セッション数を定義することができる。上記例では、1を指定しているため、1ユーザが許容するセッションは1つになる。ユーザーが複数のブラウザでログインした場合、使用した日時が最も古いセッションに対して期限切れにする。指定しない場合、1が設定される。org.springframework.security.core.session.SessionRegistryインタフェースを実装したクラスである、org.springframework.security.core.session.SessionRegistryImplを指定する。
- 新規ログインを受け付けない
spring-security.xmlに以下の設定を行う。
<bean id="concurrencyFilter"
   class="org.springframework.security.web.session.ConcurrentSessionFilter">
   <constructor-arg index="0" ref="sessionRegistry" />
   <constructor-arg index="1" value="/" />
</bean>

<bean id="sessionStrategy"
    class="org.springframework.security.web.authentication.session.CompositeSessionAuthenticationStrategy">
    <constructor-arg index="0">
        <list>
            <!-- omitted -->
            <bean class=
                "org.springframework.security.web.authentication.session.ConcurrentSessionControlStrategy">
                <constructor-arg index="0" ref="sessionRegistry" />
                <property name="maximumSessions" value="1" />
                <property name="exceptionIfMaximumExceeded" value="true"/> <!-- (1) -->
            </bean>
        </list>
    </constructor-arg>
</bean>
<!-- omitted -->
項番 説明 exceptionIfMaximumExceeded属性をtrueに設定することにより、 最大セッション数を超過した場合、org.springframework.security.web.authentication.session.SessionAuthenticationExceptionがスローされる。そのため、ConcurrentSessionFilterの第2引数で定義したパスには遷移しないので注意すること。exceptionIfMaximumExceeded属性の設定を省略した場合は、falseが設定される。Tip
<sec:session-management>要素のsession-authentication-strategy-ref属性を指定せず、<sec:session-management>要素の子要素として<sec:concurrency-control>要素を使用することもできる。
6.3.2.6. 認証エラー時のハンドラクラスの設定
<sec:form-login>要素のauthentication-failure-handler-ref属性にorg.springframework.security.web.authentication.ExceptionMappingAuthenticationFailureHandlerクラスの設定をし、spring-security.xml
<sec:http auto-config="true" use-expressions="true">
  <sec:form-login login-page="/login"
      authentication-failure-handler-ref="authenticationFailureHandler"
      authentication-success-handler-ref="authenticationSuccessHandler" />
</sec:http>

<bean id="authenticationFailureHandler"
class="org.springframework.security.web.authentication.ExceptionMappingAuthenticationFailureHandler">
<property name="defaultFailureUrl" value="/login/defaultError" /><!-- (1) -->
  <property name="exceptionMappings"><!-- (2) -->
    <props>
      <prop key=
        "org.springframework.security.authentication.BadCredentialsException"><!-- (3) -->
          /login/badCredentials
      </prop>
      <prop key=
        "org.springframework.security.core.userdetails.UsernameNotFoundException"><!-- (4) -->
          /login/usernameNotFound
      </prop>
      <prop key=
        "org.springframework.security.authentication.DisabledException"><!-- (5) -->
          /login/disabled
      </prop>
      <prop key=
        "org.springframework.security.authentication.ProviderNotFoundException"><!-- (6) -->
          /login/providerNotFound
      </prop>
      <prop key=
        "org.springframework.security.authentication.AuthenticationServiceException"><!-- (7) -->
          /login/authenticationService
      </prop>
      <!-- omitted -->
    </props>
  </property>
</bean>
| 項番 | 説明 |
|---|---|
(1)
|
エラー時のデフォルトの遷移先パスを指定する。
後述する
exceptionMappingsプロパティに定義していない例外が発生した場合、本プロパティで指定した遷移先に遷移する。 |
(2)
|
catchする例外と、例外発生時の遷移先を、リスト形式で指定する。
keyに例外クラスを指定し、値に遷移先を設定する。
|
Spring Securityがスローする代表的な例外を、以下に記述する。
| 項番 | エラーの種類 | 説明 |
|---|---|---|
(3)
|
BadCredentialsException |
パスワード照合失敗による認証エラー時にスローされる。 |
(4)
|
UsernameNotFoundException |
不正ユーザID(存在しないユーザID)による認証エラー時にスローされる。
org.springframework.security.authentication.dao.AbstractUserDetailsAuthenticationProviderを継承したクラスを認証プロバイダに指定している場合、hideUserNotFoundExceptionsをfalseに変更しないと上記例外は、BadCredentialsExceptionに変更される。 |
(5)
|
DisabledException |
無効ユーザIDによる認証エラー時に、スローされる。 |
(6)
|
ProviderNotFoundException |
認証プロバイダクラス未検出エラー時にスローされる。
設定誤り等の理由から、認証プロバイダクラスが不正な場合に発生する。
|
(7)
|
AuthenticationServiceException |
認証サービスエラー時にスローされる。
DB接続エラー等、認証サービス内で何らかのエラーが発生した際に発生する。
|
Warning
本例では、UsernameNotFoundExceptionをハンドリングして遷移させているが、
ユーザIDが存在しないことを利用者に知らせると、特定のIDの存在有無が判明するため、セキュリティの観点上望ましくない。
そのため、ユーザに通知するメッセージには、例外の種類によって区別をしない画面遷移、メッセージにした方がよい。
6.3.2.7. <sec:logout>要素の設定
<sec:logout>要素の設定方法を説明する。spring-security.xml
<sec:http auto-config="true" use-expressions="true">
  <!-- omitted -->
  <sec:logout
      logout-url="/logout"
      logout-success-url="/"
      invalidate-session="true"
      delete-cookies="JSESSIONID"
      success-handler-ref="logoutSuccessHandler"
    /> <!-- 属性の指定順番で(1)~(5) -->
  <!-- omitted -->
</sec:http>
| 項番 | 説明 |
|---|---|
(1)
|
logout-url属性に、ログアウト処理を実行するためのパスを指定する。指定がない場合、「/j_spring_security_logout」がデフォルトのパスになる。
本ガイドラインでは、上記のデフォルト値「/j_spring_security_logout」を使用せず、システム独自の値に変更することを推奨する。 この例では”/logout”を指定している。
|
(2)
|
logout-success-url属性に、ログアウト後の遷移先パスを指定する。指定がない場合、「/」がデフォルトのパスになる。
本属性を指定した場合、
success-handler-ref属性を指定すると起動時にエラーとなる。 |
(3)
|
invalidate-session属性に、ログアウト時にセッションを破棄するかを設定する。デフォルトは
trueである。trueの場合、ログアウト時にセッションが破棄される。 |
(4)
|
delete-cookies属性に、ログアウト時に削除するクッキー名を列挙する。複数記述する場合は「,」で区切る。
|
(5)
|
success-handler-ref属性に、ログアウト成功後に呼び出すハンドラクラスを指定する。本属性を指定した場合、
logout-success-url属性を指定すると起動時にエラーとなる。 |
Warning
Spring Security のデフォルト値「/j_spring_security_logout」の使用を推奨しない理由
デフォルト値を使用している場合、そのアプリケーションが、Spring Securityを使用していることについて、露見してしまう。 そのため、Spring Securityの脆弱性が発見された場合、脆弱性をついた攻撃を受けるリスクが高くなる。 前述のリスクを避けるためにも、デフォルト値を使用しないことを推奨する。
6.3.2.8. <sec:remember-me>要素の設定
<sec:remember-me>要素の属性について、以下に示す。spring-security.xml
<sec:http auto-config="true" use-expressions="true">
  <!-- omitted -->
  <sec:remember-me key="terasoluna-tourreservation-km/ylnHv"
          token-validity-seconds="#{30 * 24 * 60 * 60}" />  <!-- 属性の指定順番で(1)~(2) -->
  <!-- omitted -->
</sec:http>
| 項番 | 説明 |
|---|---|
(1)
|
key属性に、Remeber Me用のcookieを保持しておくためのユニークなキーを指定する。指定が無い場合、ユニークなキーを起動時に生成するため、起動時間向上を考えた場合指定しておくことを推奨する。
|
(2)
|
「
token-validity-seconds属性に、Remeber Me用のcookieの有効時間を秒単位で指定する。この例では30日間を設定している。指定が無い場合、デフォルトで14日間が有効期限になる。
|
上記以外の属性については、Spring Securityのマニュアルを参照されたい。
ログインフォームには以下のように「Remeber Me」機能を有効にするためのフラグを用意する必要がある。
<form method="post"
  action="${pageContext.request.contextPath}/authentication">
    <!-- omitted -->
    <label for="_spring_security_remember_me">Remember Me : </label>
    <input name="_spring_security_remember_me"
      id="_spring_security_remember_me" type="checkbox"
      checked="checked"> <!-- (1) -->
    <input type="submit" value="LOGIN">
    <!-- omitted -->
</form>
| 項番 | 説明 |
|---|---|
(1)
|
HTTPパラメータに、
_spring_security_remember_meを設定することで、trueでリクエストされた場合、次回の認証を回避することができる。 |
6.3.3. How to extend
6.3.3.1. UserDetailsServiceの拡張
org.springframework.security.core.userdetails.UserDetailsorg.springframework.security.core.userdetails.userDetailsService
を実装する必要がある。
ログインユーザーの氏名や所属部署などの付属情報を常に画面のヘッダーに表示させる必要がある場合、毎リクエストでDBから取得するのは非効率的である。
UserDetailsオブジェクトに保持させて、SecurityContextや<sec:authentication>タグからアクセスできようにするにはこの拡張が必要である。
6.3.3.1.1. UserDetailsの拡張
認証情報以外に顧客情報も保持するReservationUserDetailsクラスを作成する。
public class ReservationUserDetails extends User { // (1)
    // omitted

    private final Customer customer; // (2)

    private static final List<? extends GrantedAuthority> DEFAULT_AUTHORITIES = Collections
            .singletonList(new SimpleGrantedAuthority("ROLE_USER"));         // (3)

    public ReservationUserDetails(Customer customer) {
        super(customer.getCustomerCode(),
                customer.getCustomerPassword(), true, true, true, true, DEFAULT_AUTHORITIES); // (4)
        this.customer = customer;
    }

    public Customer getCustomer() { // (5)
        return customer;
    }
}
| 項番 | 説明 |
|---|---|
(1)
|
UserDetailsのデフォルトクラスである、org.springframework.security.core.userdetails.Userクラスを継承する。 |
(2)
|
認証情報および顧客情報をもつDomainObjectクラスを保持する。
|
(3)
|
認可情報を、
org.springframework.security.core.authority.SimpleGrantedAuthorityのコンストラクタで作成する。ここでは”ROLE_USER”という権限を与える。本実装は簡易実装であり、本来は認可情報はDB上の別のテーブルから取得すべきである。
|
(4)
|
スーパークラスのコンストラクタに、DomainObjectが持つユーザID、パスワードを設定する。
|
(5)
|
UserDetails経由で顧客情報にアクセスするためのメソッド。 |
Note
Userクラスを継承するだけでは、業務要件を実現できない場合、UserDetailsインタフェースを実装すればよい。
6.3.3.1.2. 独自UserDetailsServiceの実装
UserDetailsServiceを実装したReservationUserDetailsServiceクラスを作成する。Customerオブジェクトを取得する処理を実装したCustomerSharedServiceクラスをインジェクションして、DBから顧客情報を取得している。public class ReservationUserDetailsService implements UserDetailsService {
@Inject
CustomerSharedService customerSharedService;
@Override
public UserDetails loadUserByUsername(String username) throws UsernameNotFoundException {
Customer customer = customerSharedService.findOne(username);
// omitted
return new ReservationUserDetails(customer);
}
}
6.3.3.1.3. 使用方法
作成したReservationUserDetailsService、ReservationUserDetailsの使用方法を説明する。
spring-security.xml
<sec:authentication-manager>
    <sec:authentication-provider user-service-ref="userDetailsService"><!-- (1) -->
        <sec:password-encoder ref="passwordEncoder" />
    </sec:authentication-provider>
</sec:authentication-manager>

<bean id="userDetailsService"
    class="com.example.domain.service.userdetails.ReservationUserDetailsService"><!-- (2) -->
</bean>
<!-- omitted -->
項番 説明 (1)ReservationUserDetailsServiceのBean IDをref属性に定義する。(2)ReservationUserDetailsServiceをBean定義する。JSP
<sec:authentication>タグを使用してCustomerオブジェクトにアクセスする。<sec:authentication property="principal.customer" var="customer"/><!-- (1) --> ${f:h(customer.customerName)}<!-- (1) -->
項番 説明 (1)ReservationUserDetailsがもつCustomerオブジェクトを変数に格納する。(2)変数に格納したCustomerオブジェクトの任意のプロパティを表示する。f:h()については、XSS対策を参照されたい。Controller
@RequestMapping(method = RequestMethod.GET)
public String view(Principal principal, Model model) {
    // get Authentication
    Authentication authentication = (Authentication) principal;
    // get UserDetails
    ReservationUserDetails userDetails = (ReservationUserDetails) authentication.getPrincipal();
    // get Customer
    Customer customer = userDetails.getCustomer(); // (1)
    // omitted ...
}
項番 説明 (1)ReservationUserDetailsから、ログイン中のCustomerオブジェクトを取得する。このオブジェクトをServiceクラスに渡して業務処理を行う。
Note
顧客情報が変更された場合、一度ログアウトしないとReservationUserDetailsがもつCustomerオブジェクトは変更されない。
頻繁に変更されうる情報や、ログインユーザー以外のユーザー(管理者など)によって変更される情報は保持しない方がよい。
6.3.3.2. AuthenticationProviderの拡張
Spring Securityから提供されている認証プロバイダで対応できない業務要件がある場合、
org.springframework.security.authentication.AuthenticationProviderインタフェースを実装したクラスを作成する必要がある。
ここでは、ユーザ名、パスワード、会社識別子(独自の認証パラメータ)の3つのパラメータを使用してDB認証を行うための拡張例を示す。
上記の要件を実現するためには、以下に示すクラスを作成する必要がある。
| 項番 | 説明 |
|---|---|
(1)
|
ユーザ名、パスワード、会社識別子(独自の認証パラメータ)を保持する ここでは、 |
(2)
|
ユーザ名、パスワード、会社識別子(独自の認証パラメータ)を使用してDB認証を行う ここでは、 |
(3)
|
ユーザ名、パスワード、会社識別子(独自の認証パラメータ)をリクエストパラメータから取得して、 ここでは、 |
Tip
ここでは、認証用のパラメータとして独自のパラメータを追加する例にしているため、
Authenticationインタフェースの実装クラスとAuthenticationを生成するためのサーブレットフィルタクラスの拡張が必要となる。
ユーザ名とパスワードのみで認証する場合は、AuthenticationProviderインタフェースの実装クラスを作成するだけで、
認証処理を拡張することができる。
6.3.3.2.1. UsernamePasswordAuthenticationTokenの拡張
ここでは、UsernamePasswordAuthenticationTokenクラスを継承し、
ユーザ名とパスワードに加えて、会社識別子(独自の認証パラメータ)を保持するクラスを作成する。
// import omitted
public class CompanyIdUsernamePasswordAuthenticationToken extends
    UsernamePasswordAuthenticationToken {

    private static final long serialVersionUID = SpringSecurityCoreVersion.SERIAL_VERSION_UID;

    // (1)
    private final String companyId;

    // (2)
    public CompanyIdUsernamePasswordAuthenticationToken(
            Object principal, Object credentials, String companyId) {
        super(principal, credentials);

        this.companyId = companyId;
    }

    // (3)
    public CompanyIdUsernamePasswordAuthenticationToken(
            Object principal, Object credentials, String companyId,
            Collection<? extends GrantedAuthority> authorities) {
        super(principal, credentials, authorities);
        this.companyId = companyId;
    }

    public String getCompanyId() {
        return companyId;
    }

}
| 項番 | 説明 |
|---|---|
(1)
|
会社識別子を保持するフィールドを作成する。 |
(2)
|
認証前の情報(リクエストパラメータで指定された情報)を保持するインスタンスを作成する際に使用するコンストラクタを作成する。 |
(3)
|
認証済みの情報を保持するインスタンスを作成する際に使用するコンストラクタを作成する。
親クラスのコンストラクタの引数に認可情報を渡すことで、認証済みの状態となる。
|
6.3.3.2.2. DaoAuthenticationProvideの拡張
ここでは、DaoAuthenticationProviderクラスを継承し、
ユーザ名、パスワード、会社識別子を使用してDB認証を行うクラスを作成する。
// import omitted
public class CompanyIdUsernamePasswordAuthenticationProvider extends
    DaoAuthenticationProvider {

    // omitted

    @Override
    protected void additionalAuthenticationChecks(UserDetails userDetails,
            UsernamePasswordAuthenticationToken authentication)
            throws AuthenticationException {

        // (1)
        super.additionalAuthenticationChecks(userDetails, authentication);

        // (2)
        CompanyIdUsernamePasswordAuthenticationToken companyIdUsernamePasswordAuthentication =
            (CompanyIdUsernamePasswordAuthenticationToken) authentication;
        String requestedCompanyId = companyIdUsernamePasswordAuthentication.getCompanyId();
        String companyId = ((SampleUserDetails) userDetails)
                .getAccount().getCompanyId();
        if (!companyId.equals(requestedCompanyId)) {
            throw new BadCredentialsException(messages.getMessage(
                    "AbstractUserDetailsAuthenticationProvider.badCredentials",
                    "Bad credentials"));
        }
    }

    @Override
    protected Authentication createSuccessAuthentication(Object principal,
            Authentication authentication, UserDetails user) {
        String companyId = ((SampleUserDetails) user).getAccount()
                .getCompanyId();
        // (3)
        return new CompanyIdUsernamePasswordAuthenticationToken(user,
                authentication.getCredentials(), companyId,
                user.getAuthorities());
    }

    @Override
    public boolean supports(Class<?> authentication) {
        // (4)
        return CompanyIdUsernamePasswordAuthenticationToken.class
                .isAssignableFrom(authentication);
    }

}
| 項番 | 説明 |
|---|---|
(1)
|
親クラスのメソッドを呼び出し、Spring Securityが提供しているチェック処理を実行する。 このタイミングでパスワード認証が行われる。 |
(2)
|
パスワード認証が成功した場合は、会社識別子(独自の認証パラメータ)の妥当性をチェックする。 上記例では、リクエストされた会社識別子とテーブルに保持している会社識別子が一致するかをチェックしている。 |
(3)
|
パスワード認証及び独自の認証処理が成功した場合は、認証済み状態のCompanyIdUsernamePasswordAuthenticationTokenを作成して返却する。 |
(4)
|
CompanyIdUsernamePasswordAuthenticationTokenにキャスト可能なAuthenticationが指定された場合に、
本クラスを使用して認証処理を行うようにする。 |
Tip
ユーザの存在チェック、ユーザの状態チェック(無効ユーザ、ロック中ユーザ、利用期限切れユーザなどのチェック)は、
additionalAuthenticationChecksメソッドが呼び出される前に、親クラスの処理として行われる。
6.3.3.2.3. UsernamePasswordAuthenticationFilterの拡張
ここでは、UsernamePasswordAuthenticationFilterクラスを継承し、
認証情報(ユーザ名、パスワード、会社識別子)をAuthenticationProviderに引き渡すためのサーブレットフィルタクラスを作成する。
attemptAuthenticationメソッドの実装は、UsernamePasswordAuthenticationFilterクラスのメソッドをコピーして、カスタマイズしたものである。
// import omitted
public class CompanyIdUsernamePasswordAuthenticationFilter extends
    UsernamePasswordAuthenticationFilter {

    @Override
    public Authentication attemptAuthentication(HttpServletRequest request,
            HttpServletResponse response) throws AuthenticationException {

        if (!request.getMethod().equals("POST")) {
            throw new AuthenticationServiceException("Authentication method not supported: "
                    + request.getMethod());
        }

        // (1)
        // Obtain UserName, Password, CompanyId
        String username = super.obtainUsername(request);
        String password = super.obtainPassword(request);
        String companyId = obtainCompanyId(request);
        if (username == null) {
            username = "";
        } else {
            username = username.trim();
        }
        if (password == null) {
            password = "";
        }
        CompanyIdUsernamePasswordAuthenticationToken authRequest =
            new CompanyIdUsernamePasswordAuthenticationToken(username, password, companyId);

        // Allow subclasses to set the "details" property
        setDetails(request, authRequest);

        return this.getAuthenticationManager().authenticate(authRequest); // (2)
    }

    // (3)
    protected String obtainCompanyId(HttpServletRequest request) {
        return request.getParameter("companyid");
    }
}
| 項番 | 説明 |
|---|---|
(1)
|
リクエストパラメータから取得した認証情報(ユーザ名、パスワード、会社識別子)より、CompanyIdUsernamePasswordAuthenticationTokenのインスタンスを生成する。 |
(2)
|
リクエストパラメータで指定された認証情報(
|
(3)
|
会社識別子は、"companyid"というリクエストパラメータより取得する。 |
Note
認証情報の入力チェックについて
DBサーバへの負荷軽減等で、あきらかな入力誤りに対しては、事前にチェックを行いたい場合がある。
その場合は、UsernamePasswordAuthenticationFilterの拡張のように、
UsernamePasswordAuthenticationFilterを拡張することで、入力チェック処理を行うことができる。
なお、上記例では入力チェックは行っていない。
Todo
認証情報の入力チェックは、Controllerクラスでリクエストをハンドリングして、Bean Validationを使用して行う事も可能である。
Bean Validationを使用した入力チェックの方法については、今後追加する予定である。
6.3.3.2.4. 拡張した認証処理の適用
ユーザ名、パスワード、会社識別子(独自の認証パラメータ)を使用したDB認証機能をSpring Securityに適用する。
spring-security.xml
<!-- omitted -->

<!-- (1) -->
<sec:http
    auto-config="false"
    use-expressions="true"
    entry-point-ref="loginUrlAuthenticationEntryPoint">

    <!-- omitted -->

    <!-- (2) -->
    <sec:custom-filter
        position="FORM_LOGIN_FILTER"
        ref="companyIdUsernamePasswordAuthenticationFilter" />

    <!-- omitted -->

    <sec:custom-filter before="LOGOUT_FILTER" ref="csrfFilter" />

    <sec:logout
        logout-url="/logout"
        logout-success-url="/login"
        delete-cookies="JSESSIONID" />

    <!-- omitted -->

    <sec:intercept-url pattern="/login" access="permitAll" />
    <sec:intercept-url pattern="/**" access="isAuthenticated()" />

    <!-- omitted -->

</sec:http>

<!-- (3) -->
<bean id="loginUrlAuthenticationEntryPoint"
    class="org.springframework.security.web.authentication.LoginUrlAuthenticationEntryPoint">
    <constructor-arg value="/login" />
</bean>

<!-- (4) -->
<bean id="companyIdUsernamePasswordAuthenticationFilter"
    class="com.example.app.common.security.CompanyIdUsernamePasswordAuthenticationFilter">
    <!-- (5) -->
    <property name="filterProcessesUrl" value="/authentication" />
    <!-- (6) -->
    <property name="authenticationManager" ref="authenticationManager" />
    <!-- (7) -->
    <property name="sessionAuthenticationStrategy" ref="sessionAuthenticationStrategy" />
    <!-- (8) -->
    <property name="authenticationFailureHandler">
        <bean class="org.springframework.security.web.authentication.SimpleUrlAuthenticationFailureHandler">
            <constructor-arg value="/login?error=true" />
        </bean>
    </property>
    <!-- (9) -->
    <property name="authenticationSuccessHandler">
        <bean class="org.springframework.security.web.authentication.SimpleUrlAuthenticationSuccessHandler" />
    </property>
</bean>

<!-- (6') -->
<sec:authentication-manager alias="authenticationManager">
    <sec:authentication-provider ref="companyIdUsernamePasswordAuthenticationProvider" />
</sec:authentication-manager>
<bean id="companyIdUsernamePasswordAuthenticationProvider"
    class="com.example.app.common.security.CompanyIdUsernamePasswordAuthenticationProvider">
    <property name="userDetailsService" ref="sampleUserDetailsService" />
    <property name="passwordEncoder" ref="passwordEncoder" />
</bean>

<!-- (7') -->
<bean id="sessionAuthenticationStrategy"
    class="org.springframework.security.web.authentication.session.CompositeSessionAuthenticationStrategy">
    <constructor-arg>
        <util:list>
            <bean class="org.springframework.security.web.csrf.CsrfAuthenticationStrategy">
                <constructor-arg ref="csrfTokenRepository" />
            </bean>
            <bean class="org.springframework.security.web.authentication.session.SessionFixationProtectionStrategy" />
        </util:list>
    </constructor-arg>
</bean>

<bean id="csrfTokenRepository"
    class="org.springframework.security.web.csrf.HttpSessionCsrfTokenRepository" />

<bean id="csrfFilter" class="org.springframework.security.web.csrf.CsrfFilter">
    <constructor-arg ref="csrfTokenRepository" />
</bean>


<!-- omitted -->
| 項番 | 説明 |
|---|---|
(1)
|
|
(2)
|
|
(3)
|
ここでは、 |
(4)
|
“FORM_LOGIN_FILTER”として使用するサーブレットフィルタのbeanを定義する。 ここでは、拡張したサーブレットフィルタクラス( |
(5)
|
ここでは、 |
(6)
|
|
(6’)
|
Spring Securityが生成するAuthenticationManagerに対して、拡張したAuthenticationProvider(CompanyIdUsernamePasswordAuthenticationProvider)を設定する。 |
(7)
|
sessionAuthenticationStrategyプロパティに、認証成功時のセッションの取扱いを制御するコンポーネント(SessionAuthenticationStrategy)のbeanを指定する。 |
(7’)
|
認証成功時のセッションの取扱いを制御するコンポーネント( ここでは、Spring Securityから提供されている、
を有効化している。 |
(8)
|
authenticationFailureHandlerプロパティに、認証失敗時に呼ばれるハンドラクラスを指定する。 |
(9)
|
authenticationSuccessHandlerプロパティに、認証成功時に呼ばれるハンドラクラスを指定する。 |
Note
auto-config="false"を指定した場合、<sec:http-basic>要素と<sec:logout>要素は、明示的に定義しないと有効にならない。
6.3.3.2.5. ログインフォームの作成
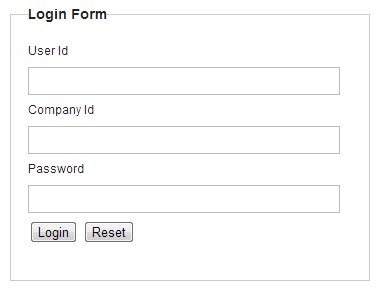
ここでは、ログインフォームの作成で紹介した画面(JSP)に対して、会社識別子を追加する。
<form:form action="${pageContext.request.contextPath}/authentication" method="post">
    <!-- omitted -->
    <span>User Id</span><br>
    <input type="text" id="username" name="j_username"><br>
    <span>Company Id</span><br>
    <input type="text" id="companyid" name="companyid"><br>  <!-- (1) -->
    <span>Password</span><br>
    <input type="password" id="password" name="j_password"><br>
    <!-- omitted -->
</form:form>
| 項番 | 説明 |
|---|---|
(1)
|
会社識別子の入力フィールド名に、
"companyid"を指定する。 |
6.3.4. Appendix
6.3.4.1. 遷移先の指定が可能な認証成功ハンドラ
Spring Securityを使用した認証では、認証に成功した場合は、
- bean定義ファイル(
spring-security.xml)に記述したパス(<form-login>要素のdefault-target-url属性に指定したパス) - ログイン前にアクセスした「認証が必要な保護ページ」を表示するためのパス
に遷移する。
共通ライブラリでは、Spring Securityが提供している機能に加えて、
遷移先のパスをリクエストパラメータで指定できるクラス(org.terasoluna.gfw.web.security.RedirectAuthenticationHandler)を提供している。
RedirectAuthenticationHandlerは、以下のような仕組みを実現するために作成されたクラスである。
- ページを表示するためにログインを行う必要がある
- ログイン後の遷移先のページをJSP側(遷移元のJSP)で指定したい
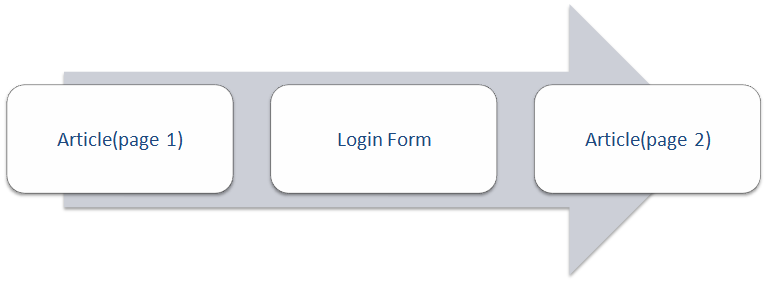
Picture - Screen_Flow
RedirectAuthenticationHandlerの使用例を、下記に示す。遷移元画面のJSPの記述例
<form:form action="${pageContext.request.contextPath}/login" method="get">
    <!-- omitted -->
  <input type="hidden" name="redirectTo"
    value="${pageContext.request.contextPath}/reservetour/read?
    ${f:query(reserveTourForm)}&page.page=${f:h(param['page.page'])}
    &page.size=${f:h(param['page.size'])}" />  <!-- (1) -->
</form:form>
| 項番 | 説明 |
|---|---|
(1)
|
hidden項目として、「ログイン成功後に遷移するページのURL」を設定する。
hidden項目のフィールド名(リクエストパラメータ名)は「
redirectTo」を指定する。フィールド名(リクエストパラメータ名)は、
RedirectAuthenticationHandlerのtargetUrlParameterプロパティの値と一致させる必要がある。 |
ログイン画面のJSPの記述例
<form:form action="${pageContext.request.contextPath}/authentication" method="post">
     <!-- omitted -->
     <input type="submit"
       value="Login">
     <input type="hidden" name="redirectTo" value="${f:h(param.redirectTo)}" />  <!-- (1) -->
     <!-- omitted -->
</form:form>
| 項番 | 説明 |
|---|---|
(1)
|
hidden項目として、遷移元画面からリクエストパラメータで渡された「ログイン成功後に遷移するページのURL」を設定する。
hidden項目のフィールド名(リクエストパラメータ名)は「
redirectTo」を指定する。フィールド名(リクエストパラメータ名)は、
RedirectAuthenticationHandlerのtargetUrlParameterプロパティの値と一致させる必要がある。 |
Spring Security 設定ファイル
<sec:http auto-config="true">
    <!-- omitted -->
    <!-- (1) -->
    <sec:form-login
        login-page="/login"
        login-processing-url="/authentication"
        authentication-failure-handler-ref="authenticationFailureHandler"
        authentication-success-handler-ref="authenticationSuccessHandler" />
    <!-- omitted -->
</sec:http>

<!-- (2) -->
<bean id="authenticationSuccessHandler"
    class="org.terasoluna.gfw.web.security.RedirectAuthenticationHandler">
</bean>

<!-- (3) -->
<bean id="authenticationFailureHandler"
    class="org.springframework.security.web.authentication.ExceptionMappingAuthenticationFailureHandler">
    <property name="defaultFailureUrl" value="/login?error=true"/> <!-- (4) -->
    <property name="useForward" value="true"/> <!-- (5) -->
</bean>
| 項番 | 説明 |
|---|---|
(1)
|
authentication-failure-handler-ref(認証エラー時のハンドラ設定)とauthentication-success-handler-ref(認証成功時のハンドラ設定)のBeanIdを指定する。 |
(2)
|
authentication-success-handler-refから参照されるbeanとしてorg.terasoluna.gfw.web.security.RedirectAuthenticationHandlerを定義する。 |
(3)
|
authentication-failure-handler-refから参照されるbeanとしてorg.springframework.security.web.authentication.ExceptionMappingAuthenticationFailureHandlerを定義する。 |
(4)
|
認証失敗時の遷移先パスを指定する。
上記例では、ログイン画面のパスと認証エラー後の遷移であることを示すクエリ(
error=true)を設定している。 |
(5)
|
本機能を使用する場合はuseForwardをtrueに指定する必要がある。
trueに指定することで、認証失敗時に表示する画面(ログイン画面)に遷移する際に、RedirectではなくForwardが使用される。これは、認証処理を行うリクエストのリクエストパラメータの中に「ログイン成功後に遷移するページのURL」を含める必要があるためである。
Redirectを使用して認証エラー画面を表示してしまうと、「ログイン成功後に遷移するページのURL」がリクエストパラメータから引き継ぎことが出来ないため、ログインが成功しても指定した画面に遷移することが出来ない。
この事象を回避するためには、Forwardを使用して「ログイン成功後に遷移するページのURL」をリクエストパラメータから引き継げるようにしておく必要がある。
|
Tip
RedirectAuthenticationHandlerは、オープンリダイレクタ脆弱性対策が施されているため、
「http://google.com」のような外部サイトへ遷移をすることはできない。
外部サイトへ移動したい場合は、org.springframework.security.web.RedirectStrategyを実装したクラスを作成し、
RedirectAuthenticationHandlerのtargetUrlParameterRedirectStrategyプロパティにインジェクションすることで実現する事ができる。
拡張する際の注意点としては、redirectToの値を改竄されても問題が発生しないようにする必要がある。
たとえば、以下のような対策が考えられる。
- 遷移先のURLを直接指定するのではなく、ページ番号などのIDを指定してIDに対応するURLにリダイレクトする。
- 遷移先のURLをチェックし、ホワイトリストに一致するURLのみリダイレクトする。