11.4. Spring Securityチュートリアル
11.4.1. はじめに
11.4.1.1. このチュートリアルで学ぶこと
- Spring Securityによる基本的な認証・認可
- データベース上のアカウント情報を使用したログイン
- 認証済みアカウントオブジェクトの取得方法
11.4.1.2. 対象読者
- チュートリアル(Todoアプリケーション)を実施ずみ (インフラストラクチャ層の実装としてMyBatis3を使用して実施していること)
- Mavenの基本的な操作を理解している
11.4.2. 作成するアプリケーションの概要
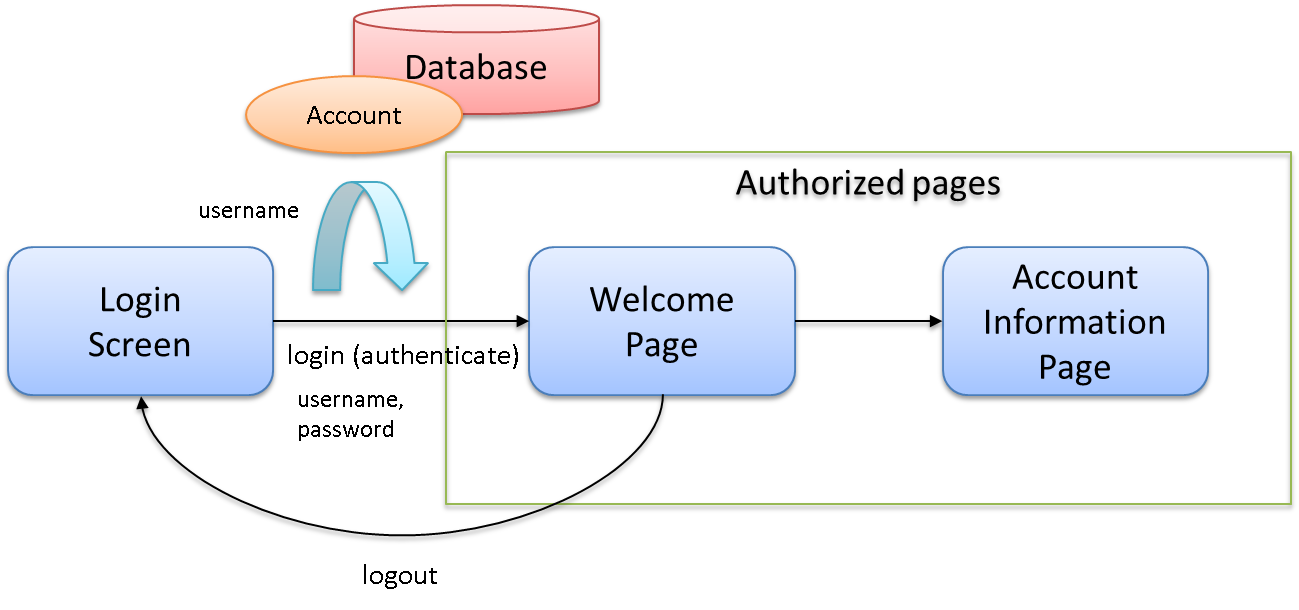
- ログインページでIDとパスワード指定して、アプリケーションにログインする事ができる。
- ログイン処理で必要となるアカウント情報はデータベース上に格納する。
- ウェルカムページとアカウント情報表示ページがあり、これらのページはログインしないと閲覧する事ができない。
- アプリケーションからログアウトする事ができる。
アプリケーションの概要を以下の図で示す。
URL一覧を以下に示す。
| 項番 | プロセス名 | HTTPメソッド | URL | 説明 |
|---|---|---|---|---|
| 1 | ログインフォーム表示 | GET | /login/loginForm | ログインフォームを表示する |
| 2 | ログイン | POST | /authentication | ログインフォームから入力されたユーザー名、パスワードを使って認証する(Spring Securityが行う) |
| 3 | ウェルカムページ表示 | GET | / | ウェルカムページを表示する |
| 4 | アカウント情報表示 | GET | /account | ログインユーザーのアカウント情報を表示する |
| 5 | ログアウト | POST | /logout | ログアウトする(Spring Securityが行う) |
11.4.3. 環境構築
11.4.3.1. プロジェクトの作成
Mavenのアーキタイプを利用し、TERASOLUNA Server Framework for Java (5.x)のブランクプロジェクトを作成する。
本チュートリアルでは、MyBatis3用のブランクプロジェクトを作成する。
なお、Spring Tool Suite(STS)へのインポート方法やアプリケーションサーバの起動方法など基本知識については、 チュートリアル(Todoアプリケーション) で説明済みのため、本チュートリアルでは説明を割愛する。
mvn archetype:generate -B^
 -DarchetypeGroupId=org.terasoluna.gfw.blank^
 -DarchetypeArtifactId=terasoluna-gfw-web-blank-mybatis3-archetype^
 -DarchetypeVersion=5.5.2.RELEASE^
 -DgroupId=com.example.security^
 -DartifactId=first-springsecurity^
 -Dversion=1.0.0-SNAPSHOT
チュートリアルを進める上で必要となる設定の多くは、作成したブランクプロジェクトに既に設定済みの状態である。 チュートリアルを実施するだけであれば、これらの設定の理解は必須ではないが、 アプリケーションを動かすためにどのような設定が必要なのかを理解しておくことを推奨する。
アプリケーションを動かすために必要な設定(設定ファイル)の解説については、 「設定ファイルの解説」を参照されたい。
11.4.4. アプリケーションの作成
11.4.4.1. ドメイン層の実装
Spring Securityの認証処理は基本的に以下の流れになる。
- 入力された
usernameからユーザー情報を検索する。 - ユーザー情報が存在する場合、そのユーザー情報がもつパスワードと入力されたパスワードをハッシュ化したものを比較する。
- 比較結果が一致する場合、認証成功とみなす。
ユーザー情報が見つからない場合やパスワードの比較結果が一致しない場合は認証失敗である。
ドメイン層ではユーザー名からAccountオブジェクトを取得する処理が必要となる。実装は、以下の順に進める。
- Domain Object(
Account)の作成 AccountRepositoryの作成AccountSharedServiceの作成
11.4.4.1.1. Domain Objectの作成
Accountクラスを作成する。src/main/java/com/example/security/domain/model/Account.javapackage com.example.security.domain.model;
import java.io.Serializable;
public class Account implements Serializable {
private static final long serialVersionUID = 1L;
private String username;
private String password;
private String firstName;
private String lastName;
public String getUsername() {
return username;
}
public void setUsername(String username) {
this.username = username;
}
public String getPassword() {
return password;
}
public void setPassword(String password) {
this.password = password;
}
public String getFirstName() {
return firstName;
}
public void setFirstName(String firstName) {
this.firstName = firstName;
}
public String getLastName() {
return lastName;
}
public void setLastName(String lastName) {
this.lastName = lastName;
}
@Override
public String toString() {
return "Account [username=" + username + ", password=" + password
+ ", firstName=" + firstName + ", lastName=" + lastName + "]";
}
}
11.4.4.1.2. AccountRepositoryの作成
Accountオブジェクトをデータベースから取得する処理を実装する。
AccountRepositoryインタフェースを作成する。src/main/java/com/example/security/domain/repository/account/AccountRepository.javapackage com.example.security.domain.repository.account;
import com.example.security.domain.model.Account;
import java.util.Optional;
public interface AccountRepository {
Optional<Account> findById(String username);
}
Accountを1件取得するためのSQLをMapperファイルに定義する。src/main/resources/com/example/security/domain/repository/account/AccountRepository.xml<?xml version="1.0" encoding="UTF-8"?>
<!DOCTYPE mapper PUBLIC "-//mybatis.org//DTD Mapper 3.0//EN"
"http://mybatis.org/dtd/mybatis-3-mapper.dtd">
<mapper namespace="com.example.security.domain.repository.account.AccountRepository">
<resultMap id="accountResultMap" type="Account">
<id property="username" column="username" />
<result property="password" column="password" />
<result property="firstName" column="first_name" />
<result property="lastName" column="last_name" />
</resultMap>
<select id="findById" parameterType="String" resultMap="accountResultMap">
SELECT
username,
password,
first_name,
last_name
FROM
account
WHERE
username = #{username}
</select>
</mapper>
11.4.4.1.4. 認証サービスの作成
src/main/java/com/example/security/domain/service/userdetails/SampleUserDetails.javapackage com.example.security.domain.service.userdetails;
import org.springframework.security.core.authority.AuthorityUtils;
import org.springframework.security.core.userdetails.User;
import com.example.security.domain.model.Account;
public class SampleUserDetails extends User { // (1)
private static final long serialVersionUID = 1L;
private final Account account; // (2)
public SampleUserDetails(Account account) {
// (3)
super(account.getUsername(), account.getPassword(), AuthorityUtils
.createAuthorityList("ROLE_USER")); // (4)
this.account = account;
}
public Account getAccount() { // (5)
return account;
}
}
| 項番 | 説明 |
|---|---|
(1)
|
org.springframework.security.core.userdetails.UserDetailsインタフェースを実装する。ここでは
UserDetailsを実装したorg.springframework.security.core.userdetails.User クラスを継承し、本プロジェクト用のUserDetailsクラスを実装する。 |
(2)
|
Springの認証ユーザークラスに、本プロジェクトのアカウント情報を保持させる。
|
(3)
|
Userクラスのコンストラクタを呼び出す。第1引数はユーザー名、第2引数はパスワード、第3引数は権限リストである。 |
(4)
|
簡易実装として、
ROLE_USERというロールのみ持つ権限を作成する。 |
(5)
|
アカウント情報のgetterを用意する。これにより、ログインユーザーの
Accountオブジェクトを取得することができる。 |
src/main/java/com/example/security/domain/service/userdetails/SampleUserDetailsService.javapackage com.example.security.domain.service.userdetails;
import javax.inject.Inject;
import org.springframework.security.core.userdetails.UserDetails;
import org.springframework.security.core.userdetails.UserDetailsService;
import org.springframework.security.core.userdetails.UsernameNotFoundException;
import org.springframework.stereotype.Service;
import org.springframework.transaction.annotation.Transactional;
import org.terasoluna.gfw.common.exception.ResourceNotFoundException;
import com.example.security.domain.model.Account;
import com.example.security.domain.service.account.AccountSharedService;
@Service
public class SampleUserDetailsService implements UserDetailsService { // (1)
@Inject
AccountSharedService accountSharedService; // (2)
@Transactional(readOnly=true)
@Override
public UserDetails loadUserByUsername(String username) throws UsernameNotFoundException {
try {
Account account = accountSharedService.findOne(username); // (3)
return new SampleUserDetails(account); // (4)
} catch (ResourceNotFoundException e) {
throw new UsernameNotFoundException("user not found", e); // (5)
}
}
}
| 項番 | 説明 |
|---|---|
(1)
|
org.springframework.security.core.userdetails.UserDetailsServiceインタフェースを実装する。 |
(2)
|
AccountSharedServiceをインジェクションする。 |
(3)
|
usernameからAccountオブジェクトを取得する処理をAccountSharedServiceに委譲する。 |
(4)
|
取得した
Accountオブジェクトを使用して、本プロジェクト用のUserDetailsオブジェクトを作成し、メソッドの返り値として返却する。 |
(5)
|
対象のユーザーが見つからない場合は、
UsernameNotFoundExceptionがスローする。 |
11.4.4.1.5. データベースの初期化スクリプトの設定
本チュートリアルでは、アカウント情報を保持するデータベースとしてH2 Database(インメモリデータベース)を使用する。 そのため、アプリケーション起動時にSQLを実行してデータベースを初期化する必要がある。
jdbc:initialize-database が設定済みであり、${database}-schema.sql にDDL文、${database}-dataload.sql にDML文を追加するだけでアプリケーション起動時にSQLを実行してデータベースを初期化することができる。なお、ブランクプロジェクトの設定ではfirst-springsecurity-infra.properties にdatabase=H2 と定義されているため、H2-schema.sql 及びH2-dataload.sql が実行される。src/main/resources/META-INF/spring/first-springsecurity-env.xml<jdbc:initialize-database data-source="dataSource"
ignore-failures="ALL">
<jdbc:script location="classpath:/database/${database}-schema.sql" encoding="UTF-8" />
<jdbc:script location="classpath:/database/${database}-dataload.sql" encoding="UTF-8" />
</jdbc:initialize-database>
src/main/resources/database/H2-schema.sqlCREATE TABLE account(
username varchar(128),
password varchar(88),
first_name varchar(128),
last_name varchar(128),
constraint pk_tbl_account primary key (username)
);
src/main/resources/database/H2-dataload.sqlINSERT INTO account(username, password, first_name, last_name) VALUES('demo', '{pbkdf2}1dd84f42a7a9a173f8f806d736d34939bed6a36e2948e8bfe88801ee5e6e61b815efc389d03165a4', 'Taro', 'Yamada'); -- (1)
COMMIT;
| 項番 | 説明 |
|---|---|
(1)
|
ブランクプロジェクトの設定では、 本チュートリアルでは、 |
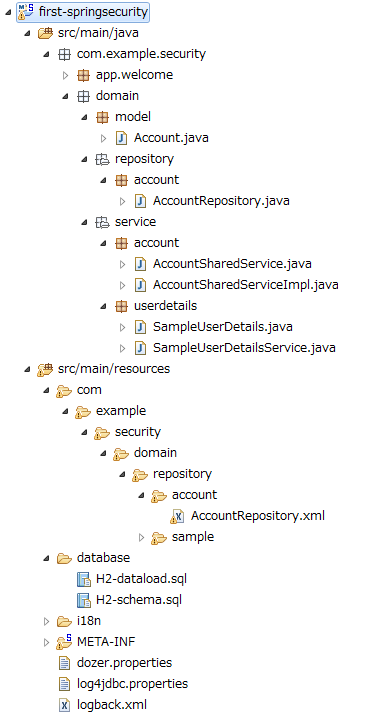
11.4.4.1.6. ドメイン層の作成後のパッケージエクスプローラー
ドメイン層に作成したファイルを確認する。
Package ExplorerのPackage PresentationはHierarchicalを使用している。
11.4.4.2. アプリケーション層の実装
11.4.4.2.1. Spring Securityの設定
spring-security.xmlにSpring Securityによる認証・認可の設定を行う。
本チュートリアルで作成するアプリケーションで扱うURLのパターンを以下に示す。
URL
|
説明
|
|---|---|
/login/loginForm
|
ログインフォームを表示するためのURL
|
/login/loginForm?error=true
|
認証エラー時に遷移するページ(ログインページ)を表示するためのURL
|
/login
|
認証処理を行うためのURL
|
/logout
|
ログアウト処理を行うためのURL
|
/
|
ウェルカムページを表示するためのURL
|
/account
|
ログインユーザーのアカウント情報を表示するためのURL
|
src/main/resources/META-INF/spring/spring-security.xml<?xml version="1.0" encoding="UTF-8"?>
<beans xmlns="http://www.springframework.org/schema/beans"
xmlns:xsi="http://www.w3.org/2001/XMLSchema-instance"
xmlns:sec="http://www.springframework.org/schema/security"
xsi:schemaLocation="
http://www.springframework.org/schema/security http://www.springframework.org/schema/security/spring-security.xsd
http://www.springframework.org/schema/beans http://www.springframework.org/schema/beans/spring-beans.xsd
">
<sec:http pattern="/resources/**" security="none"/>
<sec:http>
<!-- (1) -->
<sec:form-login
login-page="/login/loginForm"
authentication-failure-url="/login/loginForm?error=true" />
<!-- (2) -->
<sec:logout
logout-success-url="/"
delete-cookies="JSESSIONID" />
<sec:access-denied-handler ref="accessDeniedHandler"/>
<sec:custom-filter ref="userIdMDCPutFilter" after="ANONYMOUS_FILTER"/>
<sec:session-management />
<!-- (3) -->
<sec:intercept-url pattern="/login/**" access="permitAll" />
<sec:intercept-url pattern="/**" access="isAuthenticated()" />
</sec:http>
<sec:authentication-manager>
<!-- com.example.security.domain.service.userdetails.SampleUserDetailsService
is scanned by component scan with @Service -->
<!-- (4) -->
<sec:authentication-provider user-service-ref="sampleUserDetailsService" />
</sec:authentication-manager>
<!-- CSRF Protection -->
<bean id="accessDeniedHandler"
class="org.springframework.security.web.access.DelegatingAccessDeniedHandler">
<constructor-arg index="0">
<map>
<entry
key="org.springframework.security.web.csrf.InvalidCsrfTokenException">
<bean
class="org.springframework.security.web.access.AccessDeniedHandlerImpl">
<property name="errorPage"
value="/WEB-INF/views/common/error/invalidCsrfTokenError.jsp" />
</bean>
</entry>
<entry
key="org.springframework.security.web.csrf.MissingCsrfTokenException">
<bean
class="org.springframework.security.web.access.AccessDeniedHandlerImpl">
<property name="errorPage"
value="/WEB-INF/views/common/error/missingCsrfTokenError.jsp" />
</bean>
</entry>
</map>
</constructor-arg>
<constructor-arg index="1">
<bean
class="org.springframework.security.web.access.AccessDeniedHandlerImpl">
<property name="errorPage"
value="/WEB-INF/views/common/error/accessDeniedError.jsp" />
</bean>
</constructor-arg>
</bean>
<!-- Put UserID into MDC -->
<bean id="userIdMDCPutFilter" class="org.terasoluna.gfw.security.web.logging.UserIdMDCPutFilter">
</bean>
</beans>
| 項番 | 説明 |
|---|---|
(1)
|
を設定する。 |
(2)
|
を設定する。 |
(3)
|
を設定する。 ただし、 |
(4)
|
デフォルトでは、
|
11.4.4.2.2. ログインページを返すControllerの作成
src/main/java/com/example/security/app/login/LoginController.javapackage com.example.security.app.login;
import org.springframework.stereotype.Controller;
import org.springframework.web.bind.annotation.GetMapping;
import org.springframework.web.bind.annotation.RequestMapping;
@Controller
@RequestMapping("/login")
public class LoginController {
@GetMapping("/loginForm") // (1)
public String view() {
return "login/loginForm";
}
}
| 項番 | 説明 |
|---|---|
(1)
|
ログインページである、login/loginFormを返す。 |
11.4.4.2.3. ログインページの作成
src/main/webapp/WEB-INF/views/login/loginForm.jsp<!DOCTYPE html>
<html>
<head>
<title>Login Page</title>
<link rel="stylesheet" href="${pageContext.request.contextPath}/resources/app/css/styles.css">
</head>
<body>
<div id="wrapper">
<h3>Login with Username and Password</h3>
<!-- (1) -->
<c:if test="${param.containsKey('error')}">
<!-- (2) -->
<t:messagesPanel messagesType="error"
messagesAttributeName="SPRING_SECURITY_LAST_EXCEPTION" />
</c:if>
<!-- (3) -->
<form:form action="${pageContext.request.contextPath}/login">
<table>
<tr>
<td><label for="username">User:</label></td>
<td><input type="text" id="username"
name="username" value="demo">(demo)</td><!-- (4) -->
</tr>
<tr>
<td><label for="password">Password:</label></td>
<td><input type="password" id="password"
name="password" value="demo" />(demo)</td><!-- (5) -->
</tr>
<tr>
<td> </td>
<td><input name="submit" type="submit" value="Login" /></td>
</tr>
</table>
</form:form>
</div>
</body>
</html>
| 項番 | 説明 |
|---|---|
(1)
|
認証が失敗した場合、/login/loginForm?error=trueが呼び出され、ログインページを表示する。
そのため、認証エラー後の表示の時のみエラーメッセージが表示されるように<c:if>タグを使用する。 |
(2)
|
共通ライブラリから提供されている 認証が失敗した場合、Spring Securityのデフォルトの設定で使用される、 ここでは、認証エラー時にはリダイレクトするため、認証エラー時に発生した例外オブジェクトは、セッションスコープに格納される。 |
(3)
|
認証処理に必要なパラメータ(ユーザー名とパスワード)をPOSTメソッドで送信する。 |
(4)
|
ユーザー名を指定するテキストボックスを作成する。 Spring Securityのデフォルトのパラメータ名は |
(5)
|
パスワードを指定するテキストボックス(パスワード用のテキストボックス)を作成する。 Spring Securityのデフォルトのパラメータ名は |
src/main/webapp/WEB-INF/views/common/include.jsp<%@ page session="true"%> <!-- (6) -->
<%@ taglib uri="http://java.sun.com/jsp/jstl/core" prefix="c"%>
<%@ taglib uri="http://java.sun.com/jsp/jstl/fmt" prefix="fmt"%>
<%@ taglib uri="http://www.springframework.org/tags" prefix="spring"%>
<%@ taglib uri="http://www.springframework.org/tags/form" prefix="form"%>
<%@ taglib uri="http://www.springframework.org/security/tags" prefix="sec"%>
<%@ taglib uri="http://terasoluna.org/tags" prefix="t"%>
<%@ taglib uri="http://terasoluna.org/functions" prefix="f"%>
| 項番 | 説明 |
|---|---|
(6)
|
pageディレクティブのsession属性をtrueにする。 |
Note
ブランクプロジェクトのデフォルト設定では、JSPからセッションスコープにアクセスできないようになっている。 これは、安易にセッションが使用されないようにするためであるが、 認証エラーの例外オブジェクトをJSPから取得する場合は、JSPからセッションスコープにアクセスできるようにする必要がある。
<sec:form-login>タグのlogin-page属性の設定値( http://localhost:8080/first-springsecurity/login/loginForm )に遷移し、以下のような画面が表示される。11.4.4.2.4. JSPからログインユーザーのアカウント情報へアクセス
src/main/webapp/WEB-INF/views/welcome/home.jsp<!DOCTYPE html>
<html>
<head>
<meta charset="utf-8">
<title>Home</title>
<link rel="stylesheet" href="${pageContext.request.contextPath}/resources/app/css/styles.css">
</head>
<!-- (1) -->
<sec:authentication property="principal.account" var="account" />
<body>
<div id="wrapper">
<h1>Hello world!</h1>
<p>The time on the server is ${serverTime}.</p>
<!-- (2) -->
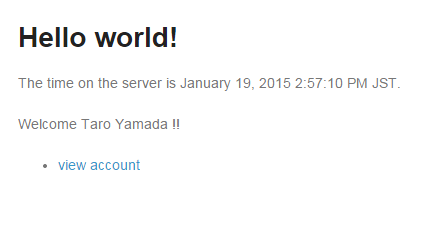
<p>Welcome ${f:h(account.firstName)} ${f:h(account.lastName)} !!</p>
<ul>
<li><a href="${pageContext.request.contextPath}/account">view account</a></li>
</ul>
</div>
</body>
</html>
| 項番 | 説明 |
|---|---|
(1)
|
チュートリアルでは、ログインユーザーの |
(2)
|
ログインユーザーのAccountオブジェクトにアクセスして、firstNameとlastNameを表示する。 |
ログインページのLoginボタンを押下し、ウェルカムページを表示する。
11.4.4.2.5. ログアウトボタンの追加
src/main/webapp/WEB-INF/views/welcome/home.jsp<!DOCTYPE html>
<html>
<head>
<meta charset="utf-8">
<title>Home</title>
<link rel="stylesheet" href="${pageContext.request.contextPath}/resources/app/css/styles.css">
</head>
<sec:authentication property="principal.account" var="account" />
<body>
<div id="wrapper">
<h1>Hello world!</h1>
<p>The time on the server is ${serverTime}.</p>
<p>Welcome ${f:h(account.firstName)} ${f:h(account.lastName)} !!</p>
<p>
<!-- (1) -->
<form:form action="${pageContext.request.contextPath}/logout">
<button type="submit">Logout</button>
</form:form>
</p>
<ul>
<li><a href="${pageContext.request.contextPath}/account">view account</a></li>
</ul>
</div>
</body>
</html>
| 項番 | 説明 |
|---|---|
(1)
|
|
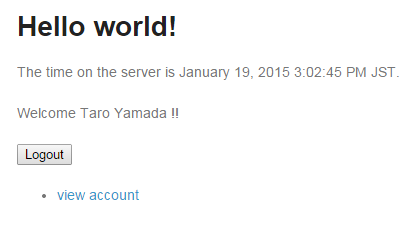
ウェルカムページにLogoutボタンが表示される。
ウェルカムページでLogoutボタンを押下すると、アプリケーションからログアウトする(ログインページが表示される)。
11.4.4.2.6. Controllerからログインユーザーのアカウント情報へアクセス
src/main/java/com/example/security/app/account/AccountController.javapackage com.example.security.app.account;
import org.springframework.security.core.annotation.AuthenticationPrincipal;
import org.springframework.stereotype.Controller;
import org.springframework.ui.Model;
import org.springframework.web.bind.annotation.GetMapping;
import org.springframework.web.bind.annotation.RequestMapping;
import com.example.security.domain.model.Account;
import com.example.security.domain.service.userdetails.SampleUserDetails;
@Controller
@RequestMapping("account")
public class AccountController {
@GetMapping
public String view(
@AuthenticationPrincipal SampleUserDetails userDetails, // (1)
Model model) {
// (2)
Account account = userDetails.getAccount();
model.addAttribute(account);
return "account/view";
}
}
| 項番 | 説明 |
|---|---|
(1)
|
@AuthenticationPrincipalアノテーションを指定して、ログインユーザーのUserDetailsオブジェクトを受け取る。 |
(2)
|
SampleUserDetailsオブジェクトが保持しているAccountオブジェクトを取得し、Viewに引き渡すためにModelに格納する。 |
src/main/webapp/WEB-INF/views/account/view.jsp<!DOCTYPE html>
<html>
<head>
<meta charset="utf-8">
<title>Home</title>
<link rel="stylesheet" href="${pageContext.request.contextPath}/resources/app/css/styles.css">
</head>
<body>
<div id="wrapper">
<h1>Account Information</h1>
<table>
<tr>
<th>Username</th>
<td>${f:h(account.username)}</td>
</tr>
<tr>
<th>First name</th>
<td>${f:h(account.firstName)}</td>
</tr>
<tr>
<th>Last name</th>
<td>${f:h(account.lastName)}</td>
</tr>
</table>
</div>
</body>
</html>
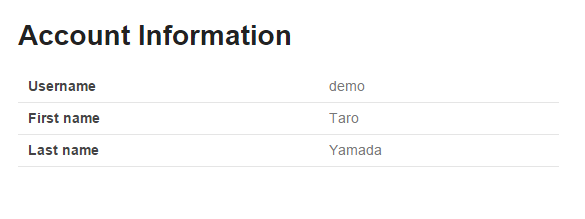
ウェルカムページのview accountリンクを押下して、ログインユーザーのアカウント情報表示ページを表示する。
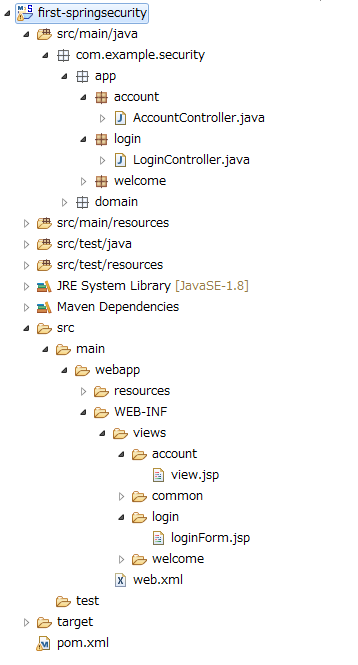
11.4.4.2.7. アプリケーション層の作成後のパッケージエクスプローラー
アプリケーション層に作成したファイルを確認する。
Package ExplorerのPackage PresentationはHierarchicalを使用している。
11.4.5. おわりに
本チュートリアルでは以下の内容を学習した。
- Spring Securityによる基本的な認証・認可
- 認証ユーザーオブジェクトのカスタマイズ方法
- RepositoryおよびServiceクラスを用いた認証処理の設定
- JSPでログイン済みアカウント情報にアクセスする方法
- Controllerでログイン済みアカウント情報にアクセスする方法
11.4.6. Appendix
11.4.6.1. 設定ファイルの解説
Spring Securityを利用するためにどのような設定が必要なのかを理解するために、設定ファイルの解説を行う。
11.4.6.1.1. spring-security.xml
spring-security.xmlには、Spring Securityに関する定義を行う。
作成したブランクプロジェクトのsrc/main/resources/META-INF/spring/spring-security.xmlは、以下のような設定となっている。
<?xml version="1.0" encoding="UTF-8"?>
<beans xmlns="http://www.springframework.org/schema/beans"
    xmlns:xsi="http://www.w3.org/2001/XMLSchema-instance"
    xmlns:sec="http://www.springframework.org/schema/security"
    xsi:schemaLocation="
        http://www.springframework.org/schema/security http://www.springframework.org/schema/security/spring-security.xsd
        http://www.springframework.org/schema/beans http://www.springframework.org/schema/beans/spring-beans.xsd
    ">

    <!-- (1) -->
    <sec:http pattern="/resources/**" security="none"/>
    <sec:http>
        <!-- (2) -->
        <sec:form-login/>
        <!-- (3) -->
        <sec:logout/>
        <!-- (4) -->
        <sec:access-denied-handler ref="accessDeniedHandler"/>
        <!-- (5) -->
        <sec:custom-filter ref="userIdMDCPutFilter" after="ANONYMOUS_FILTER"/>
        <!-- (6) -->
        <sec:session-management />
    </sec:http>

    <!-- (7) -->
    <sec:authentication-manager />

    <!-- (4) -->
    <!-- CSRF Protection -->
    <bean id="accessDeniedHandler"
        class="org.springframework.security.web.access.DelegatingAccessDeniedHandler">
        <constructor-arg index="0">
            <map>
                <entry
                    key="org.springframework.security.web.csrf.InvalidCsrfTokenException">
                    <bean
                        class="org.springframework.security.web.access.AccessDeniedHandlerImpl">
                        <property name="errorPage"
                            value="/WEB-INF/views/common/error/invalidCsrfTokenError.jsp" />
                    </bean>
                </entry>
                <entry
                    key="org.springframework.security.web.csrf.MissingCsrfTokenException">
                    <bean
                        class="org.springframework.security.web.access.AccessDeniedHandlerImpl">
                        <property name="errorPage"
                            value="/WEB-INF/views/common/error/missingCsrfTokenError.jsp" />
                    </bean>
                </entry>
            </map>
        </constructor-arg>
        <constructor-arg index="1">
            <bean
                class="org.springframework.security.web.access.AccessDeniedHandlerImpl">
                <property name="errorPage"
                    value="/WEB-INF/views/common/error/accessDeniedError.jsp" />
            </bean>
        </constructor-arg>
    </bean>

    <!-- (5) -->
    <!-- Put UserID into MDC -->
    <bean id="userIdMDCPutFilter" class="org.terasoluna.gfw.security.web.logging.UserIdMDCPutFilter">
    </bean>

</beans>
| 項番 | 説明 |
|---|---|
(1)
|
ブランクプロジェクトのデフォルトの設定では、静的リソース(js, css, imageファイルなど)にアクセスするためのURLを認証・認可の対象外にしている。 |
| (2) | <sec:form-login>タグを使用して、フォーム認証を使用したログインに関する動作を制御する。
使用方法については、「フォーム認証」 を参照されたい。 |
| (3) | <sec:logout>タグ を使用して、ログアウトに関する動作を制御する。
使用方法については、「ログアウト」 を参照されたい。 |
(4)
|
ブランクプロジェクトのデフォルトの設定では、
が設定済みである。 |
(5)
|
Spring Securityの認証ユーザ名をロガーのMDCに格納するためのサーブレットフィルタを有効化する。 この設定を有効化すると、ログに認証ユーザ名が出力されるため、トレーサビリティを向上することができる。 |
(6)
|
使用方法については、「セッション管理機能の適用」を参照されたい。 |
(7)
|
使用方法については、「DB認証の適用」を参照されたい。 |
11.4.6.1.2. spring-mvc.xml
spring-mvc.xmlには、Spring SecurityとSpring MVCを連携するための設定を行う。
作成したブランクプロジェクトのsrc/main/resources/META-INF/spring/spring-mvc.xmlは、以下のような設定となっている。
Spring Securityと関係のない設定については、説明を割愛する。
<?xml version="1.0" encoding="UTF-8"?>
<beans xmlns="http://www.springframework.org/schema/beans"
    xmlns:xsi="http://www.w3.org/2001/XMLSchema-instance"
    xmlns:context="http://www.springframework.org/schema/context"
    xmlns:mvc="http://www.springframework.org/schema/mvc"
    xmlns:util="http://www.springframework.org/schema/util"
    xmlns:aop="http://www.springframework.org/schema/aop"
    xsi:schemaLocation="http://www.springframework.org/schema/mvc http://www.springframework.org/schema/mvc/spring-mvc.xsd
        http://www.springframework.org/schema/beans http://www.springframework.org/schema/beans/spring-beans.xsd
        http://www.springframework.org/schema/util http://www.springframework.org/schema/util/spring-util.xsd
        http://www.springframework.org/schema/context http://www.springframework.org/schema/context/spring-context.xsd
        http://www.springframework.org/schema/aop http://www.springframework.org/schema/aop/spring-aop.xsd
    ">

    <context:property-placeholder
        location="classpath*:/META-INF/spring/*.properties" />

    <mvc:annotation-driven>
        <mvc:argument-resolvers>
            <bean
                class="org.springframework.data.web.PageableHandlerMethodArgumentResolver" />
            <!-- (1) -->
            <bean
                class="org.springframework.security.web.method.annotation.AuthenticationPrincipalArgumentResolver" />
        </mvc:argument-resolvers>
    </mvc:annotation-driven>

    <mvc:default-servlet-handler />

    <context:component-scan base-package="com.example.security.app" />

    <mvc:resources mapping="/resources/**"
        location="/resources/,classpath:META-INF/resources/"
        cache-period="#{60 * 60}" />

    <mvc:interceptors>
        <mvc:interceptor>
            <mvc:mapping path="/**" />
            <mvc:exclude-mapping path="/resources/**" />
            <bean
                class="org.terasoluna.gfw.web.logging.TraceLoggingInterceptor" />
        </mvc:interceptor>
        <mvc:interceptor>
            <mvc:mapping path="/**" />
            <mvc:exclude-mapping path="/resources/**" />
            <bean
                class="org.terasoluna.gfw.web.token.transaction.TransactionTokenInterceptor" />
        </mvc:interceptor>
        <mvc:interceptor>
            <mvc:mapping path="/**" />
            <mvc:exclude-mapping path="/resources/**" />
            <bean class="org.terasoluna.gfw.web.codelist.CodeListInterceptor">
                <property name="codeListIdPattern" value="CL_.+" />
            </bean>
        </mvc:interceptor>
        <!--  REMOVE THIS LINE IF YOU USE JPA
        <mvc:interceptor>
            <mvc:mapping path="/**" />
            <mvc:exclude-mapping path="/resources/**" />
            <bean
                class="org.springframework.orm.jpa.support.OpenEntityManagerInViewInterceptor" />
        </mvc:interceptor>
            REMOVE THIS LINE IF YOU USE JPA  -->
    </mvc:interceptors>

    <!-- Settings View Resolver. -->
    <mvc:view-resolvers>
        <mvc:jsp prefix="/WEB-INF/views/" />
    </mvc:view-resolvers>

    <bean id="requestDataValueProcessor"
        class="org.terasoluna.gfw.web.mvc.support.CompositeRequestDataValueProcessor">
        <constructor-arg>
            <util:list>
                <!-- (2) -->
                <bean
                    class="org.springframework.security.web.servlet.support.csrf.CsrfRequestDataValueProcessor" />
                <bean
                    class="org.terasoluna.gfw.web.token.transaction.TransactionTokenRequestDataValueProcessor" />
            </util:list>
        </constructor-arg>
    </bean>

    <!-- Setting Exception Handling. -->
    <!-- Exception Resolver. -->
    <bean id="systemExceptionResolver"
        class="org.terasoluna.gfw.web.exception.SystemExceptionResolver">
        <property name="exceptionCodeResolver" ref="exceptionCodeResolver" />
        <!-- Setting and Customization by project. -->
        <property name="order" value="3" />
        <property name="exceptionMappings">
            <map>
                <entry key="ResourceNotFoundException" value="common/error/resourceNotFoundError" />
                <entry key="BusinessException" value="common/error/businessError" />
                <entry key="InvalidTransactionTokenException" value="common/error/transactionTokenError" />
                <entry key=".DataAccessException" value="common/error/dataAccessError" />
            </map>
        </property>
        <property name="statusCodes">
            <map>
                <entry key="common/error/resourceNotFoundError" value="404" />
                <entry key="common/error/businessError" value="409" />
                <entry key="common/error/transactionTokenError" value="409" />
                <entry key="common/error/dataAccessError" value="500" />
            </map>
        </property>
        <property name="excludedExceptions">
            <array>
                <value>org.springframework.web.util.NestedServletException</value>
            </array>
        </property>
        <property name="defaultErrorView" value="common/error/systemError" />
        <property name="defaultStatusCode" value="500" />
    </bean>
    <!-- Setting AOP. -->
    <bean id="handlerExceptionResolverLoggingInterceptor"
        class="org.terasoluna.gfw.web.exception.HandlerExceptionResolverLoggingInterceptor">
        <property name="exceptionLogger" ref="exceptionLogger" />
    </bean>
    <aop:config>
        <aop:advisor advice-ref="handlerExceptionResolverLoggingInterceptor"
            pointcut="execution(* org.springframework.web.servlet.HandlerExceptionResolver.resolveException(..))" />
    </aop:config>

</beans>
| 項番 | 説明 |
|---|---|
(1)
|
|
(2)
|
|
