9.2. 認証
目次
- Overview
- How to use
- How to extend
- Appendix
9.2.1. Overview
本節では、Spring Securityが提供している認証機能について説明する。
認証処理は、アプリケーションを利用するユーザーの正当性を確認するための処理である。
ユーザーの正当性を確認するためのもっとも標準的な方法は、アプリケーションを使用できるユーザーをデータストアに登録しておき、 利用者が入力した認証情報(ユーザー名とパスワードなど)と照合する方法である。 ユーザーの情報を登録しておくデータストアにはリレーショナルデータベースを利用するのが一般的だが、ディレクトリサービスや外部システムなどを利用するケースもある。
また、利用者に認証情報を入力してもらう方式もいくつか存在する。 HTMLの入力フォームを使う方式やRFCで定められているHTTP標準の認証方式(Basic認証やDigest認証など)を利用するのが一般的だが、 OpenID認証やシングルサインオン認証などの認証方式を利用するケースもある。
本節では、HTMLの入力フォームで入力した認証情報とリレーショナルデータベースに格納されているユーザー情報を照合して認証処理を行う実装例を紹介しながら、 Spring Securityの認証機能の使い方を説明する。
9.2.1.1. 認証処理のアーキテクチャ
Spring Securityは、以下のような流れで認証処理を行う。
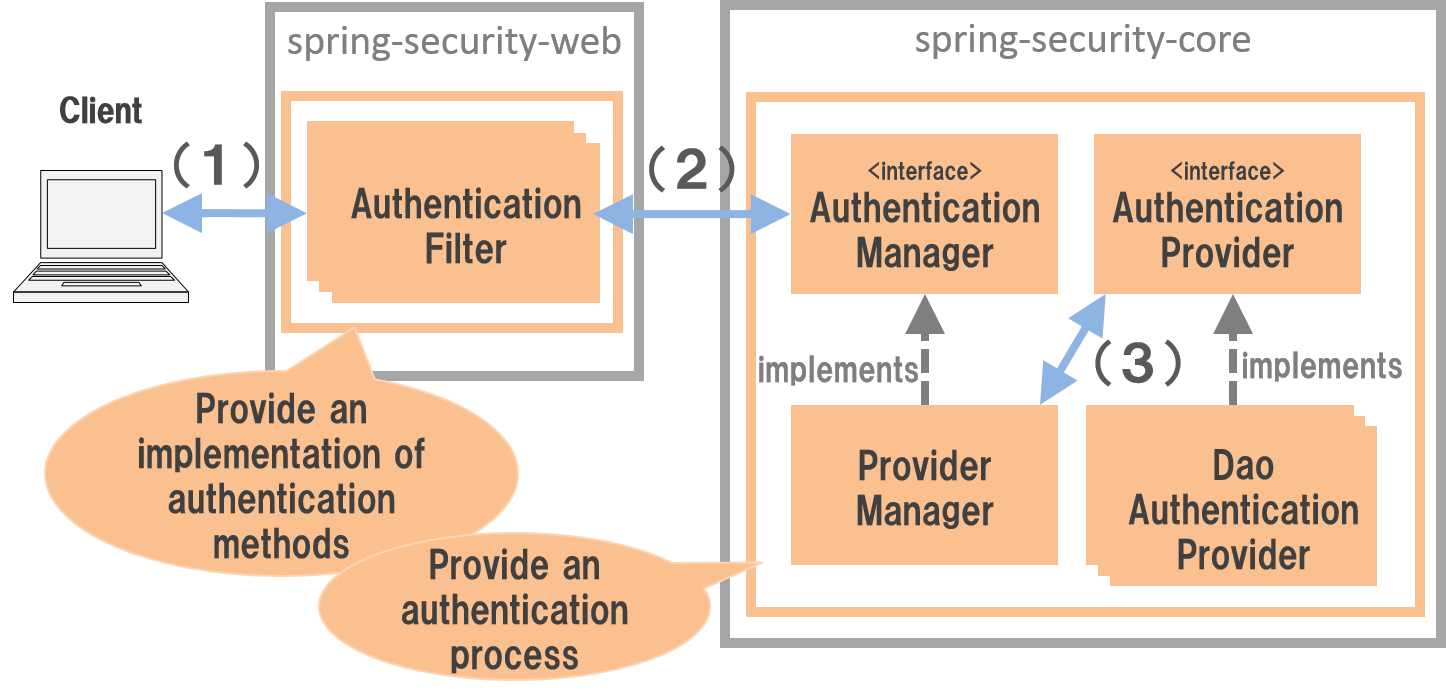
認証処理のアーキテクチャ
| 項番 | 説明 |
|---|---|
(1)
|
クライアントは、認証処理を行うパスに対して資格情報(ユーザー名とパスワード)を指定してリクエストを送信する。
|
(2)
|
Authentication Filterは、リクエストから資格情報を取得して、
AuthenticationManagerクラスの認証処理を呼び出す。 |
(3)
|
ProviderManager(デフォルトで使用されるAuthenticationManagerの実装クラス)は、実際の認証処理をAuthenticationProviderインタフェースの実装クラスに委譲する。 |
9.2.1.1.1. Authentication Filter
Authentication Filterは、認証方式に対する実装を提供するサーブレットフィルタである。 Spring Securityがサポートしている主な認証方式は以下の通り。
| クラス名 | 説明 |
|---|---|
UsernamePasswordAuthenticationFilter |
フォーム認証用のサーブレットフィルタクラスで、HTTPリクエストのパラメータから資格情報を取得する。
|
BasicAuthenticationFilter |
Basic認証用のサーブレットフィルタクラスで、HTTPリクエストの認証ヘッダから資格情報を取得する。
|
DigestAuthenticationFilter |
Digest認証用のサーブレットフィルタクラスで、HTTPリクエストの認証ヘッダから資格情報を取得する。
|
RememberMeAuthenticationFilter |
Remember Me認証用のサーブレットフィルタクラスで、HTTPリクエストのCookieから資格情報を取得する。
Remember Me認証を有効にすると、ブラウザを閉じたりセッションタイムアウトが発生しても、ログイン状態を保つことができる。
|
これらのサーブレットフィルタは、 フレームワーク処理で紹介したAuthentication Filterの1つである。
Note
Spring Securityによってサポートされていない認証方式を実現する必要がある場合は、
認証方式を実現するためのAuthentication Filterを作成し、Spring Securityに組み込むことで実現することが可能である。
9.2.1.1.2. AuthenticationManager
AuthenticationManagerは、認証処理を実行するためのインタフェースである。
Spring Securityが提供するデフォルト実装(ProviderManager)では、
実際の認証処理はAuthenticationProviderに委譲し、AuthenticationProviderで行われた認証処理の処理結果をハンドリングする仕組みになっている。
9.2.1.1.3. AuthenticationProvider
AuthenticationProviderは、認証処理の実装を提供するためのインタフェースである。
Spring Securityが提供している主なAuthenticationProviderの実装クラスは以下の通り。
| クラス名 | 説明 |
|---|---|
DaoAuthenticationProvider |
データストアに登録しているユーザーの資格情報とユーザーの状態をチェックして認証処理を行う実装クラス。
チェックで必要となる資格情報とユーザーの状態は
UserDetailsというインタフェースを実装しているクラスから取得する。 |
Note
Spring Securityが提供していない認証処理を実現する必要がある場合は、
認証処理を実現するためのAuthenticationProviderを作成し、Spring Securityに組み込むことで実現することが可能である。
9.2.2. How to use
認証機能を使用するために必要となるbean定義例や実装方法について説明する。
本項では Overviewで説明したとおり、 HTMLの入力フォームで入力した認証情報とリレーショナルデータベースに格納されているユーザー情報を照合して認証処理を行う方法について説明する。
9.2.2.1. フォーム認証
Spring Securityは、以下のような流れでフォーム認証を行う。
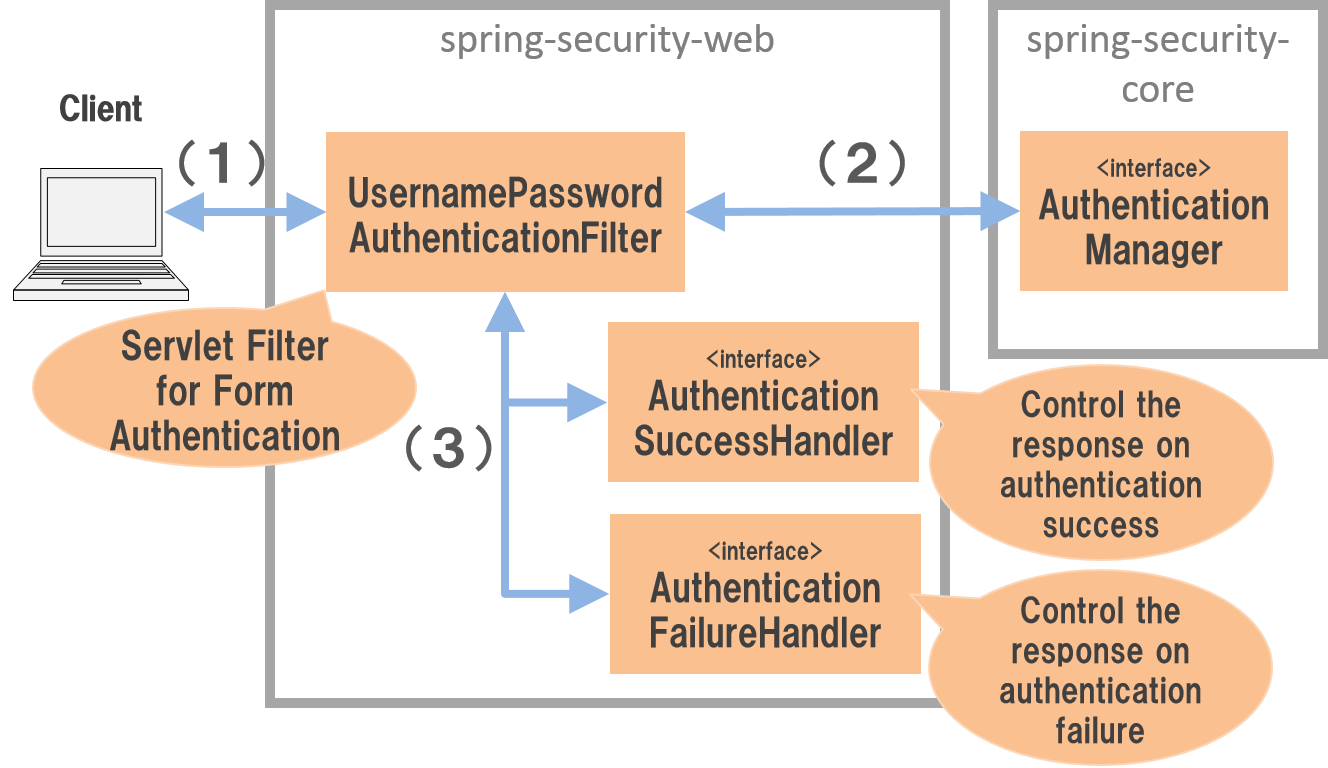
フォーム認証の仕組み
| 項番 | 説明 |
|---|---|
(1)
|
クライアントは、フォーム認証を行うパスに対して資格情報(ユーザー名とパスワード)をリクエストパラメータとして送信する。
|
(2)
|
UsernamePasswordAuthenticationFilterクラスは、リクエストパラメータから資格情報を取得して、AuthenticationManagerの認証処理を呼び出す。 |
(3)
|
UsernamePasswordAuthenticationFilterクラスは、AuthenticationManagerから返却された認証結果をハンドリングする。認証処理が成功した場合は
AuthenticationSuccessHandlerのメソッドを呼び出し、認証処理が失敗した場合はAuthenticationFailureHandlerのメソッドを呼び出し、画面遷移を行う。 |
9.2.2.1.1. フォーム認証の適用
フォーム認証を使用する場合は、以下のようなbean定義を行う。
- spring-security.xmlの定義例
<sec:http>
    <sec:form-login />    <!-- (1) -->
    <!-- omitted -->
</sec:http>
| 項番 | 説明 |
|---|---|
(1)
|
<sec:form-login>タグを定義することで、フォーム認証が有効になる。 |
Tip
auto-config属性について
<sec:http>には、フォーム認証(<sec:form-login>タグ)、Basic認証(<sec:http-basic>タグ)、ログアウト(<sec:logout>タグ)に対するコンフィギュレーションを自動で行うか否かを指定するauto-config属性が用意されている。
デフォルト値はfalse(自動でコンフィギュレーションしない)となっており、Spring Securityのリファレンスドキュメントでもデフォルト値の使用が推奨されている。
本ガイドラインでも、明示的にタグを指定するスタイルを推奨する。
要素名 説明 <form-login>UsernamePasswordAuthenticationFilter)が適用される。<http-basic>BasicAuthenticationFilter)が適用される。詳細な利用方法は、BasicAuthenticationFilterのJavaDocを参照されたい。<logout>LogoutFilter)が適用される。ログアウト処理の詳細については、「ログアウト」を参照されたい。
なお、 auto-configを定義しない場合は、フォーム認証(<sec:form-login>タグ)、もしくはBasic認証(<sec:http-basic>タグ)を定義する必要がある。
これは、ひとつのSecurityFilterChain(<sec:http>)内には、ひとつ以上のAuthentication FilterのBean定義が必要であるという、Spring Securityの仕様をみたすためである。
9.2.2.1.2. デフォルトの動作
Spring Securityのデフォルトの動作では、/loginに対してGETメソッドでアクセスするとSpring Securityが用意しているデフォルトのログインフォームが表示され、
ログインボタンを押下すると/loginに対してPOSTメソッドでアクセスして認証処理を行う。
9.2.2.1.3. ログインフォームの作成
Spring Securityはフォーム認証用のログインフォームをデフォルトで提供しているが、そのまま利用するケースは少ない。 ここでは、自身で作成したログインフォームをSpring Securityに適用する方法を説明する。
まず、ログインフォームを表示するためのJSPを作成する。 ここでは、Spring MVCでリクエストをうけてログインフォームを表示する際の実装例になっている。
- ログインフォームを表示するためのJSPの作成例(xxx-web/src/main/webapp/WEB-INF/views/login/loginForm.jsp)
<%@ page contentType="text/html;charset=UTF-8" pageEncoding="UTF-8" %>
<%@ taglib prefix="c" uri="http://java.sun.com/jsp/jstl/core" %>
<%@ taglib prefix="sec" uri="http://www.springframework.org/security/tags" %>
<%-- omitted --%>
<div id="wrapper">
<h3>Login Screen</h3>
<%-- (1) --%>
<c:if test="${param.containsKey('error')}">
<t:messagesPanel messagesType="error"
messagesAttributeName="SPRING_SECURITY_LAST_EXCEPTION"/> <%-- (2) --%>
</c:if>
<form:form action="${pageContext.request.contextPath}/login" method="post"> <%-- (3) --%>
<table>
<tr>
<td><label for="username">User Name</label></td>
<td><input type="text" id="username" name="username"></td>
</tr>
<tr>
<td><label for="password">Password</label></td>
<td><input type="password" id="password" name="password"></td>
</tr>
<tr>
<td> </td>
<td><button>Login</button></td>
</tr>
</table>
</form:form>
</div>
<%-- omitted --%>
| 項番 | 説明 |
|---|---|
(1)
|
認証エラーを表示するためのエリア。
|
(2)
|
認証エラー時に出力させる例外メッセージを出力する。
共通ライブラリで提供している
<t:messagesPanel>タグを使用して出力することを推奨する。<t:messagesPanel>タグの使用方法については、「メッセージ管理」を参照されたい。なお、認証エラーが発生した場合は、セッション又はリクエストスコープに
SPRING_SECURITY_LAST_EXCEPTIONという属性名で例外オブジェクトが格納される。 |
(3)
|
ユーザー名とパスワードを入力するためのログインフォーム。
ここではユーザー名を
username、パスワードをpassowrdというリクエストパラメータで送信する。また、
<form:form>を使用することで、CSRF対策用のトークン値がリクエストパラメータで送信される。CSRF対策については、「CSRF対策」で説明する。
|
つぎに、作成したログインフォームをSpring Securityに適用する。
- spring-security.xmlの定義例
<sec:http>
    <sec:form-login
        login-page="/login/loginForm"
        login-processing-url="/login"  /> <!-- (1)(2) -->
    <sec:intercept-url pattern="/login/**" access="permitAll"/>  <!-- (3) -->
    <sec:intercept-url pattern="/**" access="isAuthenticated()"/> <!-- (4) -->
</sec:http>
| 項番 | 説明 |
|---|---|
(1)
|
login-page属性にログインフォームを表示するためのパスを指定する。匿名ユーザーが認証を必要とするWebリソースにアクセスした場合は、この属性に指定したパスにリダイレクトしてログインフォームを表示する。
ここでは、Spring MVCでリクエストを受けてログインフォームを表示している。
詳細は 「Spring MVCでリクエストを受けてログインフォームを表示する」を参照されたい。
|
(2)
|
login-processing-url属性に認証処理を行うためのパスを指定する。デフォルトのパスも
/loginであるが、ここでは明示的に指定することとする。 |
(3)
|
ログインフォームが格納されている
/loginパス配下に対し、すべてのユーザーがアクセスできる権限を付与する。Webリソースに対してアクセスポリシーの指定方法については、「認可」を参照されたい。
|
(4)
|
アプリケーションで扱うWebリソースに対してアクセス権を付与する。
上記例では、Webアプリケーションのルートパスの配下に対して、認証済みユーザーのみがアクセスできる権限を付与している。
Webリソースに対してアクセスポリシーの指定方法については、「認可」を参照されたい。
|
Note
Spring Security 4.0における変更
Spring Security 4.0から、以下の設定のデフォルト値が変更されている
- username-parameter
- password-parameter
- login-processing-url
- authentication-failure-url
9.2.2.2. 認証成功時のレスポンス
Spring Securityは、認証成功時のレスポンスを制御するためのコンポーネントとして、
AuthenticationSuccessHandlerというインタフェースと実装クラスを提供している。
| 実装クラス | 説明 |
|---|---|
SavedRequestAwareAuthenticationSuccessHandler |
認証前にアクセスを試みたURLにリダイレクトを行う実装クラス。
デフォルトで使用される実装クラス。
|
SimpleUrlAuthenticationSuccessHandler |
defaultTargetUrlにリダイレクト又はフォワードを行う実装クラス。 |
9.2.2.2.1. デフォルトの動作
Spring Securityのデフォルトの動作では、認証前にアクセスを拒否したリクエストをHTTPセッションに保存しておいて、
認証が成功した際にアクセスを拒否したリクエストを復元してリダイレクトする。
認証したユーザーにリダイレクト先へのアクセス権があればページが表示され、アクセス権がなければ認可エラーとなる。
この動作を実現するために使用されるのが、SavedRequestAwareAuthenticationSuccessHandlerクラスである。
ログインフォームを明示的に表示してから認証処理を行った後の遷移先は、Spring Securityのデフォルトの設定では
Webアプリケーションのルートパス(“/” )となっているため、認証成功時はWebアプリケーションのルートパスにリダイレクトされる。
9.2.2.3. 認証失敗時のレスポンス
Spring Securityは、認証失敗時のレスポンスを制御するためのコンポーネントとして、
AuthenticationFailureHandlerというインタフェースと実装クラスを提供している。
| 実装クラス | 説明 |
|---|---|
SimpleUrlAuthenticationFailureHandler |
指定したパス(
defaultFailureUrl)にリダイレクト又はフォワードを行う実装クラス。 |
ExceptionMappingAuthenticationFailureHandler |
認証例外と遷移先のURLをマッピングすることができる実装クラス。
Spring Securityはエラー原因毎に発生する例外クラスが異なるため、この実装クラスを使用するとエラーの種類毎に遷移先を切り替えることが可能である。
|
DelegatingAuthenticationFailureHandler |
認証例外と
AuthenticationFailureHandlerをマッピングすることができる実装クラス。ExceptionMappingAuthenticationFailureHandlerと似ているが、認証例外毎にAuthenticationFailureHandlerを指定できるので、より柔軟な振る舞いをサポートすることができる。 |
9.2.2.3.1. デフォルトの動作
Spring Securityのデフォルトの動作では、ログインフォームを表示するためのパスにerrorというクエリパラメータが付与されたURLにリダイレクトする。
例として、ログインフォームを表示するためのパスが/loginの場合は/login?errorにリダイレクトされる。
9.2.2.4. DB認証
Spring Securityは、以下のような流れでDB認証を行う。
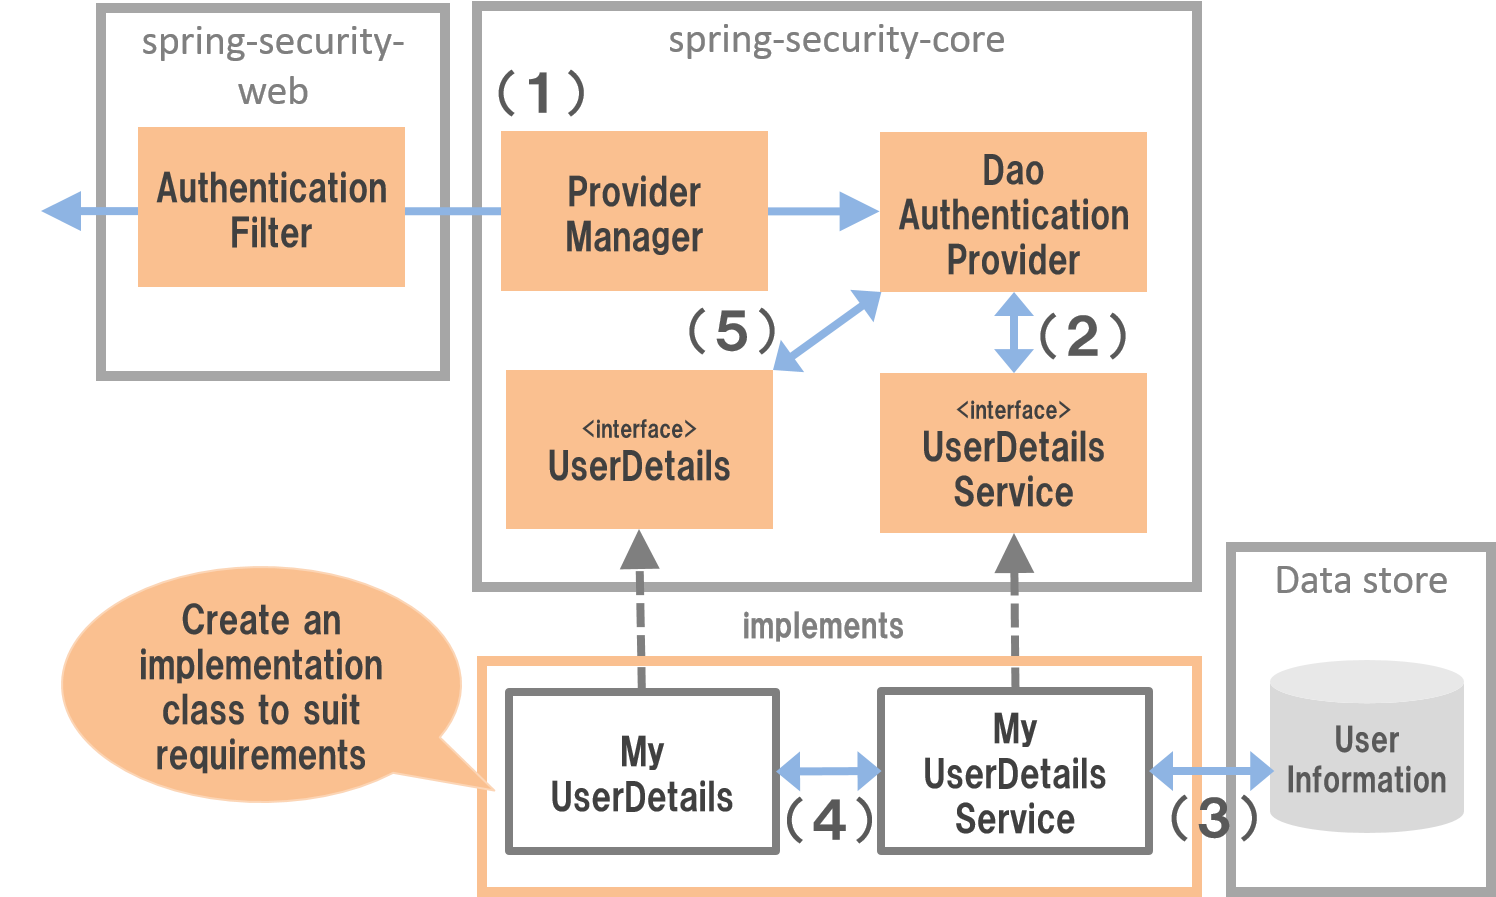
DB認証の仕組み
| 項番 | 説明 |
|---|---|
(1)
|
Spring Securityはクライアントからの認証依頼を受け、
DaoAuthenticationProviderの認証処理を呼び出す。 |
(2)
|
DaoAuthenticationProviderは、UserDetailsServiceのユーザー情報取得処理を呼び出す。 |
(3)
|
UserDetailsServiceの実装クラスは、データストアからユーザー情報を取得する。 |
(4)
|
UserDetailsServiceの実装クラスは、データストアから取得したユーザー情報からUserDetailsを生成する。 |
(5)
|
DaoAuthenticationProviderは、UserDetailsServiceから返却されたUserDetailsとクライアントが指定した認証情報との照合を行い、クライアントが指定したユーザーの正当性をチェックする。 |
Note
Spring Securityが提供するDB認証
Spring Securityは、ユーザー情報をリレーショナルデータベースからJDBC経由で取得するための実装クラスを提供している。
org.springframework.security.core.userdetails.User(UserDetailsの実装クラス)org.springframework.security.core.userdetails.jdbc.JdbcDaoImpl(UserDetailsServiceの実装クラス)
これらの実装クラスは最低限の認証処理(パスワードの照合、有効ユーザーの判定)しか行わないため、そのまま利用できるケースは少ない。
そのため、本ガイドラインでは、UserDetailsとUserDetailsServiceの実装クラスを作成する方法について説明する。
9.2.2.4.1. UserDetailsの作成
UserDetailsは、認証処理で必要となる資格情報(ユーザー名とパスワード)とユーザーの状態を提供するためのインタフェースで、以下のメソッドが定義されている。
AuthenticationProviderとしてDaoAuthenticationProviderを使用する場合は、アプリケーションの要件に合わせてUserDetailsの実装クラスを作成する。
UserDetailsインタフェース
public interface UserDetails extends Serializable {
    String getUsername(); // (1)
    String getPassword(); // (2)
    boolean isEnabled(); // (3)
    boolean isAccountNonLocked(); // (4)
    boolean isAccountNonExpired(); // (5)
    boolean isCredentialsNonExpired(); // (6)
    Collection<? extends GrantedAuthority> getAuthorities(); // (7)
}
| 項番 | メソッド名 | 説明 |
|---|---|---|
(1)
|
getUsername |
ユーザー名を返却する。
|
(2)
|
getPassword |
登録されているパスワードを返却する。
このメソッドで返却したパスワードとクライアントから指定されたパスワードが一致しない場合は、
DaoAuthenticationProviderはBadCredentialsExceptionを発生させる。 |
(3)
|
isEnabled |
有効なユーザーかを判定する。有効な場合は
trueを返却する。無効なユーザーの場合は、
DaoAuthenticationProviderはDisabledExceptionを発生させる。 |
(4)
|
isAccountNonLocked |
アカウントのロック状態を判定する。ロックされていない場合は
trueを返却する。アカウントがロックされている場合は、
DaoAuthenticationProviderはLockedExceptionを発生させる。 |
(5)
|
isAccountNonExpired |
アカウントの有効期限の状態を判定する。有効期限内の場合は
trueを返却する。有効期限切れの場合は、
DaoAuthenticationProviderはAccountExpiredExceptionを発生させる。 |
(6)
|
isCredentialsNonExpired |
資格情報の有効期限の状態を判定する。有効期限内の場合は
trueを返却する。有効期限切れの場合は、
DaoAuthenticationProviderはCredentialsExpiredExceptionを発生させる。 |
(7)
|
getAuthorities |
ユーザーに与えられている権限リストを返却する。
このメソッドは認可処理で使用される。
|
Note
認証例外による遷移先の切り替え
DaoAuthenticationProviderが発生させる例外毎に画面遷移を切り替えたい場合は、
AuthenticationFailureHandlerとしてExceptionMappingAuthenticationFailureHandlerを使用すると実現することができる。
例として、ユーザーのパスワードの有効期限が切れた際にパスワード変更画面に遷移させたい場合は、
ExceptionMappingAuthenticationFailureHandlerを使ってCredentialsExpiredExceptionをハンドリングすると画面遷移を切り替えることができる。
詳細は、認証失敗時のレスポンスのカスタマイズを参照されたい。
Note
Spring Securityが提供する資格情報
Spring Securityは、資格情報(ユーザー名とパスワード)とユーザーの状態を保持するための実装クラス(org.springframework.security.core.userdetails.User)を提供しているが、
このクラスは認証処理に必要な情報しか保持することができない。
一般的なアプリケーションでは、認証処理で使用しないユーザーの情報(ユーザーの氏名など)も必要になるケースが多いため、Userクラスをそのまま利用できるケースは少ない。
ここでは、アカウントの情報を保持するUserDetailsの実装クラスを作成する。
本例はUserを継承することでも実現することができるが、UserDetails を実装する方法の例として紹介している。
- UserDetailsの実装クラスの作成例
public class AccountUserDetails implements UserDetails { // (1)

    private final Account account;
    private final Collection<GrantedAuthority> authorities;

    public AccountUserDetails(
        Account account, Collection<GrantedAuthority> authorities) {
        // (2)
        this.account = account;
        this.authorities = authorities;
    }

    // (3)
    public String getPassword() {
        return account.getPassword();
    }
    public String getUsername() {
        return account.getUsername();
    }
    public boolean isEnabled() {
        return account.isEnabled();
    }
    public Collection<GrantedAuthority> getAuthorities() {
        return authorities;
    }

    // (4)
    public boolean isAccountNonExpired() {
        return true;
    }
    public boolean isAccountNonLocked() {
        return true;
    }
    public boolean isCredentialsNonExpired() {
        return true;
    }

    // (5)
    public Account getAccount() {
        return account;
    }

}
| 項番 | 説明 |
|---|---|
(1)
|
UserDetailsインタフェースを実装したクラスを作成する。 |
(2)
|
ユーザー情報と権限情報をプロパティに保持する。
|
(3)
|
UserDetailsインタフェースに定義されているメソッドを実装する。 |
(4)
|
本節の例では、「アカウントのロック」「アカウントの有効期限切れ」「資格情報の有効期限切れ」に対するチェックは未実装であるが、要件に合わせて実装されたい。
|
(5)
|
認証処理成功後の処理でアカウント情報にアクセスできるようにするために、getterメソッドを用意する。
|
Spring Securityは、UserDetailsの実装クラスとしてUserクラスを提供している。
Userクラスを継承すると資格情報とユーザーの状態を簡単に保持することができる。
- Userクラスを継承したUserDetails実装クラスの作成例
public class AccountUserDetails extends User {

    private final Account account;

    public AccountUserDetails(Account account, boolean accountNonExpired,
            boolean credentialsNonExpired, boolean accountNonLocked,
            Collection<GrantedAuthority> authorities) {
        super(account.getUsername(), account.getPassword(),
                account.isEnabled(), true, true, true, authorities);
        this.account = account;
    }

    public Account getAccount() {
        return account;
    }
}
9.2.2.4.2. UserDetailsServiceの作成
UserDetailsServiceは、認証処理で必要となる資格情報とユーザーの状態をデータストア
から取得するためのインタフェースで、以下のメソッドが定義されている。
AuthenticationProviderとしてDaoAuthenticationProviderを使用する場合は、
アプリケーションの要件に合わせてUserDetailsServiceの実装クラスを作成する。
- UserDetailsServiceインタフェース
public interface UserDetailsService {
    UserDetails loadUserByUsername(String username) throws UsernameNotFoundException;
}
ここでは、データベースからアカウント情報を検索して、UserDetailsのインスタンス
を生成するためのサービスクラスを作成する。
本サンプルでは、SharedServiceを使用して、アカウント情報を取得している。
SharedServiceについては、Serviceの実装を参照されたい。
- AccountSharedServiceインタフェースの作成例
public interface AccountSharedService {
    Account findOne(String username);
}
- AccountSharedServiceの実装クラスの作成例
// (1)
@Service
@Transactional
public class AccountSharedServiceImpl implements AccountSharedService {
    @Inject
    AccountRepository accountRepository;

    // (2)
    @Override
    public Account findOne(String username) {
        Account account = accountRepository.findOneByUsername(username);
        if (account == null) {
            throw new ResourceNotFoundException("The given account is not found! username="
                    + username);
        }
        return account;
    }
}
| 項番 | 説明 |
|---|---|
(1)
|
AccountSharedServiceインタフェースを実装したクラスを作成し、@Serviceを付与する。上記例では、コンポーネントスキャン機能を使って
AccountSharedServiceImplをDIコンテナに登録している。 |
(2)
|
データベースからアカウント情報を検索する。
アカウント情報が見つからない場合は、共通ライブラリの例外である
ResourceNotFoundExceptionを発生させる。Repositoryの作成例については、「Spring Securityチュートリアル」を参照されたい。
|
- UserDetailsServiceの実装クラスの作成例
// (1)
@Service
@Transactional
public class AccountUserDetailsService implements UserDetailsService {
    @Inject
    AccountSharedService accountSharedService;

    public UserDetails loadUserByUsername(String username)
            throws UsernameNotFoundException {

        try {
            Account account = accountSharedService.findOne(username);
            // (2)
            return new AccountUserDetails(account, getAuthorities(account));
        } catch (ResourceNotFoundException e) {
            // (3)
            throw new UsernameNotFoundException("user not found", e);
        }
    }

    // (4)
    private Collection<GrantedAuthority> getAuthorities(Account account) {
        if (account.isAdmin()) {
            return AuthorityUtils.createAuthorityList("ROLE_USER", "ROLE_ADMIN");
        } else {
            return AuthorityUtils.createAuthorityList("ROLE_USER");
        }
    }
}
| 項番 | 説明 |
|---|---|
(1)
|
UserDetailsServiceインタフェースを実装したクラスを作成し、@Serviceを付与する。上記例では、コンポーネントスキャン機能を使って
UserDetailsServiceをDIコンテナに登録している。 |
(2)
|
AccountSharedServiceを使用してアカウント情報を取得する。アカウント情報が見つかった場合は、
UserDetailsを生成する。上記例では、ユーザー名、パスワード、ユーザーの有効状態をアカウント情報から取得している。
|
(3)
|
アカウント情報が見つからない場合は、
UsernameNotFoundExceptionを発生させる。 |
(4)
|
ユーザーが保持する権限(ロール)情報を生成する。ここで生成した権限(ロール)情報は、認可処理で使用される。
|
Note
認可で使用する権限情報
Spring Securityの認可処理は、ROLE_で始まる権限情報をロールとして扱う。
そのため、ロールを使用してリソースへのアクセス制御を行う場合は、 ロールとして扱う権限情報にROLE_プレフィックスを付与する必要がある。
Note
認証例外情報の隠蔽
Spring Securityのデフォルトの動作では、UsernameNotFoundExceptionはBadCredentialsExceptionという例外に変換してからエラー処理を行う。
BadCredentialsExceptionは、クライアントから指定された資格情報のいずれかの項目に誤りがあることを通知するための例外であり、具体的なエラー理由がクライアントに通知されることはない。
9.2.2.4.3. DB認証の適用
作成したUserDetailsServiceを使用して認証処理を行うためには、
DaoAuthenticationProviderを有効化して、作成したUserDetailsServiceを適用する必要がある。
- spring-security.xmlの定義例
<sec:authentication-manager> <!-- (1) -->
    <sec:authentication-provider user-service-ref="accountUserDetailsService"> <!-- (2) -->
        <sec:password-encoder ref="passwordEncoder" /> <!-- (3) -->
    </sec:authentication-provider>
</sec:authentication-manager>

<bean id="passwordEncoder"
    class="org.springframework.security.crypto.bcrypt.BCryptPasswordEncoder" /> <!-- (4) -->
| 項番 | 説明 |
|---|---|
(1)
|
AuthenticationManagerをbean定義する。 |
(2)
|
<sec:authentication-manager>要素内に <sec:authentication-provider>要素を定義する。本定義により、デフォルト設定の
DaoAuthenticationProviderが有効になる。 |
(3)
|
パスワード照合時に使用する
PasswordEncoderのbeanを指定する。 |
(4)
|
パスワード照合時に使用する
PasswordEncoderをBean定義する。上記例では、パスワードをBCryptアルゴリズムでハッシュ化する
BCryptPasswordEncoderを定義している。パスワードのハッシュ化については、「パスワードのハッシュ化」を参照されたい。
|
9.2.2.5. パスワードのハッシュ化
パスワードをデータベースなどに保存する場合は、パスワードそのものではなくパスワードの ハッシュ値を保存するのが一般的である。
Spring Securityは、パスワードをハッシュ化するためのインタフェースと実装クラスを 提供しており、認証機能と連携して動作する。
Spring Securityが提供するインタフェースには、以下の2種類がある。
org.springframework.security.crypto.password.PasswordEncoderorg.springframework.security.authentication.encoding.PasswordEncoder
どちらもPasswordEncoderという名前のインタフェースであるが、
org.springframework.security.authentication.encodingパッケージのPasswordEncoderは非推奨になっている。
パスワードのハッシュ化要件に制約がない場合は、org.springframework.security.crypto.passwordパッケージのPasswordEncoderインタフェースの実装クラスを使用することを推奨する。
Note
非推奨のPasswordEncoderの利用方法については、
「非推奨パッケージのPasswordEncoderの利用」を参照されたい。
org.springframework.security.crypto.password.PasswordEncoderのメソッド定義
public interface PasswordEncoder {
    String encode(CharSequence rawPassword);
    boolean matches(CharSequence rawPassword, String encodedPassword);
}
| メソッド名 | 説明 |
|---|---|
encode |
パスワードをハッシュ化するためのメソッド。
アカウントの登録処理やパスワード変更処理などでデータストアに保存するパスワードをハッシュ化する際に使用できる。
|
matches |
平文のパスワードとハッシュ化されたパスワードを照合するためのメソッド。
このメソッドはSpring Securityの認証処理でも利用されるが、パスワード変更処理などで現在のパスワードや過去に使用していたパスワードと照合する際にも使用できる。
|
Spring Securityは、PasswordEncoderインタフェースの実装クラスとして、以下の5クラスを提供している。
| 実装クラス | 説明 |
|---|---|
BCryptPasswordEncoder |
BCryptアルゴリズムを使用してパスワードのハッシュ化及び照合を行う実装クラス。
詳細は、BCryptPasswordEncoderのJavaDocを参照されたい。
|
StandardPasswordEncoder |
SHA-256アルゴリズムを使用してパスワードのハッシュ化及び照合を行う実装クラス。
詳細は、StandardPasswordEncoderのJavaDocを参照されたい。
|
NoOpPasswordEncoder |
ハッシュ化しない実装クラス。
テスト用のクラスであり、実際のアプリケーションで使用することはない。
|
Pbkdf2PasswordEncoder |
PBKDF2アルゴリズムを使用してパスワードのハッシュ化及び照合を行う実装クラス。
Pbkdf2PasswordEncoderはSpring Security 4.1から追加されたクラスである。詳細は、Pbkdf2PasswordEncoderのJavaDocを参照されたい。
|
SCryptPasswordEncoder |
SCryptアルゴリズムを使用してパスワードのハッシュ化及び照合を行う実装クラス。
SCryptPasswordEncoderはSpring Security 4.1から追加されたクラスである。詳細は、SCryptPasswordEncoderのJavaDocを参照されたい。
|
本節では、BCryptPasswordEncoderの使い方について説明する。
Note
パスワードをStandardPasswordEncoder によるハッシュ化によって管理する場合、すべてのパスワードがハッシュ化されている必要がある。
パスワードが平文で保存されているアカウントが存在し、そのアカウントで認証しようとした場合、例外メッセージに以下のような形でパスワードが出力されてしまうため注意が必要である。
java.lang.IllegalArgumentException: Non-hex character in input: (DB等で管理されている「平文パスワード」)
Note
ガイドラインではBCryptPasswordEncoderの使い方を紹介しているが、OWASPではBCryptアルゴリズムよりPBKDF2アルゴリズムが推奨されている。
また、NIST800-132の「5 Password-Based Key Derivation Functions」ではPBKDFのハッシュ関数に使用するイテレーションカウントを、最低1,000、特に重要なキーや性能が問題にならないシステムの場合は10,000,000を設定することが推奨されている。
イテレーションカウントが大きくなるほどパスワード強度は増すが、性能にあたえる影響も大きくなる。
Todo
TBD
PBKDF2アルゴリズムに対応するには、前述の
Pbkdf2PasswordEncoderを使用すればよい。Pbkdf2PasswordEncoderの使用方法については、次版以降に記載する予定である。
9.2.2.5.1. BCryptPasswordEncoder
BCryptPasswordEncoderは、BCryptアルゴリズムを使用してパスワードのハッシュ化及びパスワードの照合を行う実装クラスである。
ソルト には16バイトの乱数(java.security.SecureRandom)が使用され、
デフォルトでは1,024(2の10乗)回 ストレッチング を行う。
- applicationContext.xmlの定義例
<bean id="passwordEncoder"
    class="org.springframework.security.crypto.bcrypt.BCryptPasswordEncoder" > <!-- (1) -->
    <constructor-arg name="strength" value="11" /> <!-- (2) -->
</bean>
| 項番 | 説明 |
|---|---|
(1)
|
passwordEncoderのクラスに
BCryptPasswordEncoderを指定する。 |
(2)
|
コンストラクタの引数に、ハッシュ化のストレッチング回数のラウンド数を指定する。
本引数は省略可能であり、指定できる値は”
4”から31である。なお、未指定時のデフォルト値は
10である。本ガイドラインでは説明を省略するが、コンストラクタ引数として
java.security.SecureRandom.SecureRandomを指定することも可能である。 |
Warning
SecureRandomの使用について
Linux環境でSecureRandomを使用する場合、処理の遅延やタイムアウトが発生する場合がある。
これは使用する乱数生成器に左右される事象であり、以下のドキュメントに説明がある。
本事象が発生する場合は、以下のいずれかの設定を追加することで回避することができる。
- Javaコマンド実行時に
-Djava.security.egd=file:/dev/urandomを指定する。 ${JAVA_HOME}/jre/lib/security/java.security内のsecurerandom.source=/dev/randomをsecurerandom.source=/dev/urandomに変更する。
Java SE 7のb19以前のバージョン(正式リリース前)で本事象が発生する場合は、 /dev/urandom ではなく /dev/./urandom を指定する必要がある。ただし、 SecureRandomで使用するアルゴリズムが NativePRNGの場合は回避することができない。
BCryptPasswordEncoderを使用して処理を行うクラスでは、PasswordEncoderをDIコンテナからインジェクションして使用する。
@Service
@Transactional
public class AccountServiceImpl implements AccountService {

    @Inject
    AccountRepository accountRepository;

    @Inject
    PasswordEncoder passwordEncoder; // (1)

    public Account register(Account account, String rawPassword) {
        // omitted
        String encodedPassword = passwordEncoder.encode(rawPassword); // (2)
        account.setPassword(encodedPassword);
        // omitted
        return accountRepository.save(account);
    }

}
| 項番 | 説明 |
|---|---|
(1)
|
PasswordEncoderをインジェクションする。 |
(2)
|
インジェクションした
PasswordEncoderのメソッドを呼び出す。ここでは、データストアに保存するパスワードをハッシュ化している。
|
Note
ソルト
ハッシュ化対象のデータに追加する文字列のことである。 ソルトをパスワードに付与することで、実際のパスワードより桁数が長くなるため、レインボークラックなどのパスワード解析を困難にすることができる。 なお、ソルトはユーザーごとに異なる値(ランダム値等)を設定することを推奨する。 これは、同じソルトを使用していると、ハッシュ値からハッシュ化前の文字列(パスワード)がわかってしまう可能性があるためである。
Note
ストレッチング
ハッシュ関数の計算を繰り返し行うことで、保管するパスワードに関する情報を繰り返し暗号化することである。 パスワードの総当たり攻撃への対策として、パスワード解析に必要な時間を延ばすために行う。 しかし、ストレッチングはシステムの性能に影響を与えるので、システムの性能を考慮してストレッチング回数を決める必要がある。
Spring Securityのデフォルトでは1,024(2の10乗)回ストレッチングを行うが、この回数はコンストラクタ引数(strength)で変更することができる。
strengthには4(16回)から31(2,147,483,648回)を指定することが可能である。
ストレッチング回数が多いほどパスワードの強度は増すが、計算量が多くなるため性能にあたえる影響も大きくなる。
9.2.2.6. 認証イベントのハンドリング
Spring Securityは、Spring Frameworkが提供しているイベント通知の仕組みを利用して、 認証処理の処理結果を他のコンポーネントと連携する仕組みを提供している。
この仕組みを利用すると、以下のようなセキュリティ要件をSpring Securityの認証機能に組み込むことが可能である。
- 認証成功、失敗などの認証履歴をデータベースやログに保存する。
- パスワードを連続して間違った場合にアカウントをロックする。
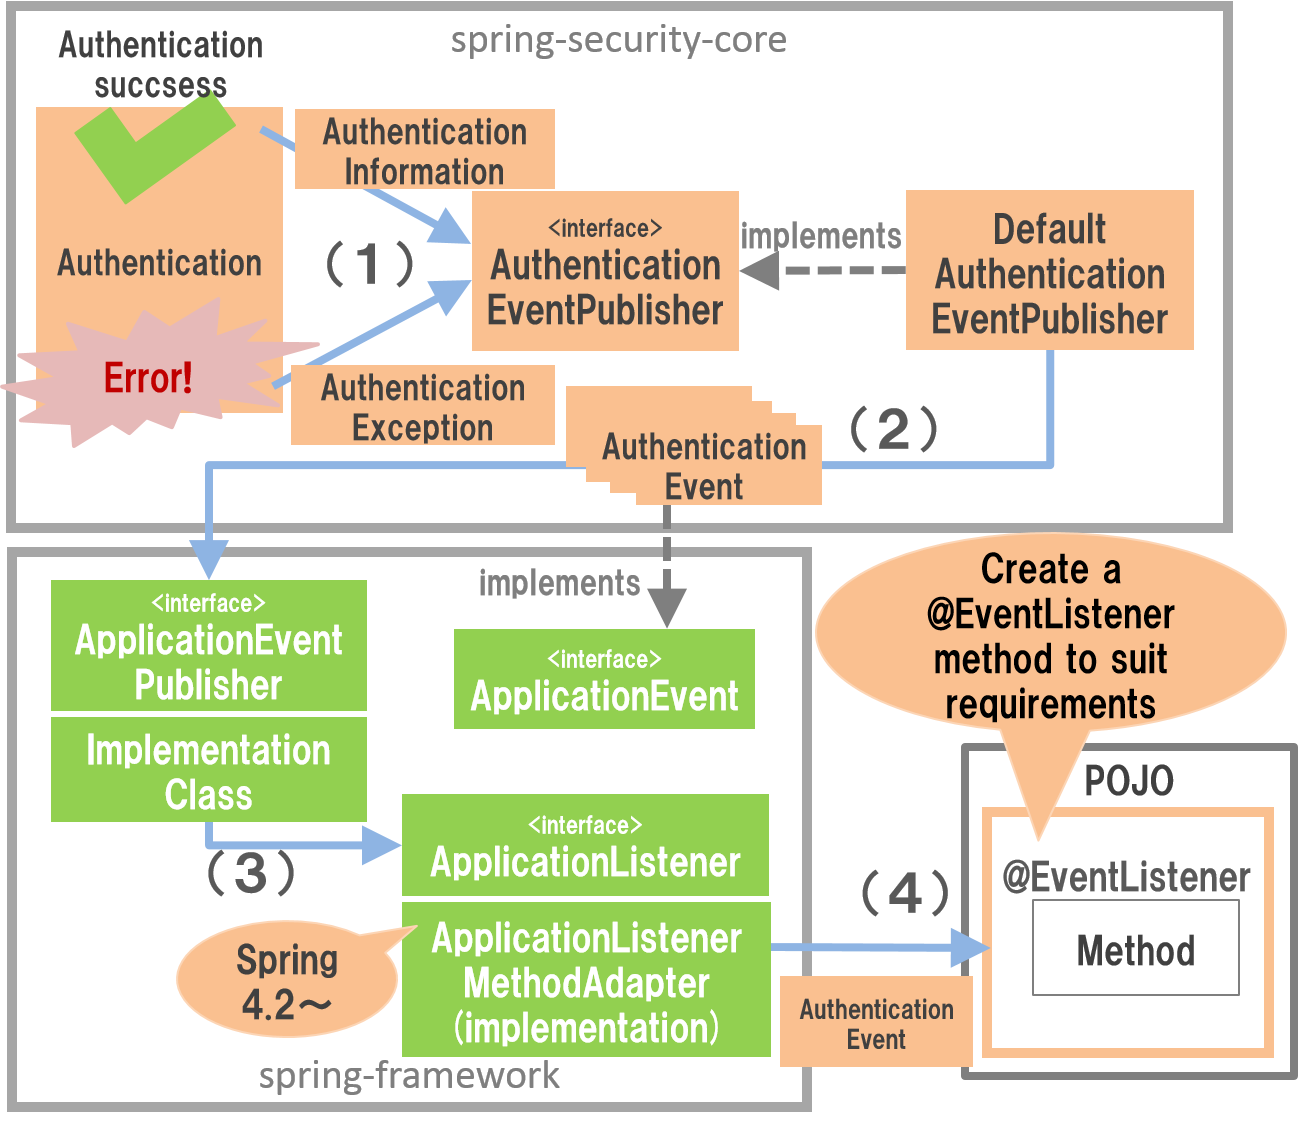
認証イベントの通知は、以下のような仕組みで行われる。
イベント通知の仕組み
| 項番 | 説明 |
|---|---|
(1)
|
Spring Securityの認証機能は、認証結果(認証情報や認証例外)を
AuthenticationEventPublisherに渡して認証イベントの通知依頼を行う。 |
(2)
|
AuthenticationEventPublisherインタフェースのデフォルトの実装クラスは認証結果に対応する認証イベントクラスのインスタンスを生成し、
ApplicationEventPublisherに渡してイベントの通知依頼を行う。 |
(3)
|
ApplicationEventPublisherインタフェースの実装クラスは、ApplicationListenerインタフェースの実装クラスにイベントを通知する。 |
(4)
|
ApplicationListenerの実装クラスの一つであるApplicationListenerMethodAdaptorは、@org.springframework.context.event.EventListenerが付与されているメソッドを呼び出してイベントを通知する。 |
Note
メモ
Spring 4.1まではApplicationListenerインタフェースの実装クラスを作成してイベントを受け取る必要があったが、
Spring 4.2からはPOJOに@EventListenerを付与したメソッドを実装するだけでイベントを受け取ることが可能である。
なお、Spring 4.2以降でも、従来通りApplicationListenerインタフェースの実装クラスを作成してイベントを受け取ることも可能である。
Spring Security使用しているイベントは、認証が成功したことを通知するイベントと認証が失敗したことを通知するイベントの2種類に分類される。 以下にSpring Securityが用意しているイベントクラスを説明する。
9.2.2.6.1. 認証成功イベント
認証が成功した時にSpring Securityが通知する主なイベントは以下の3つである。 この3つのイベントは途中でエラーが発生しなければ、以下の順番ですべて通知される。
| イベントクラス | 説明 |
|---|---|
AuthenticationSuccessEvent |
AuthenticationProviderによる認証処理が成功したことを通知するためのイベントクラス。
このイベントをハンドリングすると、クライアントが正しい認証情報を指定したことを検知することが可能である。
なお、このイベントをハンドリングした後の後続処理でエラーが発生する可能性がある点に注意されたい。 |
SessionFixationProtectionEvent |
セッション固定攻撃対策の処理(セッションIDの変更処理)が成功したことを通知するためのイベントクラス。 このイベントをハンドリングすると、変更後のセッションIDを検知することが可能になる。 |
InteractiveAuthenticationSuccessEvent |
認証処理がすべて成功したことを通知するためのイベントクラス。 このイベントをハンドリングすると、画面遷移を除くすべての認証処理が成功したことを検知することが可能になる。 |
9.2.2.6.2. 認証失敗イベント
認証が失敗した時にSpring Securityが通知する主なイベントは以下の通り。 認証に失敗した場合は、いずれか一つのイベントが通知される。
| イベントクラス | 説明 |
|---|---|
AuthenticationFailureBadCredentialsEvent |
BadCredentialsExceptionが発生したことを通知するためのイベントクラス。 |
AuthenticationFailureDisabledEvent |
DisabledExceptionが発生したことを通知するためのイベントクラス。 |
AuthenticationFailureLockedEvent |
LockedExceptionが発生したことを通知するためのイベントクラス。 |
AuthenticationFailureExpiredEvent |
AccountExpiredExceptionが発生したことを通知するためのイベントクラス。 |
AuthenticationFailureCredentialsExpiredEvent |
CredentialsExpiredExceptionが発生したことを通知するためのイベントクラス。 |
AuthenticationFailureServiceExceptionEvent |
AuthenticationServiceExceptionが発生したことを通知するためのイベントクラス。 |
9.2.2.6.3. イベントリスナの作成
認証イベントの通知を受け取って処理を行いたい場合は、@EventListenerを付与したメソッドを実装したクラスを作成し、DIコンテナに登録する。
- イベントリスナクラスの実装例
@Component
public class AuthenticationEventListeners {

    private static final Logger log =
            LoggerFactory.getLogger(AuthenticationEventListeners.class);

@EventListener // (1)
public void handleBadCredentials(
    AuthenticationFailureBadCredentialsEvent event) { // (2)
    log.info("Bad credentials is detected. username : {}", event.getAuthentication().getName());
    // omitted
}
| 項番 | 説明 |
|---|---|
(1)
|
@EventListenerをメソッドに付与したメソッドを作成する。 |
(2)
|
メソッドの引数にハンドリングしたい認証イベントクラスを指定する。
|
上記例では、クライアントが指定した認証情報に誤りがあった場合に通知されるAuthenticationFailureBadCredentialsEventをハンドリングするクラスを作成する例としているが、
他のイベントも同じ要領でハンドリングすることが可能である。
9.2.2.7. ログアウト
Spring Securityは、以下のような流れでログアウト処理を行う。
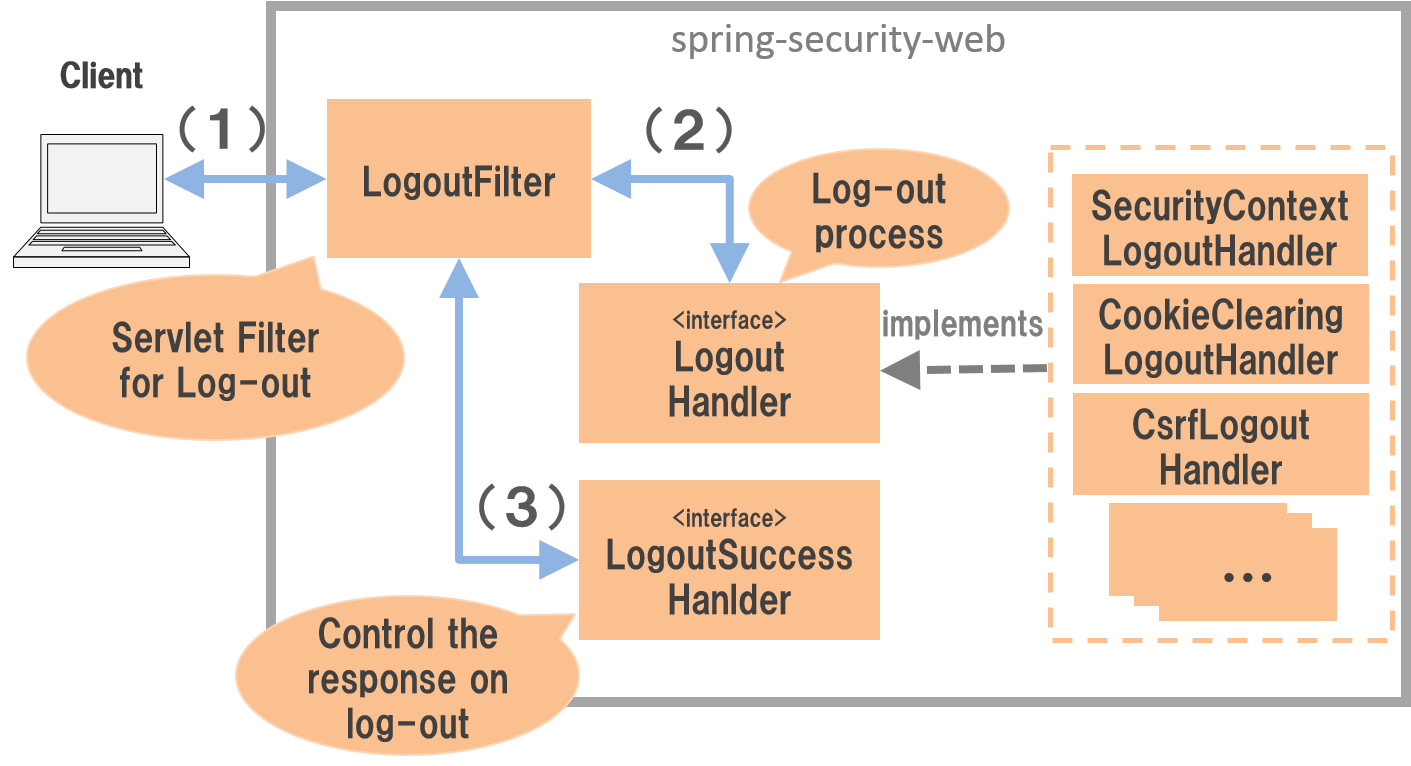
ログアウト処理の仕組み
| 項番 | 説明 |
|---|---|
(1)
|
クライアントは、ログアウト処理を行うためのパスにリクエストを送信する。
|
(2)
|
LogoutFilterは、LogoutHandlerのメソッドを呼び出し、実際のログアウト処理を行う。 |
(3)
|
LogoutFilterは、LogoutSuccessHandlerのメソッドを呼び出し、画面遷移を行う。 |
LogoutHandlerの実装クラスは複数存在し、それぞれ以下の役割をもっている。
| 実装クラス | 説明 |
|---|---|
SecurityContextLogoutHandler |
ログインユーザーの認証情報のクリアとセッションの破棄を行うクラス。
|
CookieClearingLogoutHandler |
指定したクッキーを削除するためのレスポンスを行うクラス。
|
CsrfLogoutHandler |
CSRF対策用トークンの破棄を行うクラス。
|
これらのLogoutHandlerは、Spring Securityが提供しているbean定義をサポートするクラスが自動でLogoutFilterに設定する仕組みになっているため、
基本的にはアプリケーションの開発者が直接意識する必要はない。
また、Remember Me認証機能 を有効にすると、Remember Me認証用のTokenを破棄するためのLogoutHandlerの実装クラスも設定される。
9.2.2.7.1. ログアウト処理の適用
ログアウト処理を適用するためには、以下のようなbean定義を行う。
- spring-security.xmlの定義例
<sec:http>
    <!-- omitted -->
    <sec:logout /> <!-- (1) -->
    <!-- omitted -->
</sec:http>
| 項番 | 説明 |
|---|---|
(1)
|
<sec:logout>タグを定義することで、ログアウト処理が有効となる。 |
Note
Spring Security 4.0における変更
Spring Security 4.0から、以下の設定のデフォルト値が変更されている
- logout-url
Tip
Cookieの削除
本ガイドラインでは説明を割愛するが、 <sec:logout>タグには、ログアウト時に指定したCookieを削除するためのdelete-cookies属性が存在する。
ただし、この属性を使用しても正常にCookieが削除できないケースが報告されている。
詳細はSpring Securityの以下のJIRAを参照されたい。
9.2.2.7.2. デフォルトの動作
Spring Securityのデフォルトの動作では、/logoutというパスにリクエストを送るとログアウト処理が行われる。
ログアウト処理では、「ログインユーザーの認証情報のクリア」「セッションの破棄」が行われる。
また、
- CSRF対策を行っている場合は、「CSRF対策用トークンの破棄」
- Remember Me認証機能を使用している場合は、「Remember Me認証用のTokenの破棄」
も行われる
- ログアウト処理を呼び出すためのJSPの実装例
<%@ taglib prefix="c" uri="http://java.sun.com/jsp/jstl/core" %>
<%@ taglib prefix="sec" uri="http://www.springframework.org/security/tags" %>
<%-- omitted --%>
<form:form action="${pageContext.request.contextPath}/logout" method="post"> <%-- (1) --%>
    <button>ログアウト</button>
</form:form>
| 項番 | 説明 |
|---|---|
(1)
|
Note
CSRFトークンの送信
CSRF対策を有効にしている場合は、CSRF対策用のトークンをPOSTメソッドで送信する必要がある。
9.2.2.8. ログアウト成功時のレスポンス
Spring Securityは、ログアウト成功時のレスポンスを制御するためのコンポーネントとして、
LogoutSuccessHandlerというインタフェースと実装クラスを提供している。
| 実装クラス | 説明 |
|---|---|
SimpleUrlLogoutSuccessHandler |
指定したパス(
defaultTargetUrl)にリダイレクトを行う実装クラス。 |
9.2.2.8.1. デフォルトの動作
Spring Securityのデフォルトの動作では、ログインフォームを表示するためのパスにlogoutというクエリパラメータが付与されたURLにリダイレクトする。
例として、ログインフォームを表示するためのパスが/loginの場合は/login?logoutにリダイレクトされる。
9.2.2.9. 認証情報へのアクセス
認証されたユーザーの認証情報は、Spring Securityのデフォルト実装ではセッションに格納される。
セッションに格納された認証情報は、リクエスト毎にSecurityContextPersistenceFilterクラスによってSecurityContextHolderというクラスに格納され、同一スレッド内であればどこからでもアクセスすることができるようになる。
ここでは、認証情報からUserDetailsを取得し、取得したUserDetailsが保持している情報にアクセスする方法を説明する。
9.2.2.9.1. Javaからのアクセス
一般的な業務アプリケーションでは、「いつ」「誰が」「どのデータに」「どのようなアクセスをしたか」を記録する監査ログを取得することがある。 このような要件を実現する際の「誰が」は、認証情報から取得することができる。
- Javaから認証情報へアクセスする実装例
Authentication authentication =
        SecurityContextHolder.getContext().getAuthentication(); // (1)
String userUuid = null;
if (authentication.getPrincipal() instanceof AccountUserDetails) {
    AccountUserDetails userDetails =
            AccountUserDetails.class.cast(authentication.getPrincipal()); // (2)
    userUuid = userDetails.getAccount().getUserUuid(); // (3)
}
if (log.isInfoEnabled()) {
    log.info("type:Audit\tuserUuid:{}\tresource:{}\tmethod:{}",
            userUuid, httpRequest.getRequestURI(), httpRequest.getMethod());
}
| 項番 | 説明 |
|---|---|
(1)
|
SecurityContextHolderから認証情報(Authenticationオブジェクト) を取得する。 |
(2)
|
Authentication#getPrincipal()メソッドを呼び出して、UserDetailsオブジェクトを取得する。認証済みでない場合(匿名ユーザーの場合)は、匿名ユーザーであることを示す文字列が返却されるため注意されたい。
|
(3)
|
UserDetailsから処理に必要な情報を取得する。ここでは、ユーザーを一意に識別するための値(UUID)を取得している。
|
Warning
認証情報へのアクセスと結合度
Spring Securityのデフォルト実装では、認証情報をスレッドローカルの変数に格納しているため、リクエストを受けたスレッドと同じスレッドであればどこからでもアクセス可能である。
この仕組みは便利ではあるが、認証情報を必要とするクラスがSecurityContextHolderクラスに直接依存してしまうため、乱用するとコンポーネントの疎結合性が低下するので注意が必要である。
Spring Securityでは、Spring MVCの機能と連携してコンポーネント間の疎結合性を保つための仕組みを別途提供している。 Spring MVCとの連携方法については、「認証処理とSpring MVCの連携」で説明する。 本ガイドラインではSpring MVCとの連携を使用して認証情報を取得することを推奨する。
Note
認証処理用のフィルタ(FORM_LOGIN_FILTER)をカスタマイズする場合は、
<sec:concurrency-control>要素の指定に加えて、以下の2つのSessionAuthenticationStrategyクラスを有効化する必要がある。
org.springframework.security.web.authentication.session.ConcurrentSessionControlAuthenticationStrategy認証成功後にログインユーザ毎のセッション数をチェックするクラス。org.springframework.security.web.authentication.session.RegisterSessionAuthenticationStrategy認証に成功したセッションをセッション管理領域に登録するクラス。
version 1.0.x.RELEASEで依存しているSpring Security 3.1では、org.springframework.security.web.authentication.session.ConcurrentSessionControlStrategyというクラスが提供されていたが、
Spring Security 3.2より非推奨のAPIになり、Spring Security 4.0より廃止になっている。
Spring Security 3.1からSpring Security 3.2以降にバージョンアップする場合は、以下のクラスを組み合わせて使用するように変更する必要がある。
ConcurrentSessionControlAuthenticationStrategy(Spring Security 3.2で追加)RegisterSessionAuthenticationStrategy(Spring Security 3.2で追加)org.springframework.security.web.authentication.session.SessionFixationProtectionStrategy
具体的な定義方法については、 Spring Security Reference -Web Application Security (Concurrency Control)- のサンプルコードを参考にされたい。
9.2.2.9.2. JSPからのアクセス
一般的なWebアプリケーションでは、ログインユーザーのユーザー情報などを画面に表示することがある。 このような要件を実現する際のログインユーザーのユーザー情報は、認証情報から取得することができる。
- JSPから認証情報へアクセスする実装例
<%@ taglib prefix="sec" uri="http://www.springframework.org/security/tags" %>
<%-- omitted --%>
ようこそ、
<sec:authentication property="principal.account.lastName"/> <%-- (1) --%>
さん。
| 項番 | 説明 |
|---|---|
(1)
|
Spring Securityから提供されている
<sec:authentication>タグを使用して、認証情報(Authenticationオブジェクト) を取得する。property属性にアクセスしたいプロパティへのパスを指定する。ネストしているオブジェクトへアクセスしたい場合は、プロパティ名を”
.” でつなげればよい。 |
Tip
認証情報の表示方法
ここでは、認証情報が保持するユーザー情報を表示する際の実装例を説明したが、var属性とscope属性を組み合わせて任意のスコープ変数に値を格納することも可能である。
ログインユーザーの状態によって表示内容を切り替えたい場合は、ユーザー情報を変数に格納しておき、JSTLのタグライブラリなどを使って表示を切り替えることが可能である。
上記の例は、以下のように記述することでも実現することができる。
本例では、scope属性を省略しているため、pageスコープが適用される。
<%@ taglib prefix="sec" uri="http://www.springframework.org/security/tags" %>
<%-- omitted --%>
<sec:authentication var="principal" property="principal"/>
<%-- omitted --%>
ようこそ、
${f:h(principal.account.lastName)}
さん。
9.2.2.10. 認証処理とSpring MVCの連携
Spring Securityは、Spring MVCと連携するためのコンポーネントをいくつか提供している。 ここでは、認証処理と連携するためのコンポーネントの使い方を説明する。
9.2.2.10.1. 認証情報へのアクセス
Spring Securityは、認証情報(UserDetails)をSpring MVCのコントローラーのメソッドに引き渡すためのコンポーネントとして、AuthenticationPrincipalArgumentResolverクラスを提供している。
AuthenticationPrincipalArgumentResolverを使用すると、コントローラーのメソッド引数としてUserDetailsインタフェースまたはその実装クラスのインスタンスを受け取ることができるため、コンポーネントの疎結合性を高めることができる。
認証情報(UserDetails)をコントローラーの引数として受け取るためには、まずAuthenticationPrincipalArgumentResolverをSpring MVCに適用する必要がある。
AuthenticationPrincipalArgumentResolverを適用するためのbean定義は以下の通りである。
なお、ブランクプロジェクトにはAuthenticationPrincipalArgumentResolverが設定済みである。
- spring-mvc.xmlの定義例
  <mvc:annotation-driven>
      <mvc:argument-resolvers>
          <!-- omitted -->
          <!-- (1) -->
          <bean class="org.springframework.security.web.method.annotation.AuthenticationPrincipalArgumentResolver" />
          <!-- omitted -->
      </mvc:argument-resolvers>
</mvc:annotation-driven>
| 項番 | 説明 |
|---|---|
(1)
|
HandlerMethodArgumentResolverの実装クラスとして、AuthenticationPrincipalArgumentResolverをSpring MVCに適用する。 |
認証情報(UserDetails)をコントローラーのメソッドで受け取る際は、以下のようなメソッドを作成する。
- 認証情報(UserDetails)を受け取るメソッドの作成例
@RequestMapping("account")
@Controller
public class AccountController {

    public String view(
            @AuthenticationPrincipal AccountUserDetails userDetails, // (1)
            Model model) {
        model.addAttribute(userDetails.getAccount());
        return "profile";
    }

}
| 項番 | 説明 |
|---|---|
(1)
|
認証情報(
UserDetails) を受け取るための引数を宣言し、@org.springframework.security.core.annotation.AuthenticationPrincipalを引数アノテーションとして指定する。AuthenticationPrincipalArgumentResolverは、@AuthenticationPrincipalが付与されている引数に認証情報(UserDetails)が設定される。 |
9.2.3. How to extend
本節では、Spring Securityが用意しているカスタマイズポイントや拡張方法について説明する。
Spring Securityは、多くのカスタマイズポイントを提供しているため、すべてのカスタマイズポイントを紹介することはできないため、ここでは代表的なカスタマイズポイントに絞って説明を行う。
9.2.3.1. フォーム認証のカスタマイズ
フォーム認証処理のカスタマイズポイントを説明する。
9.2.3.1.1. 認証パスの変更
Spring Securityのデフォルトでは、認証処理を実行するためのパスは「/login」であるが、
以下のようなbean定義を行うことで変更することが可能である。
- spring-security.xmlの定義例
<sec:http>
    <sec:form-login login-processing-url="/authentication" /> <!-- (1) -->
    <!-- omitted -->
</sec:http>
| 項番 | 説明 |
|---|---|
(1)
|
login-processing-url属性に認証処理を行うためのパスを指定する。 |
Note
認証処理のパスを変更した場合は、ログインフォーム のリクエスト先も変更する必要がある。
9.2.3.1.2. 資格情報を送るリクエストパラメータ名の変更
Spring Securityのデフォルトでは、資格情報(ユーザー名とパスワード)を送るためのリクエストパラメータは「username」と「password」であるが、
以下のようなbean定義を行うことで変更することが可能である。
- spring-security.xmlの定義例
<sec:http>
    <sec:form-login
        username-parameter="uid"
        password-parameter="pwd" /> <!-- (1) (2) -->
    <!-- omitted -->
</sec:http>
| 項番 | 説明 |
|---|---|
(1)
|
username-parameter属性にユーザー名のリクエストパラメータ名を指定する。 |
(2)
|
password-parameter属性にパスワードのリクエストパラメータ名を指定する。 |
Note
リクエストパラメータ名を変更した場合は、ログインフォーム 内の項目名も変更する必要がある。
9.2.3.2. 認証成功時のレスポンスのカスタマイズ
認証成功時のレスポンスのカスタマイズポイントを説明する。
9.2.3.2.1. デフォルト遷移先の変更
ログインフォームを自分で表示して認証処理を行った後の遷移先(デフォルトURL)は、
Webアプリケーションのルートパス(“/” )だが、以下のようなbean定義を行うことで変更することが可能である。
- spring-security.xmlの定義例
<sec:http>
    <sec:form-login default-target-url="/menu" /> <!-- (1) -->
</sec:http>
| 項番 | 説明 |
|---|---|
(1)
|
default-target-url属性に認証成功時に遷移するデフォルトのパスを指定する。 |
9.2.3.2.2. 遷移先の固定化
Spring Securityのデフォルトの動作では、未認証時に認証が必要なページへのリクエストを受信した場合は、受信したリクエストを一旦HTTPセッションに保存し、認証ページに遷移する。 認証成功時にリクエストを復元してリダイレクトするが、以下のようなbean定義を行うことで常に同じ画面に遷移させることが可能である。
- spring-security.xmlの定義例
<sec:http>
    <sec:form-login
        default-target-url="/menu"
        always-use-default-target="true" /> <!-- (1) -->
</sec:http>
| 項番 | 説明 |
|---|---|
(1)
|
always-use-default-target属性にtrueを指定する。 |
9.2.3.2.3. AuthenticationSuccessHandlerの適用
Spring Securityが提供しているデフォルトの動作をカスタマイズする仕組みだけでは要件をみたせない場合は、
以下のようなbean定義を行うことでAuthenticationSuccessHandlerインタフェースの実装クラスを直接適用することができる。
- spring-security.xmlの定義例
<bean id="authenticationSuccessHandler" class="com.example.app.security.handler.MyAuthenticationSuccessHandler"> <!-- (1) -->

<sec:http>
    <sec:form-login authentication-success-handler-ref="authenticationSuccessHandler" /> <!-- (2) -->
</sec:http>
| 項番 | 説明 |
|---|---|
(1)
|
AuthenticationSuccessHandlerインタフェースの実装クラスをbean定義する。 |
(2)
|
authentication-success-handler-ref属性に定義したauthenticationSuccessHandlerを指定する。 |
Warning
AuthenticationSuccessHandlerの責務
AuthenticationSuccessHandlerは、認証成功時におけるWeb層の処理(主に画面遷移に関する処理)を行うためのインタフェースである。
そのため、認証失敗回数のクリアなどのビジネスルールに依存する処理(ビジネスロジック)をこのインタフェースの実装クラスを経由して呼び出すべきではない。
ビジネスルールに依存する処理の呼び出しは、前節で紹介している「認証イベントのハンドリング」の仕組みを使用されたい。
9.2.3.3. 認証失敗時のレスポンスのカスタマイズ
認証失敗時のレスポンスのカスタマイズポイントを説明する。
9.2.3.3.1. 遷移先の変更
Spring Securityのデフォルトの動作では、ログインフォームを表示するためのパスにerrorというクエリパラメータが付与されたURLにリダイレクトするが、
以下のようなbean定義を行うことで変更することが可能である。
- spring-security.xmlの定義例
<sec:http>
    <sec:form-login authentication-failure-url="/loginFailure" /> <!-- (1) -->
</sec:http>
| 項番 | 説明 |
|---|---|
(1)
|
authentication-failure-url属性に認証失敗時に遷移するパスを指定する。 |
9.2.3.3.2. AuthenticationFailureHandlerの適用
Spring Securityが提供しているデフォルトの動作をカスタマイズする仕組みだけでは要件をみたせない場合は、
以下のようなbean定義を行うことでAuthenticationFailureHandlerインタフェースの実装クラスを直接適用することができる。
- spring-security.xmlの定義例
 <!-- (1) -->
<bean id="authenticationFailureHandler"
    class="org.springframework.security.web.authentication.ExceptionMappingAuthenticationFailureHandler" />
    <property name="defaultFailureUrl" value="/login/systemError" /> <!-- (2) -->
    <property name="exceptionMappings"> <!-- (3) -->
        <props>
            <prop key="org.springframework.security.authentication.BadCredentialsException"> <!-- (4) -->
                /login/badCredentials
            </prop>
            <prop key="org.springframework.security.core.userdetails.UsernameNotFoundException"> <!-- (5) -->
                /login/usernameNotFound
            </prop>
            <prop key="org.springframework.security.authentication.DisabledException"> <!-- (6) -->
                /login/disabled
            </prop>
            <!-- omitted -->
        </props>
    </property>
</bean>

<sec:http>
    <sec:form-login authentication-failure-handler-ref="authenticationFailureHandler" /> <!-- (7) -->
</sec:http>
項番
|
説明
|
|---|---|
(1)
|
AuthenticationFailureHandlerインタフェースの実装クラスをbean定義する。 |
(2)
|
defaultFailureUrl属性にデフォルトの遷移先のURLを指定する。下記(4)-(6)の定義に合致しない例外が発生した際は、本設定の遷移先に遷移する。
|
(3)
|
exceptionMappingsプロパティにハンドルするorg.springframework.security.authentication.AuthenticationServiceExceptionの実装クラスと例外発生時の遷移先を Map形式で設定する。キーに
org.springframework.security.authentication.AuthenticationServiceException実装クラスを設定し、値に遷移先URLを設定する。 |
(4)
|
BadCredentialsExceptionパスワード照合失敗による認証エラー時にスローされる。
|
(5)
|
UsernameNotFoundException不正ユーザーID(存在しないユーザーID)による認証エラー時にスローされる。
org.springframework.security.authentication.dao.AbstractUserDetailsAuthenticationProviderを継承したクラスを認証プロバイダに指定している場合、
hideUserNotFoundExceptionsプロパティをfalseに変更しないと本例外は、BadCredentialsExceptionに変更される。 |
(6)
|
DisabledException無効ユーザーIDによる認証エラー時にスローされる。
|
(7)
|
authentication-failure-handler-ref属性にauthenticationFailureHandlerを設定する。 |
Note
例外発生時の制御
exceptionMappingsプロパティに定義した例外が発生した場合、例外にマッピングした遷移先にリダイレクトされるが、
発生した例外オブジェクトがセッションスコープに格納されないため、Spring Securityが生成したエラーメッセージを画面に表示する事ができない。
そのため、遷移先の画面で表示するエラーメッセージは、リダイレクト先の処理(Controller又はViewの処理)で生成する必要がある。
また、以下のプロパティを参照する処理が呼び出されないため、設定値を変更しても動作が変わらないという点を補足しておく。
useForwardallowSessionCreation
9.2.3.4. ログアウト処理のカスタマイズ
ログアウト処理のカスタマイズポイントを説明する。
9.2.3.4.1. ログアウトパスの変更
Spring Securityのデフォルトでは、ログアウト処理を実行するためのパスは「/logout」であるが、
以下のようなbean定義を行うことで変更することが可能である。
- spring-security.xmlの定義例
<sec:http>
    <!-- omitted -->
    <sec:logout logout-url="/auth/logout" /> <!-- (1) -->
    <!-- omitted -->
</sec:http>
| 項番 | 説明 |
|---|---|
(1)
|
logout-url属性を設定し、ログアウト処理を行うパスを指定する。 |
Note
ログアウトパスを変更した場合は、ログアウトフォーム のリクエスト先も変更する必要がある。
Tip
システムエラー発生時の振る舞い システムエラーが発生した場合は、業務継続不可となるケースが多いと考えられる。 システムエラー発生後、業務を継続させたくない場合は、以下のような対策を講じることを推奨する。
- システムエラー発生時にセッション情報をクリアする。
- システムエラー発生時に認証情報をクリアする。
ここでは、共通ライブラリの例外ハンドリング機能を使用してシステム例外発生時に認証情報をクリアする例を説明する。 例外ハンドリング機能の詳細については「例外ハンドリング」を参照されたい。
// (1)
public class LogoutSystemExceptionResolver extends SystemExceptionResolver {
    // (2)
    @Override
    protected ModelAndView doResolveException(HttpServletRequest request,
            HttpServletResponse response, java.lang.Object handler,
            java.lang.Exception ex) {

        // SystemExceptionResolverの処理を行う
        ModelAndView resulut = super.doResolveException(request, response,
                handler, ex);

        // 認証情報をクリアする (2)
        SecurityContextHolder.clearContext();

        return resulut;
    }
}
項番 説明 org.terasoluna.gfw.web.exception.SystemExceptionResolver.SystemExceptionResolverを拡張する。
なお、認証情報をクリアする方法以外にも、セッションをクリアすることでも、同様の要件を満たすことができる。 プロジェクトの要件に合わせて実装されたい。
9.2.3.5. ログアウト成功時のレスポンスのカスタマイズ
ログアウト処理成功時のレスポンスのカスタマイズポイントを説明する。
9.2.3.5.1. 遷移先の変更
- spring-security.xmlの定義例
<sec:http>
    <!-- omitted -->
    <sec:logout logout-success-url="/logoutSuccess" /> <!-- (1) -->
    <!-- omitted -->
</sec:http>
| 項番 | 説明 |
|---|---|
(1)
|
logout-success-url属性を設定し、ログアウト成功時に遷移するパスを指定する。 |
9.2.3.5.2. LogoutSuccessHandlerの適用
- spring-security.xmlの定義例
<!-- (1) -->
<bean id="logoutSuccessHandler" class="com.example.app.security.handler.MyLogoutSuccessHandler" />

<sec:http>
    <!-- omitted -->
    <sec:logout success-handler-ref="logoutSuccessHandler" /> <!-- (2) -->
    <!-- omitted -->
</sec:http>
| 項番 | 説明 |
|---|---|
(1)
|
LogoutSuccessHandlerインタフェースの実装クラスをbean定義する。 |
(2)
|
success-handler-ref属性にLogoutSuccessHandlerを設定する。 |
9.2.3.6. エラーメッセージのカスタマイズ
認証に失敗した場合、Spring Securityが用意しているエラーメッセージが表示されるが、 このエラーメッセージは変更することが可能である。
メッセージ変更方法の詳細については、メッセージ管理を参照されたい。
9.2.3.6.1. システムエラー時のメッセージ
認証処理の中で予期しないエラー(システムエラーなど)が発生した場合、InternalAuthenticationServiceExceptionという例外が発生する。
InternalAuthenticationServiceExceptionが保持するメッセージには、原因例外のメッセージが設定されるため、画面にそのまま表示するのは適切ではない。
例えばユーザー情報をデーターベースから取得する時にDBアクセスエラーが発生した場合、SQLExceptionが保持する例外メッセージが画面に表示されることになる。
システムエラーの例外メッセージを画面に表示させないためには、ExceptionMappingAuthenticationFailureHandlerを使用してInternalAuthenticationServiceExceptionをハンドリングし、
システムエラーが発生したことを通知するためのパスに遷移させるなどの対応が必要となる。
- spring-security.xmlの定義例
  <bean id="authenticationFailureHandler"
      class="org.springframework.security.web.authentication.ExceptionMappingAuthenticationFailureHandler">
      <property name="defaultFailureUrl" value="/login?error" />
      <property name="exceptionMappings">
          <props>
              <prop key="org.springframework.security.authentication.InternalAuthenticationServiceException">
                  /login?systemError
              </prop>
              <!-- omitted -->
          </props>
      </property>
  </bean>

<sec:http>
    <sec:form-login authentication-failure-handler-ref="authenticationFailureHandler" />
</sec:http>
ここでは、システムエラーが発生したことを識別するためのクエリパラメータ(systemError)を付けてログインフォームに遷移させている。
遷移先に指定したログインフォームでは、クエリパラメータにsystemErrorが指定されている場合は、認証例外のメッセージを表示するのではなく、
固定のエラーメッセージを表示するようにしている。
- ログインフォームの実装例
<c:choose>
    <c:when test="${param.containsKey('error')}">
        <span style="color: red;">
            <c:out value="${SPRING_SECURITY_LAST_EXCEPTION.message}"/>
        </span>
    </c:when>
    <c:when test="${param.containsKey('systemError')}">
        <span style="color: red;">
            System Error occurred.
        </span>
    </c:when>
</c:choose>
Note
ここでは、ログインフォームに遷移させる場合の実装例を紹介したが、システムエラー画面に遷移させてもよい。
9.2.3.7. 認証時の入力チェック
DBサーバへの負荷軽減等で、認証ページにおける、あきらかな入力誤りに対しては、事前にチェックを行いたい場合がある。 このような場合は、Bean Validationを使用した入力チェックも可能である。
9.2.3.7.1. Bean Validationによる入力チェック
以下にBean Validationを使用した入力チェックの例を説明する。 Bean Validationに関する詳細は 入力チェックを参照すること。
- フォームクラスの実装例
public class LoginForm implements Serializable {

    // omitted
    @NotEmpty // (1)
    private String username;

    @NotEmpty // (1)
    private String password;
    // omitted

}
| 項番 | 説明 |
|---|---|
(1)
|
本例では、
username、passwordをそれぞれ必須入力としている。 |
- コントローラクラスの実装例
@ModelAttribute
public LoginForm setupForm() { // (1)
    return new LoginForm();
}

@RequestMapping(value = "login")
public String login(@Validated LoginForm form, BindingResult result) {
    // omitted
    if (result.hasErrors()) {
        // omitted
    }
    return "forward:/authenticate"; // (2)
}
| 項番 | 説明 |
|---|---|
(1)
|
LoginFormを初期化する。 |
(2)
|
forwardで
<sec:form-login>要素のlogin-processing-url属性に指定したパスに Forward する。認証に関する設定は、フォーム認証のカスタマイズを参照すること。
|
加えて、Forwardによる遷移でもSpring Securityの処理が行われるよう、認証パスをSpring Securityサーブレットフィルタに追加する。
- web.xmlの設定例
<filter>
    <filter-name>springSecurityFilterChain</filter-name>
    <filter-class>
        org.springframework.web.filter.DelegatingFilterProxy
    </filter-class>
</filter>
<filter-mapping>
    <filter-name>springSecurityFilterChain</filter-name>
    <url-pattern>/*</url-pattern>
</filter-mapping>
<!-- (1) -->
<filter-mapping>
    <filter-name>springSecurityFilterChain</filter-name>
    <url-pattern>/authenticate</url-pattern>
    <dispatcher>FORWARD</dispatcher>
</filter-mapping>
| 項番 | 説明 |
|---|---|
(1)
|
Forwardで認証するためのパターンを指定する
ここでは認証パスである
/authenticateを指定している。 |
9.2.3.8. 認証処理の拡張
Spring Securityから提供されている認証プロバイダで対応できない認証要件がある場合は、
org.springframework.security.authentication.AuthenticationProviderインタフェースを実装したクラスを作成する必要がある。
ここでは、ユーザー名、パスワード、会社識別子(独自の認証パラメータ)の3つのパラメータを使用してDB認証を行うための拡張例を示す。
上記の要件を実現するためには、以下に示すクラスを作成する必要がある。
| 項番 | 説明 |
|---|---|
(1)
|
ユーザー名、パスワード、会社識別子を保持する
org.springframework.security.core.Authenticationインタフェースの実装クラス。ここでは、
org.springframework.security.authentication.UsernamePasswordAuthenticationTokenクラスを継承して作成する。 |
(2)
|
ユーザー名、パスワード、会社識別子を使用してDB認証を行う
org.springframework.security.authentication.AuthenticationProviderの実装クラス。ここでは、
org.springframework.security.authentication.dao.DaoAuthenticationProviderクラスを継承して作成する。 |
(3)
|
ユーザー名、パスワード、会社識別子をリクエストパラメータから取得して、
AuthenticationManager(AuthenticationProvider)に渡すAuthenticationを生成するためのAuthentication Filterクラス。ここでは、
org.springframework.security.web.authentication.UsernamePasswordAuthenticationFilterクラスを継承して作成する。 |
Note
ここでは、認証用のパラメータとして独自のパラメータを追加する例にしているため、
Authenticationインタフェースの実装クラスとAuthenticationを生成するためのAuthentication Filterクラスの拡張が必要となる。
ユーザー名とパスワードのみで認証する場合は、AuthenticationProviderインタフェースの実装クラスを作成するだけで、
認証処理を拡張することができる。
9.2.3.8.1. Authenticationインターフェースの実装クラスの作成
UsernamePasswordAuthenticationTokenクラスを継承し、ユーザー名とパスワードに加えて、会社識別子(独自の認証パラメータ)を保持するクラスを作成する。
// import omitted
public class CompanyIdUsernamePasswordAuthenticationToken extends
    UsernamePasswordAuthenticationToken {

    private static final long serialVersionUID = SpringSecurityCoreVersion.SERIAL_VERSION_UID;

    // (1)
    private final String companyId;

    // (2)
    public CompanyIdUsernamePasswordAuthenticationToken(
            Object principal, Object credentials, String companyId) {
        super(principal, credentials);
        this.companyId = companyId;
    }

    // (3)
    public CompanyIdUsernamePasswordAuthenticationToken(
            Object principal, Object credentials, String companyId,
            Collection<? extends GrantedAuthority> authorities) {
        super(principal, credentials, authorities);
        this.companyId = companyId;
    }

    public String getCompanyId() {
        return companyId;
    }

}
| 項番 | 説明 |
|---|---|
(1)
|
会社識別子を保持するフィールドを作成する。
|
(2)
|
認証前の情報(リクエストパラメータで指定された情報)を保持するインスタンスを作成する際に使用するコンストラクタを作成する。
|
(3)
|
認証済みの情報を保持するインスタンスを作成する際に使用するコンストラクタを作成する。
親クラスのコンストラクタの引数に認可情報を渡すことで、認証済みの状態となる。
|
9.2.3.8.2. AuthenticationProviderインターフェースの実装クラスの作成
DaoAuthenticationProviderクラスを継承し、ユーザー名、パスワード、会社識別子を使用してDB認証を行うクラスを作成する。
// import omitted
public class CompanyIdUsernamePasswordAuthenticationProvider extends
    DaoAuthenticationProvider {

    // omitted

    @Override
    protected void additionalAuthenticationChecks(UserDetails userDetails,
            UsernamePasswordAuthenticationToken authentication)
            throws AuthenticationException {

        // (1)
        super.additionalAuthenticationChecks(userDetails, authentication);

        // (2)
        CompanyIdUsernamePasswordAuthenticationToken companyIdUsernamePasswordAuthentication =
                (CompanyIdUsernamePasswordAuthenticationToken) authentication;
        String requestedCompanyId = companyIdUsernamePasswordAuthentication.getCompanyId();
        String companyId = ((SampleUserDetails) userDetails).getAccount().getCompanyId();
        if (!companyId.equals(requestedCompanyId)) {
            throw new BadCredentialsException(messages.getMessage(
                    "AbstractUserDetailsAuthenticationProvider.badCredentials",
                    "Bad credentials"));
        }
    }

    @Override
    protected Authentication createSuccessAuthentication(Object principal,
            Authentication authentication, UserDetails user) {
        String companyId = ((SampleUserDetails) user).getAccount()
                .getCompanyId();
        // (3)
        return new CompanyIdUsernamePasswordAuthenticationToken(user,
                authentication.getCredentials(), companyId,
                user.getAuthorities());
    }

    @Override
    public boolean supports(Class<?> authentication) {
        // (4)
        return CompanyIdUsernamePasswordAuthenticationToken.class
                .isAssignableFrom(authentication);
    }

}
| 項番 | 説明 |
|---|---|
(1)
|
親クラスのメソッドを呼び出し、Spring Securityが提供しているチェック処理を実行する。
この処理にはパスワード認証処理も含まれる。
|
(2)
|
パスワード認証が成功した場合は、会社識別子(独自の認証パラメータ)の妥当性をチェックする。
上記例では、リクエストされた会社識別子とテーブルに保持している会社識別子が一致するかをチェックしている。
|
(3)
|
パスワード認証及び独自の認証処理が成功した場合は、認証済み状態の
CompanyIdUsernamePasswordAuthenticationTokenを作成して返却する。 |
(4)
|
CompanyIdUsernamePasswordAuthenticationTokenにキャスト可能なAuthenticationが指定された場合に、本クラスを使用して認証処理を行うようにする。 |
Note
ユーザーの存在チェック、ユーザーの状態チェック(無効ユーザー、ロック中ユーザー、利用期限切れユーザーなどのチェック)は、
additionalAuthenticationChecksメソッドが呼び出される前に親クラスの処理として行われる。
9.2.3.8.3. Authentication Filterの作成
UsernamePasswordAuthenticationFilterクラスを継承し、
認証情報(ユーザー名、パスワード、会社識別子)をAuthenticationProviderに引き渡すためのAuthentication Filterクラスを作成する。
attemptAuthenticationメソッドの実装は、UsernamePasswordAuthenticationFilterクラスのメソッドをコピーしてカスタマイズしたものである。
// import omitted
public class CompanyIdUsernamePasswordAuthenticationFilter extends
    UsernamePasswordAuthenticationFilter {

    @Override
    public Authentication attemptAuthentication(HttpServletRequest request,
            HttpServletResponse response) throws AuthenticationException {

        if (!request.getMethod().equals("POST")) {
            throw new AuthenticationServiceException("Authentication method not supported: "
                    + request.getMethod());
        }

        // (1)
        // Obtain UserName, Password, CompanyId
        String username = super.obtainUsername(request);
        String password = super.obtainPassword(request);
        String companyId = obtainCompanyId(request);
        if (username == null) {
            username = "";
        } else {
            username = username.trim();
        }
        if (password == null) {
            password = "";
        }
        CompanyIdUsernamePasswordAuthenticationToken authRequest =
            new CompanyIdUsernamePasswordAuthenticationToken(username, password, companyId);

        // Allow subclasses to set the "details" property
        setDetails(request, authRequest);

        return this.getAuthenticationManager().authenticate(authRequest); // (2)
    }

    // (3)
    protected String obtainCompanyId(HttpServletRequest request) {
        return request.getParameter("companyId");
    }
}
| 項番 | 説明 |
|---|---|
(1)
|
リクエストパラメータから取得した認証情報(ユーザー名、パスワード、会社識別子)より、
CompanyIdUsernamePasswordAuthenticationTokenのインスタンスを生成する。 |
(2)
|
リクエストパラメータで指定された認証情報(
CompanyIdUsernamePasswordAuthenticationTokenのインスタンス)を指定して、org.springframework.security.authentication.AuthenticationManagerのauthenticateメソッドを呼び出す。AuthenticationManagerのメソッドを呼び出すと、AuthenticationProviderの認証処理が呼び出される。 |
(3)
|
会社識別子は、
companyIdというリクエストパラメータより取得する。 |
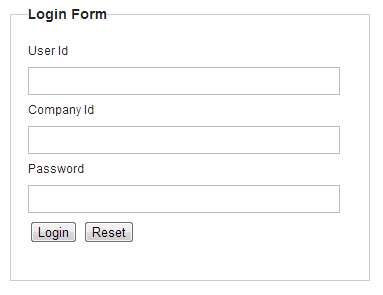
9.2.3.8.4. ログインフォームの修正
ログインフォームの作成で作成したログインフォーム(JSP)に対して、会社識別子を追加する。
<form:form action="${pageContext.request.contextPath}/login" method="post">
    <!-- omitted -->
        <tr>
            <td><label for="username">User Name</label></td>
            <td><input type="text" id="username" name="username"></td>
        </tr>
        <tr>
            <td><label for="companyId">Company Id</label></td>
            <td><input type="text" id="companyId" name="companyId"></td> <!-- (1) -->
        </tr>
        <tr>
            <td><label for="password">Password</label></td>
            <td><input type="password" id="password" name="password"></td>
        </tr>
    <!-- omitted -->
</form:form>
| 項番 | 説明 |
|---|---|
(1)
|
会社識別子の入力フィールド名に
companyIdを指定する。 |
9.2.3.8.5. 拡張した認証処理の適用
ユーザー名、パスワード、会社識別子(独自の認証パラメータ)を使用したDB認証機能をSpring Securityに適用する。
- spring-security.xmlの定義例
<!-- omitted -->

<!-- (1) -->
<sec:http
    entry-point-ref="loginUrlAuthenticationEntryPoint">

    <!-- omitted -->

    <!-- (2) -->
    <sec:custom-filter
        position="FORM_LOGIN_FILTER" ref="companyIdUsernamePasswordAuthenticationFilter" />

    <!-- omitted -->

    <sec:csrf token-repository-ref="csrfTokenRepository" />

    <sec:logout
        logout-url="/logout"
        logout-success-url="/login" />

    <!-- omitted -->

    <sec:intercept-url pattern="/login" access="permitAll" />
    <sec:intercept-url pattern="/**" access="isAuthenticated()" />

    <!-- omitted -->

</sec:http>

<!-- (3) -->
<bean id="loginUrlAuthenticationEntryPoint"
    class="org.springframework.security.web.authentication.LoginUrlAuthenticationEntryPoint">
    <constructor-arg value="/login" />
</bean>

<!-- (4) -->
<bean id="companyIdUsernamePasswordAuthenticationFilter"
    class="com.example.app.common.security.CompanyIdUsernamePasswordAuthenticationFilter">
    <!-- (5) -->
    <property name="requiresAuthenticationRequestMatcher">
        <bean class="org.springframework.security.web.util.matcher.AntPathRequestMatcher">
            <constructor-arg index="0" value="/authentication" />
            <constructor-arg index="1" value="POST" />
        </bean>
    </property>
    <!-- (6) -->
    <property name="authenticationManager" ref="authenticationManager" />
    <!-- (7) -->
    <property name="sessionAuthenticationStrategy" ref="sessionAuthenticationStrategy" />
    <!-- (8) -->
    <property name="authenticationFailureHandler">
        <bean class="org.springframework.security.web.authentication.SimpleUrlAuthenticationFailureHandler">
            <constructor-arg value="/login?error=true" />
        </bean>
    </property>
    <!-- (9) -->
    <property name="authenticationSuccessHandler">
        <bean class="org.springframework.security.web.authentication.SimpleUrlAuthenticationSuccessHandler" />
    </property>
</bean>

<!-- (6') -->
<sec:authentication-manager alias="authenticationManager">
    <sec:authentication-provider ref="companyIdUsernamePasswordAuthenticationProvider" />
</sec:authentication-manager>
<bean id="companyIdUsernamePasswordAuthenticationProvider"
    class="com.example.app.common.security.CompanyIdUsernamePasswordAuthenticationProvider">
    <property name="userDetailsService" ref="sampleUserDetailsService" />
    <property name="passwordEncoder" ref="passwordEncoder" />
</bean>

<!-- (7') -->
<bean id="sessionAuthenticationStrategy"
    class="org.springframework.security.web.authentication.session.CompositeSessionAuthenticationStrategy">
    <constructor-arg>
        <util:list>
            <bean class="org.springframework.security.web.csrf.CsrfAuthenticationStrategy">
                <constructor-arg ref="csrfTokenRepository" />
            </bean>
            <bean class="org.springframework.security.web.authentication.session.SessionFixationProtectionStrategy" />
        </util:list>
    </constructor-arg>
</bean>

<bean id="csrfTokenRepository"
    class="org.springframework.security.web.csrf.HttpSessionCsrfTokenRepository" />


<!-- omitted -->
| 項番 | 説明 |
|---|---|
(1)
|
(2)の
<sec:custom-filter>タグを使用してFORM_LOGIN_FILTERを差し替える場合は、<sec:http>タグの属性に以下の設定を行う必要がある。
|
(2)
|
<sec:custom-filter>タグを使用してFORM_LOGIN_FILTERを差し替える。<sec:custom-filter>タグのposition属性にFORM_LOGIN_FILTERを指定し、ref属性に拡張したAuthentication Filterのbeanを指定する。 |
(3)
|
<sec:http>タグのentry-point-ref属性に使用するAuthenticationEntryPointのbeanを指定する。ここでは、
<sec:form-login>タグを指定した際に使用されるorg.springframework.security.web.authentication.LoginUrlAuthenticationEntryPointクラスのbeanを指定している。 |
(4)
|
FORM_LOGIN_FILTERとして使用するAuthentication Filterクラスのbeanを定義する。ここでは、拡張したAuthentication Filterクラス(
CompanyIdUsernamePasswordAuthenticationFilter)のbeanを定義している。 |
(5)
|
requiresAuthenticationRequestMatcherプロパティに、認証処理を行うリクエストを検出するためのRequestMatcherインスタンスを指定する。ここでは、
/authenticationというパスにリクエストがあった場合に認証処理を行うように設定している。これは、
<sec:form-login>タグのlogin-processing-url属性に/authenticationを指定したのと同義である。 |
(6)
|
authenticationManagerプロパティに、<sec:authentication-manager>タグのalias属性に設定した値を指定する。<sec:authentication-manager>タグのalias属性を指定すると、Spring Securityが生成した
AuthenticationManagerのbeanを、他のbeanへDIすることができる様になる。 |
(6’)
|
Spring Securityが生成する
AuthenticationManagerに対して、拡張したAuthenticationProvider(CompanyIdUsernamePasswordAuthenticationProvider)を設定する。 |
(7)
|
sessionAuthenticationStrategyプロパティに、認証成功時のセッションの取り扱いを制御するコンポーネント(SessionAuthenticationStrategy)のbeanを指定する。 |
(7’)
|
認証成功時のセッションの取り扱いを制御するコンポーネント(
SessionAuthenticationStrategy)のbeanを定義する。ここでは、Spring Securityから提供されている、
を有効化している。
|
(8)
|
authenticationFailureHandlerプロパティに、認証失敗時に呼ばれるハンドラクラスを指定する。 |
(9)
|
authenticationSuccessHandlerプロパティに、認証成功時に呼ばれるハンドラクラスを指定する。 |
Note
auto-configについて
auto-config="false"を指定又は指定を省略した際にBasic認証処理とログアウト処理を有効化したい場合は、<sec:http-basic>タグと<sec:logout>タグを明示的に定義する必要がある。
9.2.3.9. 非推奨パッケージのPasswordEncoderの利用
セキュリティ要件によっては、前述したPasswordEncoderを実装したクラスでは実現できない場合がある。
特に、既存のアカウント情報で使用しているハッシュ化要件を踏襲する必要がある場合は、前述のPasswordEncoderでは要件を満たせないことがある。
具体的には、既存のハッシュ化要件が以下のようなケースである。
- アルゴリズムがSHA-512である。
- ストレッチング回数が1000回である。
- ソルトがアカウントテーブルのカラムに格納されており、
PasswordEncoderの外から渡す必要がある。
このようなケースでは、org.springframework.security.crypto.password.PasswordEncoderインタフェースの実装クラスではなく、
org.springframework.security.authentication.encoding.PasswordEncoderインタフェースの実装クラスの使用することで要件を満たすことができる。
Warning
Spring Security 3.1.4以前では、org.springframework.security.authentication.encoding.PasswordEncoderを実装したクラスをハッシュ化に使用していたが、3.1.4以降では非推奨となっている。
9.2.3.9.1. ShaPasswordEncoderの利用
本ガイドラインでは、ShaPasswordEncoderを例に、非推奨パッケージのPasswordEncoderの利用について説明する。
ハッシュ化要件が以下のケースの場合は、ShaPasswordEncoderを利用することで要件を満たすことができる。
- アルゴリズムがSHA-512
- ストレッチング回数を1000回
まず、ShaPasswordEncoderのbeanを定義する。
- applicationContext.xmlの定義例
<bean id ="passwordEncoder"
    class="org.springframework.security.authentication.encoding.ShaPasswordEncoder"> <!-- (1) -->
    <constructor-arg value="512" /> <!-- (2) -->
    <property name="iterations" value="1000" /> <!-- (3) -->
</bean>
| 項番 | 説明 |
|---|---|
(1)
|
org.springframework.security.authentication.encoding.ShaPasswordEncoderのbeanを定義する。 |
(2)
|
SHAアルゴリズムの種類を指定する。
指定可能な値は、「”
1” 、256、384、512」である。省略した場合は、「”
1” 」となる。 |
(3)
|
ハッシュ化時のストレッチング回数を指定する。
省略した場合は、1回となる。
|
次に、ShaPasswordEncoderをSpring Securityの認証処理(DaoAuthenticationProvider)に適用する。
- spring-security.xmlの定義例
<bean id="authenticationProvider"
    class="org.springframework.security.authentication.dao.DaoAuthenticationProvider">
    <!-- omitted -->
    <property name="saltSource" ref="saltSource" /> <!-- (1) -->
    <property name="userDetailsService" ref="userDetailsService" />
    <property name="passwordEncoder" ref="passwordEncoder" /> <!-- (2) -->
</bean>

<bean id="saltSource"
    class="org.springframework.security.authentication.dao.ReflectionSaltSource"> <!-- (3) -->
    <property name="userPropertyToUse" value="username" /> <!-- (4) -->
</bean>
| 項番 | 説明 |
|---|---|
(1)
|
saltSourceプロパティにorg.springframework.security.authentication.dao.SaltSourceインタフェースの実装クラスのbeanを指定する。SaltSourceは、ソルトをUserDetailsから取得するためのインタフェースである。 |
(2)
|
passwordEncoderプロパティにorg.springframework.security.authentication.encoding.PasswordEncoderインタフェースの実装クラスのbeanを指定する。上記例では、
ShaPasswordEncoderのbeanを指定している。 |
(3)
|
SaltSourceのbeanを定義する。上記例では、リフレクションを使用して
UserDetailsのプロパティからソルトを取得するクラス(ReflectionSaltSource)を利用している。 |
(4)
|
ソルトが格納されている
UserDetailsのプロパティを指定する。上記例では、
UserDetailsのusernameプロパティの値をソルトとして使用する。 |
アプリケーションの処理で非推奨のPasswordEncoderを使用する場合は、PasswordEncoderをインジェクションして使用する。
- Javaクラスの実装例
@Inject
PasswordEncoder passwordEncoder;

public String register(Customer customer, String rawPassword, String userSalt) {
    // omitted
    String password = passwordEncoder.encodePassword(rawPassword, userSalt); // (1)
    customer.setPassword(password);
    // omitted
}

public boolean matches(Customer customer, String rawPassword, String userSalt) {
    return passwordEncoder.isPasswordValid(customer.getPassword(), rawPassword, userSalt); // (2)
}
| 項番 | 説明 |
|---|---|
(1)
|
パスワードをハッシュ化する場合は、
encodePasswordメソッドを使用する。メソッドの引数には、パスワード、ソルト文字列の順で指定する。
|
(2)
|
パスワードを照合する場合は、
isPasswordValidメソッドを使用する。メソッドの引数には、ハッシュ化済みのパスワード、平文のパスワード、ソルト文字列の順で指定する。
|
9.2.4. Appendix
9.2.4.1. Spring MVCでリクエストを受けてログインフォームを表示する
Spring MVCでリクエストを受けてログインフォームを表示する方法を説明する。
- spring-mvc.xmlの定義例
ログインフォームを表示するControllerの定義例。
@Controller
@RequestMapping("/login")
public class LoginController { // (1)

    @RequestMapping
    public String index() {
        return "login";
    }
}
| 項番 | 説明 |
|---|---|
(1)
|
view名として”login”を返却する。
InternalResourceViewResolverによってsrc/main/webapp/WEB-INF/views/login.jspが出力される。 |
本例のように、単純にview名を返すだけのメソッドが一つだけあるControllerであれば、<mvc:view-controller>を使用して代用することも可能である。
詳しくは、HTMLを応答するを参照されたい。
9.2.4.2. Remember Me認証の利用
「Remember Me認証」とは、 Webサイトに頻繁にアクセスするユーザーの利便性を高めるための機能の一つで、ログイン状態を通常のライフサイクルより長く保持するための機能である。 本機能を使用すると、ブラウザを閉じた後やセッションタイムが発生した後でも、Cookieに保持しているRemember Me認証用のTokenを使用して、 ユーザ名とパスワードを再入力することなく自動でログインすることができる。 なお、本機能は、ユーザーがログイン状態を保持することを許可した場合のみ有効となる。
Spring Securityは、「Hash-Based Token 方式のRemember Me認証」と「Persistent Token 方式のRemember Me認証」をサポートしており、 デフォルトではHash-Based Token方式が使用される。
Remember Me認証を利用する場合は、<sec:remember-me>タグを追加する。
- spring-security.xmlの定義例
<sec:http>
    <!-- omitted -->
    <sec:remember-me key="terasoluna-tourreservation-km/ylnHv"
        token-validity-seconds="#{30 * 24 * 60 * 60}" />  <!-- (1) (2) -->
    <!-- omitted -->
</sec:http>
| 項番 | 説明 |
|---|---|
(1)
|
key属性に、Remember Me認証用のTokenを生成したアプリケーションを識別するキー値を指定する。キー値の指定が無い場合、アプリケーションの起動毎にユニークな値が生成される。
なお、Hash-Based Tokenが保持しているキー値とサーバーで保持しているキー値が異なる場合、無効なTokenとして扱われる。
つまり、アプリケーションを再起動する前に生成したHash-Based Tokenを有効なTokenとして扱いたい場合は、
key属性の指定は必須である。 |
(2)
|
token-validity-seconds属性に、Remember Me認証用のTokenの有効時間を秒単位で指定する。指定が無い場合、デフォルトで14日間が有効時間になる。
上記例では、有効時間として30日間を設定している。
|
上記以外の属性については、Spring Security Reference -The Security Namespace (<remember-me>) -を参照されたい。
Note
Spring Security 4.0における変更
Spring Security 4.0から、以下の設定のデフォルト値が変更されている
- remember-me-parameter
- remember-me-cookie
ログインフォームには、「Remember Me認証」機能の利用有無を指定するためのフラグ(チェックボックス項目)を用意する。
- ログインフォームのJSPの実装例
<form:form action="${pageContext.request.contextPath}/login" method="post">
        <!-- omitted -->
        <tr>
            <td><label for="remember-me">Remember Me : </label></td>
            <td><input name="remember-me" id="remember-me" type="checkbox" checked="checked" value="true"></td> <!-- (1) -->
        </tr>
        <!-- omitted -->
</form:form>
| 項番 | 説明 |
|---|---|
(1)
|
「Remember Me認証」機能の利用有無を指定するためのフラグ(チェックボックス項目)を追加し、フィールド名(リクエストパラメータ名)には、
remember-me-parameterのデフォルト値であるremember-meを指定する。チェックボックスの
value属性には、trueを設定する。チェックボックスをチェック状態にしてから認証処理を実行すると、以降のリクエストから「Remember Me認証」機能が適用される。
|
Tip
value属性の設定値について
value属性には、trueを設定する旨がrememberMeRequestedのJavaDocに記載されているが、
実装上はon、yes、”1” も設定可能である。