2.3. First application based on Spring MVC
Caution
This version is already obsolete. Please check the latest guideline.
Index
Before entering into the advanced usage of Spring MVC, it is better to understand Spring MVC by actually trying hands-on web application development using Spring MVC.
2.3.1. Prerequisites
The description of this chapter has been verified on the following environment. (For other environments, replace the contents mentioned here appropriately)
| Classification | Product |
|---|---|
| OS | Windows 7 |
| JVM | Java 1.8 |
| IDE | Spring Tool Suite 3.6.4.RELEASE (Hereafter referred as [STS]) |
| Build Tool | Apache Maven 3.3.9 (Hereafter referred as [Maven]) |
| Application Server | Pivotal tc Server Developer Edition v3.1 (enclosed in STS) |
| Web Browser | Google Chrome 46.0.2490.80 m |
Note
To connect the internet via proxy server, STS Proxy settings and Maven Proxy settings are required for the following operations.
2.3.2. Create a New Project
Create project using mvn archetype:generate on internet.
mvn archetype:generate -B^
 -DarchetypeCatalog=http://repo.terasoluna.org/nexus/content/repositories/terasoluna-gfw-releases^
 -DarchetypeGroupId=org.terasoluna.gfw.blank^
 -DarchetypeArtifactId=terasoluna-gfw-web-blank-archetype^
 -DarchetypeVersion=5.1.0.RELEASE^
 -DgroupId=com.example.helloworld^
 -DartifactId=helloworld^
 -Dversion=1.0.0-SNAPSHOT
Here, created a project on Windows environment.
C:\work>mvn archetype:generate -B^
More?  -DarchetypeCatalog=http://repo.terasoluna.org/nexus/content/repositories/terasoluna-gfw-releases^
More?  -DarchetypeGroupId=org.terasoluna.gfw.blank^
More?  -DarchetypeArtifactId=terasoluna-gfw-web-blank-archetype^
More?  -DarchetypeVersion=5.1.0.RELEASE^
More?  -DgroupId=com.example.helloworld^
More?  -DartifactId=helloworld^
More?  -Dversion=1.0.0-SNAPSHOT
[INFO] Scanning for projects...
[INFO]
[INFO] ------------------------------------------------------------------------
[INFO] Building Maven Stub Project (No POM) 1
[INFO] ------------------------------------------------------------------------
[INFO]
[INFO] >>> maven-archetype-plugin:2.2:generate (default-cli) > generate-sources @ standalone-pom >>>
[INFO]
[INFO] <<< maven-archetype-plugin:2.2:generate (default-cli) < generate-sources @ standalone-pom <<<
[INFO]
[INFO] --- maven-archetype-plugin:2.2:generate (default-cli) @ standalone-pom ---
[INFO] Generating project in Batch mode
[INFO] Archetype repository missing. Using the one from [org.terasoluna.gfw.blank:terasoluna-gfw-web-blank-archetype:1.0.0.RELEASE -> http://repo.terasoluna.org/nexus/content/repositories/terasoluna-gfw-releases] found in catalog http://repo.terasoluna.org/nexus/content/repositories/terasoluna-gfw-releases
[INFO] ----------------------------------------------------------------------------
[INFO] Using following parameters for creating project from Archetype: terasoluna-gfw-web-blank-archetype:5.1.0.RELEASE
[INFO] ----------------------------------------------------------------------------
[INFO] Parameter: groupId, Value: com.example.helloworld
[INFO] Parameter: artifactId, Value: helloworld
[INFO] Parameter: version, Value: 1.0.0-SNAPSHOT
[INFO] Parameter: package, Value: com.example.helloworld
[INFO] Parameter: packageInPathFormat, Value: com/example/helloworld
[INFO] Parameter: package, Value: com.example.helloworld
[INFO] Parameter: version, Value: 1.0.0-SNAPSHOT
[INFO] Parameter: groupId, Value: com.example.helloworld
[INFO] Parameter: artifactId, Value: helloworld
[INFO] project created from Archetype in dir: C:\work\helloworld
[INFO] ------------------------------------------------------------------------
[INFO] BUILD SUCCESS
[INFO] ------------------------------------------------------------------------
[INFO] Total time: 1.631 s
[INFO] Finished at: 2015-07-31T08:47:12+00:00
[INFO] Final Memory: 11M/26M
[INFO] ------------------------------------------------------------------------
C:\work>
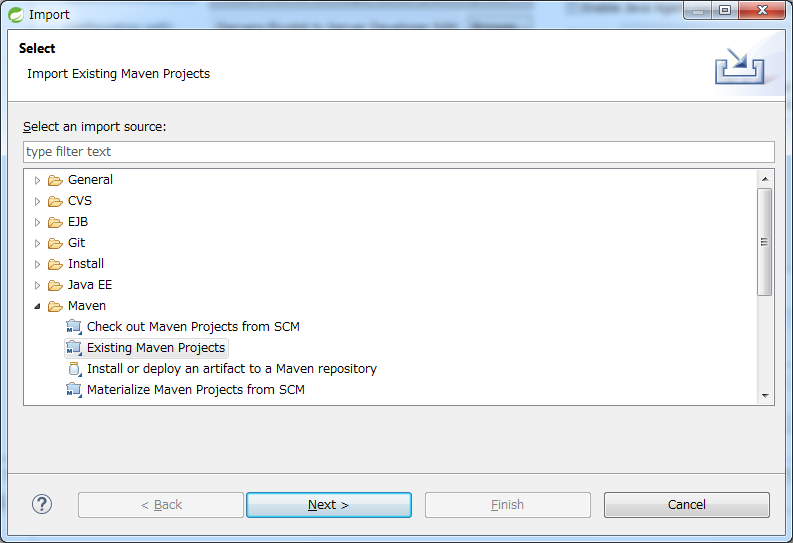
Select the archetype created project from STS menu [File] -> [Import] -> [Maven] -> [Existing Maven Projects] -> [Next].
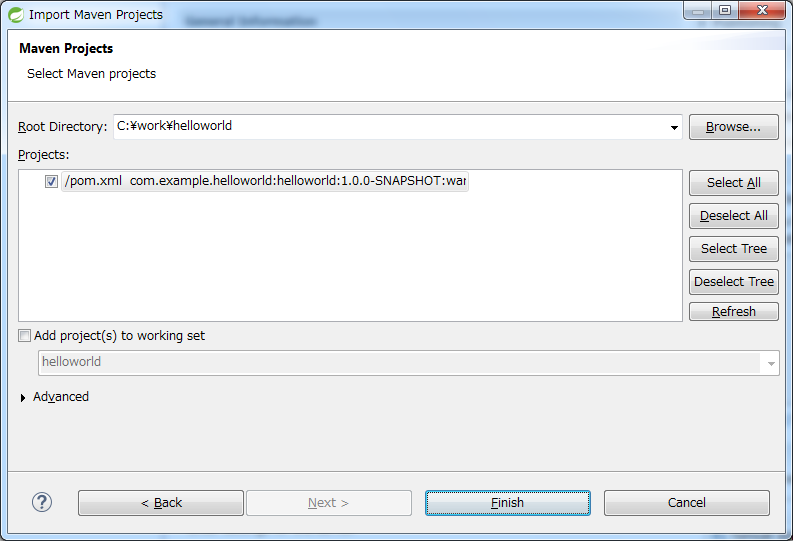
Click on [Finish] by selecting C:\work\helloworld in Root Directory and selecting pom.xml of helloworld in Projects.
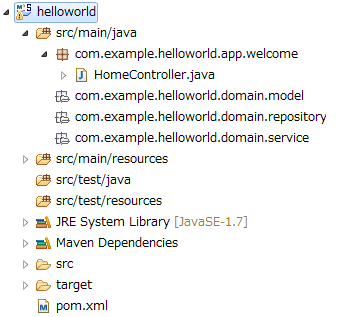
Following project is generated in the Package Explorer.
To understand the configuration of Spring MVC, the generated Spring MVC configuration file (src/main/resources/META-INF/spring/spring-mvc.xml) is described briefly.
<?xml version="1.0" encoding="UTF-8"?>
<beans xmlns="http://www.springframework.org/schema/beans"
    xmlns:xsi="http://www.w3.org/2001/XMLSchema-instance" xmlns:context="http://www.springframework.org/schema/context"
    xmlns:mvc="http://www.springframework.org/schema/mvc" xmlns:util="http://www.springframework.org/schema/util"
    xmlns:aop="http://www.springframework.org/schema/aop"
    xsi:schemaLocation="http://www.springframework.org/schema/mvc http://www.springframework.org/schema/mvc/spring-mvc.xsd
    http://www.springframework.org/schema/beans http://www.springframework.org/schema/beans/spring-beans.xsd
    http://www.springframework.org/schema/util http://www.springframework.org/schema/util/spring-util.xsd
    http://www.springframework.org/schema/context http://www.springframework.org/schema/context/spring-context.xsd
    http://www.springframework.org/schema/aop http://www.springframework.org/schema/aop/spring-aop.xsd">

    <context:property-placeholder
        location="classpath*:/META-INF/spring/*.properties" />

    <!-- (1) Enables the Spring MVC @Controller programming model -->
    <mvc:annotation-driven>
        <mvc:argument-resolvers>
            <bean
                class="org.springframework.data.web.PageableHandlerMethodArgumentResolver" />
            <bean
                class="org.springframework.security.web.method.annotation.AuthenticationPrincipalArgumentResolver" />
        </mvc:argument-resolvers>
    </mvc:annotation-driven>

    <mvc:default-servlet-handler />

    <!-- (2) -->
    <context:component-scan base-package="com.example.helloworld.app" />

    <mvc:resources mapping="/resources/**"
        location="/resources/,classpath:META-INF/resources/"
        cache-period="#{60 * 60}" />

    <mvc:interceptors>
        <mvc:interceptor>
            <mvc:mapping path="/**" />
            <mvc:exclude-mapping path="/resources/**" />
            <mvc:exclude-mapping path="/**/*.html" />
            <bean
                class="org.terasoluna.gfw.web.logging.TraceLoggingInterceptor" />
        </mvc:interceptor>
        <mvc:interceptor>
            <mvc:mapping path="/**" />
            <mvc:exclude-mapping path="/resources/**" />
            <mvc:exclude-mapping path="/**/*.html" />
            <bean
                class="org.terasoluna.gfw.web.token.transaction.TransactionTokenInterceptor" />
        </mvc:interceptor>
        <mvc:interceptor>
            <mvc:mapping path="/**" />
            <mvc:exclude-mapping path="/resources/**" />
            <mvc:exclude-mapping path="/**/*.html" />
            <bean class="org.terasoluna.gfw.web.codelist.CodeListInterceptor">
                <property name="codeListIdPattern" value="CL_.+" />
            </bean>
        </mvc:interceptor>
        <!--  REMOVE THIS LINE IF YOU USE JPA
        <mvc:interceptor>
            <mvc:mapping path="/**" />
            <mvc:exclude-mapping path="/resources/**" />
            <mvc:exclude-mapping path="/**/*.html" />
            <bean
                class="org.springframework.orm.jpa.support.OpenEntityManagerInViewInterceptor" />
        </mvc:interceptor>
            REMOVE THIS LINE IF YOU USE JPA  -->
    </mvc:interceptors>

    <!-- (3) Resolves views selected for rendering by @Controllers to .jsp resources in the /WEB-INF/views directory -->
    <!-- Settings View Resolver. -->
    <mvc:view-resolvers>
        <mvc:jsp prefix="/WEB-INF/views/" />
    </mvc:view-resolvers>

    <bean id="requestDataValueProcessor"
        class="org.terasoluna.gfw.web.mvc.support.CompositeRequestDataValueProcessor">
        <constructor-arg>
            <util:list>
                <bean class="org.springframework.security.web.servlet.support.csrf.CsrfRequestDataValueProcessor" />
                <bean
                    class="org.terasoluna.gfw.web.token.transaction.TransactionTokenRequestDataValueProcessor" />
            </util:list>
        </constructor-arg>
    </bean>

    <!-- Setting Exception Handling. -->
    <!-- Exception Resolver. -->
    <bean class="org.terasoluna.gfw.web.exception.SystemExceptionResolver">
        <property name="exceptionCodeResolver" ref="exceptionCodeResolver" />
        <!-- Setting and Customization by project. -->
        <property name="order" value="3" />
        <property name="exceptionMappings">
            <map>
                <entry key="ResourceNotFoundException" value="common/error/resourceNotFoundError" />
                <entry key="BusinessException" value="common/error/businessError" />
                <entry key="InvalidTransactionTokenException" value="common/error/transactionTokenError" />
                <entry key=".DataAccessException" value="common/error/dataAccessError" />
            </map>
        </property>
        <property name="statusCodes">
            <map>
                <entry key="common/error/resourceNotFoundError" value="404" />
                <entry key="common/error/businessError" value="409" />
                <entry key="common/error/transactionTokenError" value="409" />
                <entry key="common/error/dataAccessError" value="500" />
            </map>
        </property>
        <property name="defaultErrorView" value="common/error/systemError" />
        <property name="defaultStatusCode" value="500" />
    </bean>
    <!-- Setting AOP. -->
    <bean id="handlerExceptionResolverLoggingInterceptor"
        class="org.terasoluna.gfw.web.exception.HandlerExceptionResolverLoggingInterceptor">
        <property name="exceptionLogger" ref="exceptionLogger" />
    </bean>
    <aop:config>
        <aop:advisor advice-ref="handlerExceptionResolverLoggingInterceptor"
            pointcut="execution(* org.springframework.web.servlet.HandlerExceptionResolver.resolveException(..))" />
    </aop:config>

</beans>
| Sr. No. | Description |
|---|---|
(1)
|
Default settings of Spring MVC are configured by defining <mvc:annotation-driven>. Refer to the official website Enabling the MVC Java Config or the MVC XML Namespace for default configuration of Spring framework. |
(2)
|
Define the package which will be target of searching components used in Spring MVC. |
(3)
|
Define the location of the JSP by specifying Tip
The definition example of using the conventional
|
Next, Controller (com.example.helloworld.app.welcome.HomeController) for displaying the Welcome page is described briefly.
 package com.example.helloworld.app.welcome;

 import java.text.DateFormat;
 import java.util.Date;
 import java.util.Locale;

 import org.slf4j.Logger;
 import org.slf4j.LoggerFactory;
 import org.springframework.stereotype.Controller;
 import org.springframework.ui.Model;
 import org.springframework.web.bind.annotation.RequestMapping;
 import org.springframework.web.bind.annotation.RequestMethod;

 /**
  * Handles requests for the application home page.
  */
 @Controller // (4)
 public class HomeController {

     private static final Logger logger = LoggerFactory
             .getLogger(HomeController.class);

     /**
      * Simply selects the home view to render by returning its name.
      */
     @RequestMapping(value = "/", method = {RequestMethod.GET, RequestMethod.POST}) // (5)
     public String home(Locale locale, Model model) {
         logger.info("Welcome home! The client locale is {}.", locale);

         Date date = new Date();
         DateFormat dateFormat = DateFormat.getDateTimeInstance(DateFormat.LONG,
                 DateFormat.LONG, locale);

         String formattedDate = dateFormat.format(date);

         model.addAttribute("serverTime", formattedDate); // (6)

         return "welcome/home"; // (7)
     }

 }
| Sr. No. | Description |
|---|---|
(4)
|
It can be read automatically by DI container if @Controller annotation is used. As stated earlier in [explanation of Spring MVC configuration files (2)], it is the target of component-scan. |
(5)
|
It gets executed when the HTTP method is GET or POST and the Resource is (or request URL) is “/”. |
(6)
|
Set Model object to be delivered to View. |
(7)
|
Return View name. “WEB-INF/views/welcome/home.jsp” is rendered as per the configuration [Explanation of Spring MVC configuration files (3)] . |
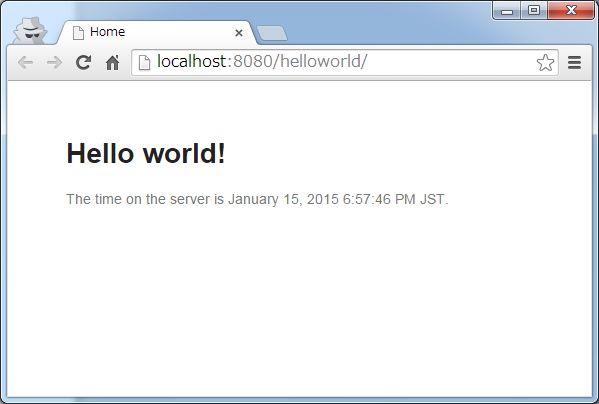
Lastly, JSP (src/main/webapp/WEB-INF/views/welcome/home.jsp) for displaying the Welcome page is described briefly.
<!DOCTYPE html>
<html>
<head>
<meta charset="utf-8">
<title>Home</title>
<link rel="stylesheet"
    href="${pageContext.request.contextPath}/resources/app/css/styles.css">
</head>
<body>
    <div id="wrapper">
        <h1>Hello world!</h1>
        <p>The time on the server is ${serverTime}.</p> <%-- (8) --%>
    </div>
</body>
</html>
| Sr. No. | Description |
|---|---|
(8)
|
As stated earlier in [explanation of Controller (6)] the object (serverTime) set in Model is stored in HttpServletRequest.
Therefore the value passed from Controller can be output by mentioning However about ${XXX}, it is necessary to perform HTML escaping since there is possibility of XSS attack. |
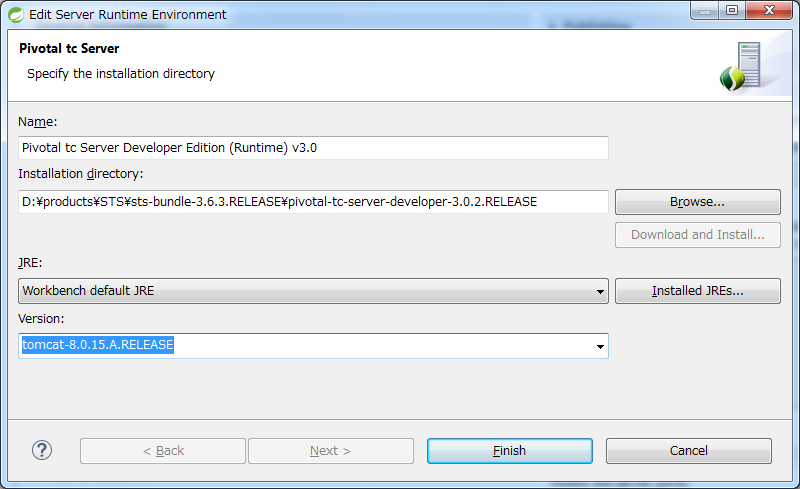
2.3.3. Run on Server
Note
Since tc Server internally uses the Tomcat, it is possible to choose below two versions in the STS.
- tomcat-8.0.15.A.RELEASE (version used by default)
- tomcat-7-0.57.A.RELEASE
If you want to switch the Tomcat to be used, change the [Version] field of ts Server by opening the [Edit Server Runtime Environment] dialog box. Java (JRE) version can also be changed from this dialog box.
2.3.4. Create an Echo Application
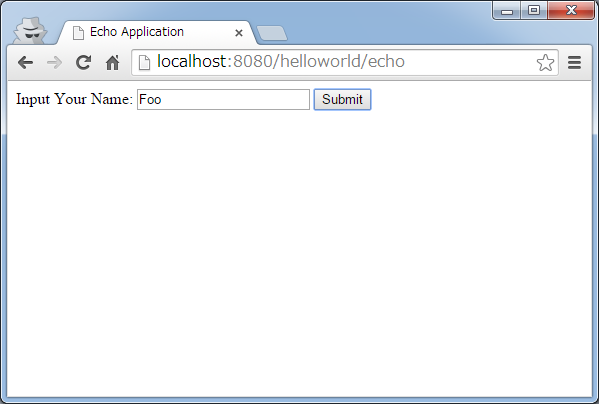
Lets go ahead and create a simple application. It is a typical eco application in which message will be displayed if name is entered in the text field as given below.
2.3.4.1. Creating a form object
EchoForm class under com.example.helloworld.app.echo package. It is a simple JavaBean that has only one1 property.package com.example.helloworld.app.echo;
import java.io.Serializable;
public class EchoForm implements Serializable {
private static final long serialVersionUID = 2557725707095364445L;
private String name;
public void setName(String name) {
this.name = name;
}
public String getName() {
return name;
}
}
2.3.4.2. Create a Controller
EchoController class under com.example.helloworld.app.echo package.package com.example.helloworld.app.echo;
import org.springframework.stereotype.Controller;
import org.springframework.ui.Model;
import org.springframework.web.bind.annotation.ModelAttribute;
import org.springframework.web.bind.annotation.RequestMapping;
import org.springframework.web.bind.annotation.RequestMethod;
@Controller
@RequestMapping("echo")
public class EchoController {
@ModelAttribute // (1)
public EchoForm setUpEchoForm() {
EchoForm form = new EchoForm();
return form;
}
@RequestMapping // (2)
public String index(Model model) {
return "echo/index"; // (3)
}
@RequestMapping(value = "hello", method = RequestMethod.POST) // (4)
public String hello(EchoForm form, Model model) {// (5)
model.addAttribute("name", form.getName()); // (6)
return "echo/hello";
}
}
| Sr. No. | Description |
|---|---|
(1)
|
Add
@ModelAttribute annotation to the method. Return value of such a method is automatically added to the Model.Attribute name of the Model can be specified in
@ModelAttribute, but the class name with the first letter in lower case is the default attribute name. In this case it will be “echoForm”. This attribute name must match with the value of modelAttribute of form:form tag. |
(2)
|
When nothing is specified in
value attribute of @RequestMapping annotation at the method level, it is mapped to @RequestMapping added at class level. In this case, index method is called, if “<contextPath>/echo” is accessed.When nothing is set in
method attribute, mapping is done for any HTTP method. |
(3)
|
Since “echo/index” is returned as View name, “WEB-INF/views/echo/index.jsp” is rendered by the ViewResolver.
|
(4)
|
Since “hello” is specified in
value attribute and RequestMethod.POST is specified in method attribute of the @RequestMapping annotation method, if “<contextPath>/echo/hello” is accessed with POST method, hello method is called. |
(5)
|
EchoForm object added to the model in (1) is passed as argument.
|
(6)
|
name entered in form is passed as it is to the View. |
Note
The value specified in the method attribute of @RequestMapping annotation is
generally varied by how the data transmitted from the client.
- POST method in case of storing data to the server (in case of updating process).
- GET method or unspecified (any method) in case of not storing data to the server (in case of referring process).
In echo application,
indexmethod is not going to save data to the server, it is unspecified (any method)hellomethod is going to save data intoModelobject, it is POST method
etc are specified.
2.3.4.3. Create JSP Files
Finally create JSP for input screen and output screen. Each file path must match with View name as follows.
Create input screen (src/main/webapp/WEB-INF/views/echo/index.jsp).
<!DOCTYPE html>
<html>
<head>
<title>Echo Application</title>
</head>
<body>
  <%-- (1) --%>
  <form:form modelAttribute="echoForm" action="${pageContext.request.contextPath}/echo/hello">
    <form:label path="name">Input Your Name:</form:label>
    <form:input path="name" />
    <input type="submit" />
  </form:form>
</body>
</html>
| Sr. No. | Description |
|---|---|
(1)
|
HTML form is constructed using tag library. Specify the name of form object created by Controller in
modelAttribute attribute.Refer here for tag library.
|
Note
POST method is used if method attribute of <form:form> tag is omitted.
The generated HTML is as follows
<!DOCTYPE html>
<html>
<head>
<title>Echo Application</title>
</head>
<body>
  <form id="echoForm" action="/helloworld/echo/hello" method="post">
    <label for="name">Input Your Name:</label>
    <input id="name" name="name" type="text" value=""/>
    <input type="submit" />
  <input type="hidden" name="_csrf" value="43595f38-3edd-4c08-843b-3c31a00d2b15" />
</form>
</body>
</html>
Create output screen (src/main/webapp/WEB-INF/views/echo/hello.jsp).
<!DOCTYPE html>
<html>
<head>
<title>Echo Application</title>
</head>
<body>
  <p>
    Hello <c:out value="${name}" /> <%-- (2) --%>
  </p>
</body>
</html>
| Sr. No. | Description |
|---|---|
(2)
|
Output “name” passed from Controller. Take countermeasures for XSS using
c:out tag. |
Note
Here, XSS countermeasure taken using c:out standard tag, however, f:h() function provided in common library can be used easily.
Refer to XSS Countermeasures for details.
2.3.4.4. Implement Input Validation
Till this point Input validation is not implemented in this application. In Spring MVC, Bean Validation and annotation based input validation can be easily implemented. For example name input validation is performed in Eco Application.
Add annotation for Input check rule to the name of EchoForm.
package com.example.helloworld.app.echo;

import java.io.Serializable;

import javax.validation.constraints.NotNull;
import javax.validation.constraints.Size;

public class EchoForm implements Serializable {
    private static final long serialVersionUID = 2557725707095364445L;

    @NotNull // (1)
    @Size(min = 1, max = 5) // (2)
    private String name;

    public void setName(String name) {
        this.name = name;
    }

    public String getName() {
        return name;
    }
}
| Sr. No. | Description |
|---|---|
(1)
|
Whether
name parameter exists in HTTP request or not can be checked by @NotNull annotation. |
(2)
|
Whether the size of
name is more than or equal to 1 and less than or equal to 5 can be checked by @Size(min = 1, max = 5). |
Implement the input check and the error handling when an error occurs in the input check.
package com.example.helloworld.app.echo;

import org.springframework.stereotype.Controller;
import org.springframework.ui.Model;
import org.springframework.validation.BindingResult;
import org.springframework.validation.annotation.Validated;
import org.springframework.web.bind.annotation.ModelAttribute;
import org.springframework.web.bind.annotation.RequestMapping;
import org.springframework.web.bind.annotation.RequestMethod;

@Controller
@RequestMapping("echo")
public class EchoController {

    @ModelAttribute
    public EchoForm setUpEchoForm() {
        EchoForm form = new EchoForm();
        return form;
    }

    @RequestMapping
    public String index(Model model) {
        return "echo/index";
    }

    @RequestMapping(value = "hello", method = RequestMethod.POST)
    public String hello(@Validated EchoForm form, BindingResult result, Model model) { // (1)
        if (result.hasErrors()) { // (2)
            return "echo/index";
        }
        model.addAttribute("name", form.getName());
        return "echo/hello";
    }
}
| Sr. No. | Description |
|---|---|
(1)
|
In Controller, add
@Validated annotation to the argument on which validation needs to be executed. Also add BindingResult object to the arguments.Input validation is automatically performed using Bean Validation and the result is stored in
BindingResult object. |
(2)
|
Error can be checked by executing
hasErrors method. If there is an input error, it returns View name to display the input screen. |
Add the implementation of displaying input error message on input screen (src/main/webapp/WEB-INF/views/echo/index.jsp).
<!DOCTYPE html>
<html>
<head>
<title>Echo Application</title>
</head>
<body>
  <form:form modelAttribute="echoForm" action="${pageContext.request.contextPath}/echo/hello">
    <form:label path="name">Input Your Name:</form:label>
    <form:input path="name" />
    <form:errors path="name" cssStyle="color:red" /><%-- (1) --%>
    <input type="submit" />
  </form:form>
</body>
</html>
| Sr. No. | Description |
|---|---|
(1)
|
Add
form:errors tag for displaying error message when an error occurs on input screen. |
- When an empty name is sent
- Size is more than 5 characters.
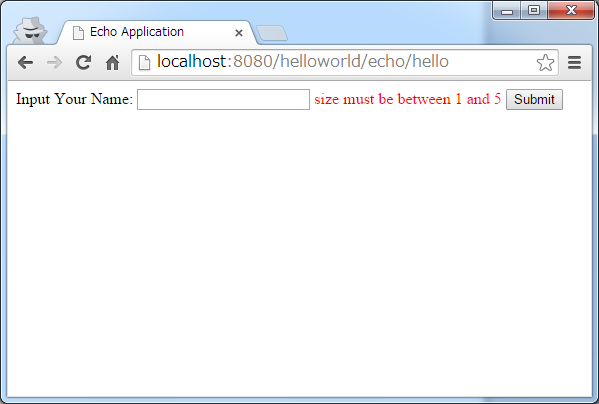
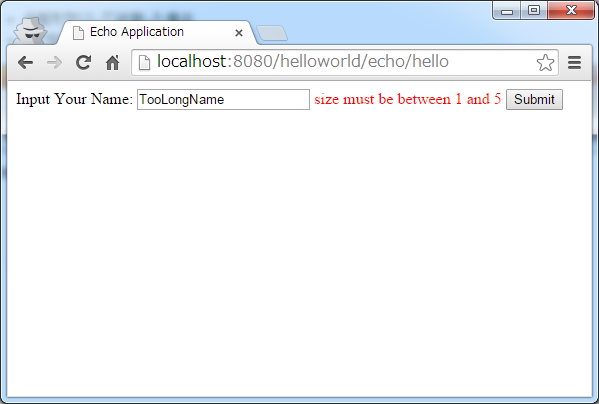
The generated HTML is as follows.
<!DOCTYPE html>
<html>
<head>
<title>Echo Application</title>
</head>
<body>
  <form id="echoForm" action="/helloworld/echo/hello" method="post">
    <label for="name">Input Your Name:</label>
    <input id="name" name="name" type="text" value=""/>
    <span id="name.errors" style="color:red">size must be between 1 and 5</span>
    <input type="submit" />
  <input type="hidden" name="_csrf" value="6e94a78d-4a2c-4a41-a514-0a60f0dbedaf" />
</form>
</body>
</html>
2.3.4.5. Summary
The following are the learnings from this chapter.
- How to create blank project using
mvn archetype:generate. - Basic Spring MVC configuration set-up
- Simplified level screen transition
- Way to pass values between screens
- Simple input validation
If above points are still not understood, it is recommended to read this chapter again and start again from building the environment.