5.12. Double Submit Protection
Caution
This version is already obsolete. Please check the latest guideline.
Table of Contents
- Overview
- How to use
- Preventing double clicking of button using JavaScript
- Using PRG (Post-Redirect-Get) pattern
- Using transaction token check
- Transaction token check provided by common library
- Attributes of
@TransactionTokenCheckannotation - Format of transaction token
- Lifecycle of transaction token
- Settings for using a transaction token check
- Settings for handling transaction token errors
- How to use transaction token check in Controller
- How to use transaction token check in View (JSP)
- When multiple usecases are to be implemented in one Controller
- Typical example of using transaction token check
- Exclusion control of parallel processing while using a session
- How to extend
- Appendix
5.12.1. Overview
5.12.1.1. Problems
If any of the operations given below is performed in a Web application with screens, it leads to same process being executed multiple times.
Sr. No. Operation Operation Overview
Each problem is described in detail below.
5.12.1.1.1. Double clicking of ‘Update’ button
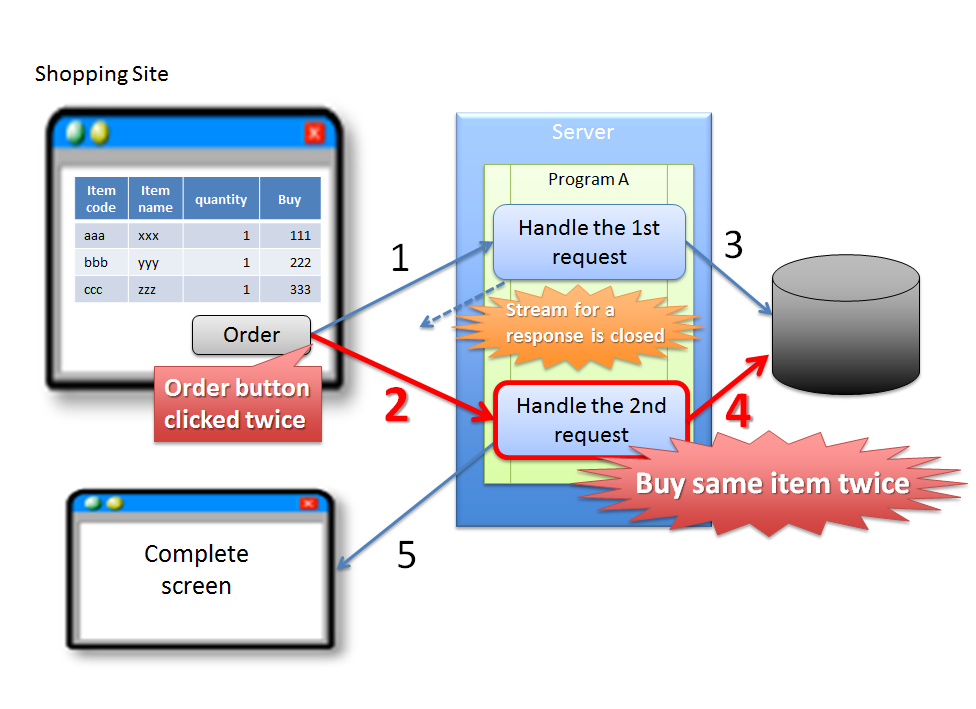
Sr. No. Description Warning
In the above case, since buyer accidentally clicks ‘Order’ button again, it results in duplicate purchase of same product. Although the problem can be attributed to erroneous operation by the buyer, it is desirable to have the application design such that the above problems do not occur.
5.12.1.1.2. Reloading of screen after completion of update process
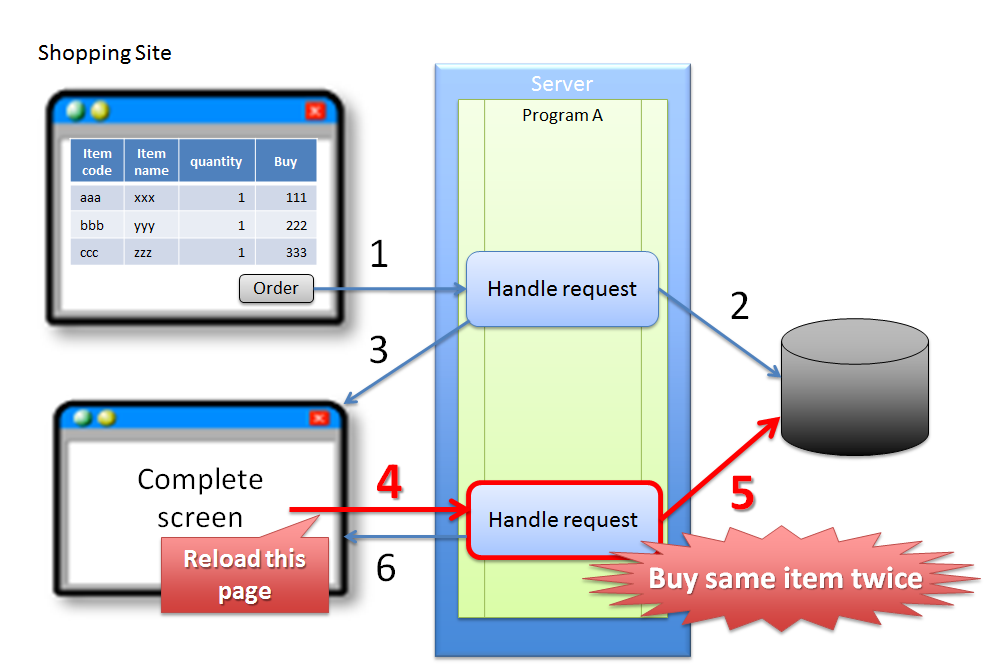
Sr. No. Description Warning
In the above case, since buyer accidentally executes Reload functionality of the browser, it results in duplicate purchase of same product. Although the problem can be attributed to erroneous operation by the buyer, it is desirable to have the application design such that the above problems do not occur.
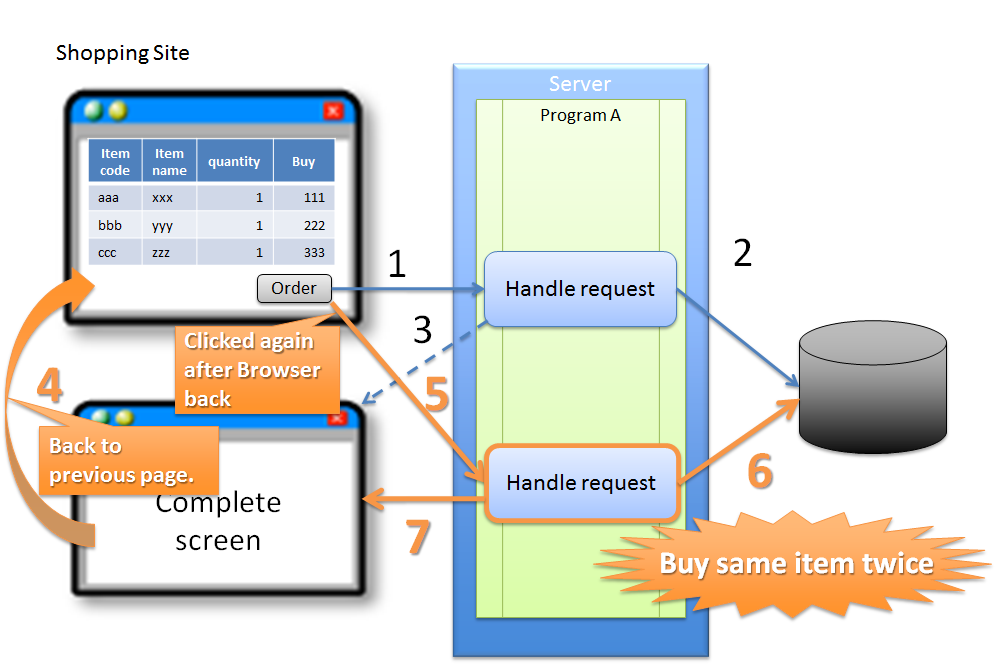
5.12.1.1.3. Invalid screen transition using ‘Back’ button of the browser
Sr. No. Description Note
In the above case, since buyer does not perform any erroneous operation, the problem is not attributed to the buyer.
However, if update process gets executed even after performing invalid screen operations, the following problems occur.
Warning
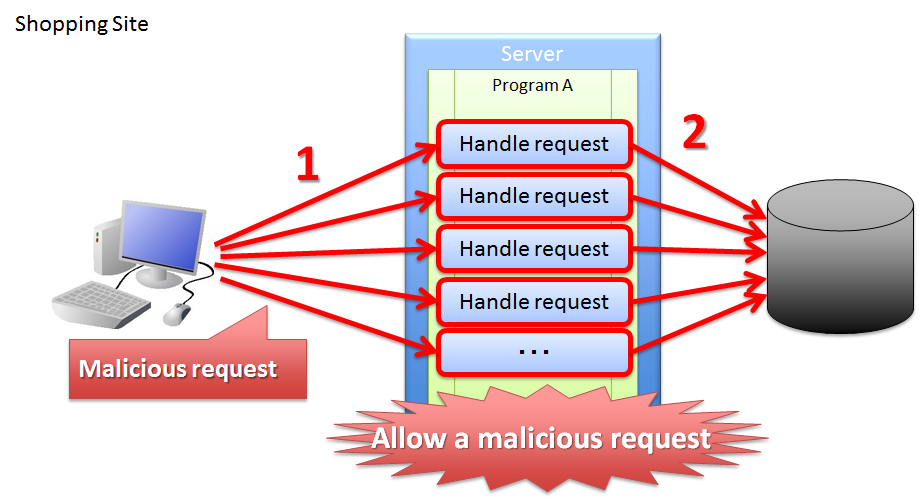
As described above, update process getting executed even after performing invalid screen operations increases the risk of direct updates by a malicious attacker bypassing a valid route.
Sr. No. Description Execution of purchase process through an invalid request increases the load on each server resulting in inability to purchase products through a valid route. As a result, the problem causes a ripple effect for the users who purchase the products through valid routes. Hence, it is desirable to have the application design such that the above problems do not occur.
5.12.1.2. Solutions
Sr. No. Solution Overview Note
When only transaction token check is performed, even a simple operational mistake can lead to transaction token error which in turn results in a low-usability application for the user.
To ensure usability as well as to prevent the problems that occur due to double submission, measures such as “Preventing double clicking of a button using JavaScript” and “Applying PRG (Post-Redirect-Get) pattern” are necessary.
** Although this guideline recommends that you implement all the measures, the decision should be taken depending on application requirements.**
Warning
In Ajax and Web services, since it is difficult to transfer transaction tokens which change for each request, transaction token check need not be used. In Ajax, double submit protection should be performed using only one of the above measures i.e. “Preventing double clicking of a button using JavaScript”.
Todo
TBD
There is further scope for reviewing the check methods in Ajax and Web services.
5.12.1.2.1. Preventing double clicking of a button using JavaScript
- By disabling the button or link so that it cannot be clicked
- By maintaining a flag for tracking process status and displaying notification “Process in progress” when the button or link is clicked in the middle of the process.
The image when a button is disabled will be as follows:
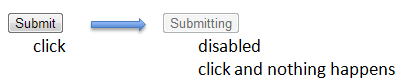
Warning
If all the buttons and links on the screen are disabled, the screen operations can no longer be performed if there is no response from the Server. Therefore, it is recommended not to disable buttons or links that execute events such as “Return to previous screen” or “Go to top screen” etc.
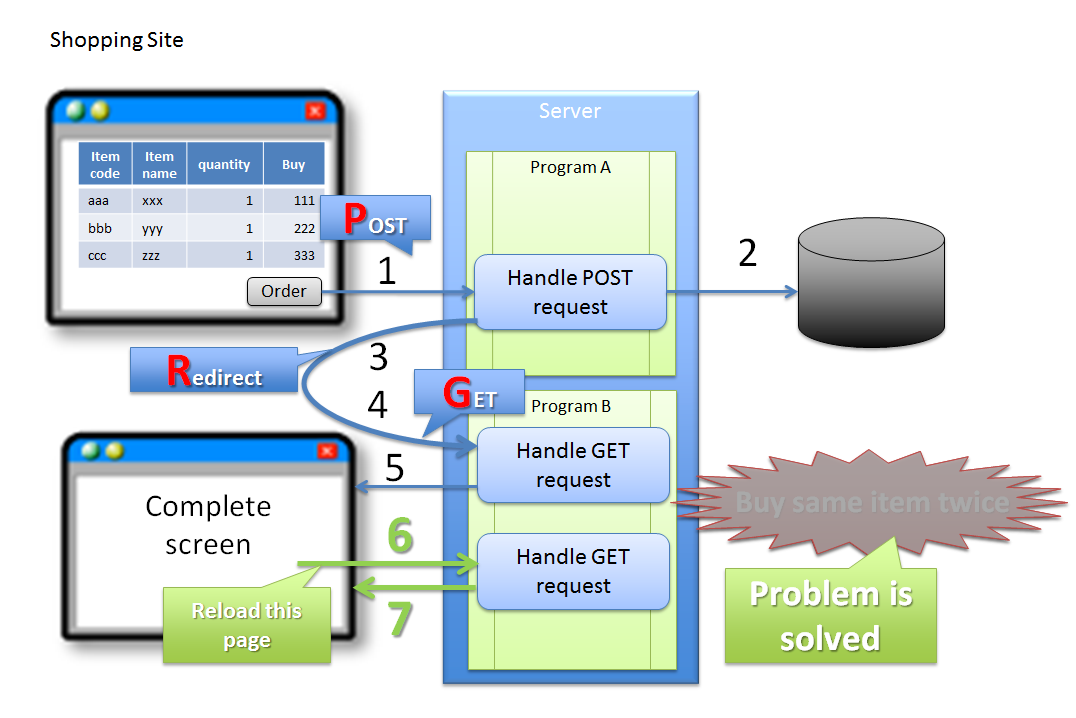
5.12.1.2.2. About PRG (Post-Redirect-Get) pattern
Sr. No. Description Note
It is recommended to use PRG pattern for the processes associated with update process and implement a control so that a request of GET method is sent when ‘Refresh’ button of the browser is clicked.
Warning
In the PRG pattern, the re-execution of update process cannot be prevented by clicking ‘Back’ button of the browser on Completion screen. A transaction token check must be performed to prevent re-execution of update process after an invalid screen transition using ‘Back’ button of the browser.
5.12.1.2.3. Transaction Token Check
Transaction token check consists of the following 3 processes.
- When a request is received from Client, the Server stores a value (hereafter referred to as transaction token) for uniquely identifying a transaction on the Server.
- Server passes the transaction token to the Client. In case of a Web application with screens, it passes the transaction token to the Client using hidden tag of form.
- When submitting the next request, Client sends the transaction token that was passed from the Server. Server compares the transaction token received from the Client and the transaction token stored on the Server.
When the transaction token sent in the request does not match with the transaction token stored on the Server, it is treated as invalid request and an error is returned.
Warning
Misuse of transaction token check leads to poor usability of the application; hence the scope of its usage should be defined by considering the following points.
The process flow when expected operations are performed and process flow when unexpected operations are performed using transaction token check are shown below.
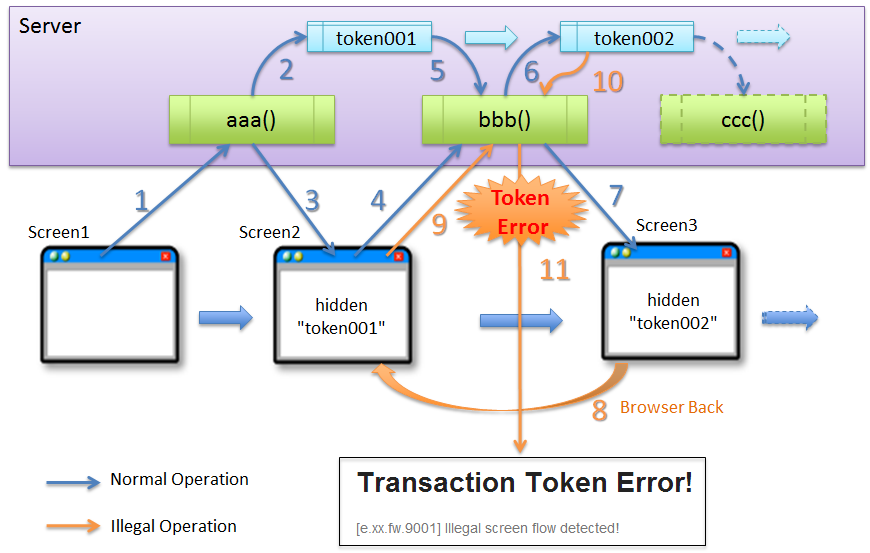
Sr. No. Description
Sr. No. Description
The 3 events described below can be prevented by transaction token check.
- Invalid screen transition in case of a business process that requires fixed screen transition
- Data update due to invalid requests that do not involve valid screen transitions
- Duplicate execution of update process due to double submission
Invalid screen transition in case of a business process that requires fixed screen transition, can be prevented by the flow shown below.
Sr. No. Description
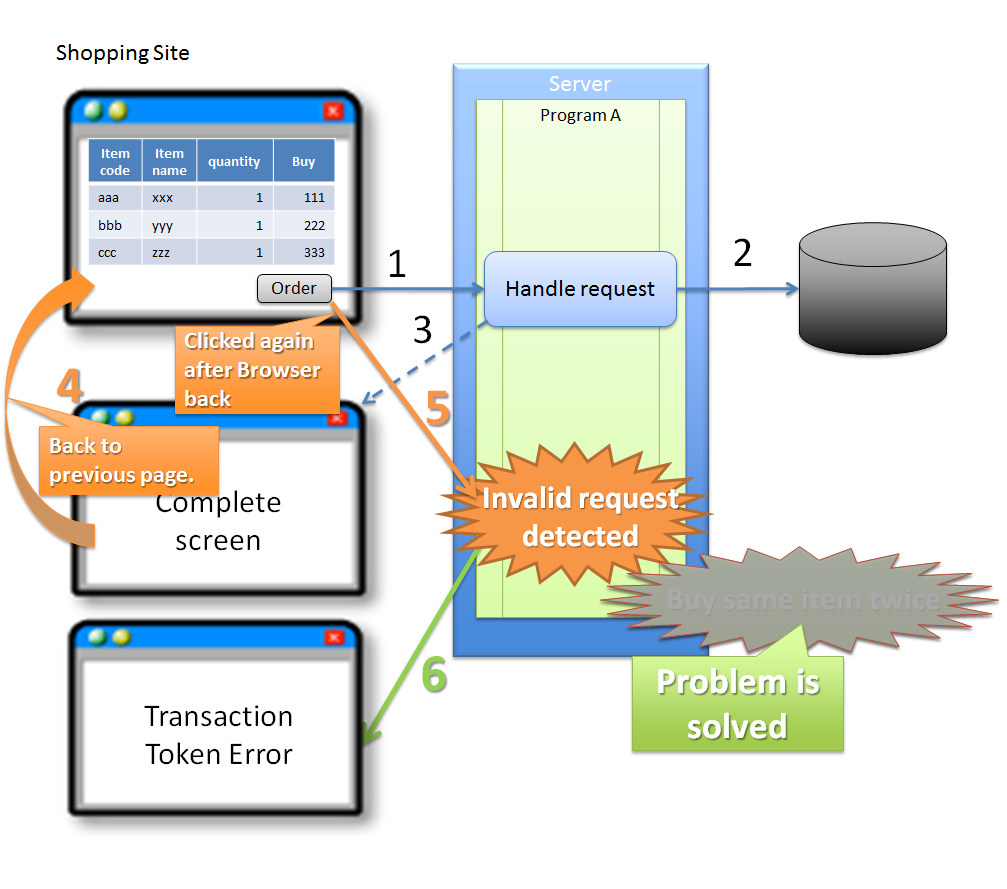
Data updated by an invalid request which does not involve a valid screen transition can be prevented by the flow shown below.
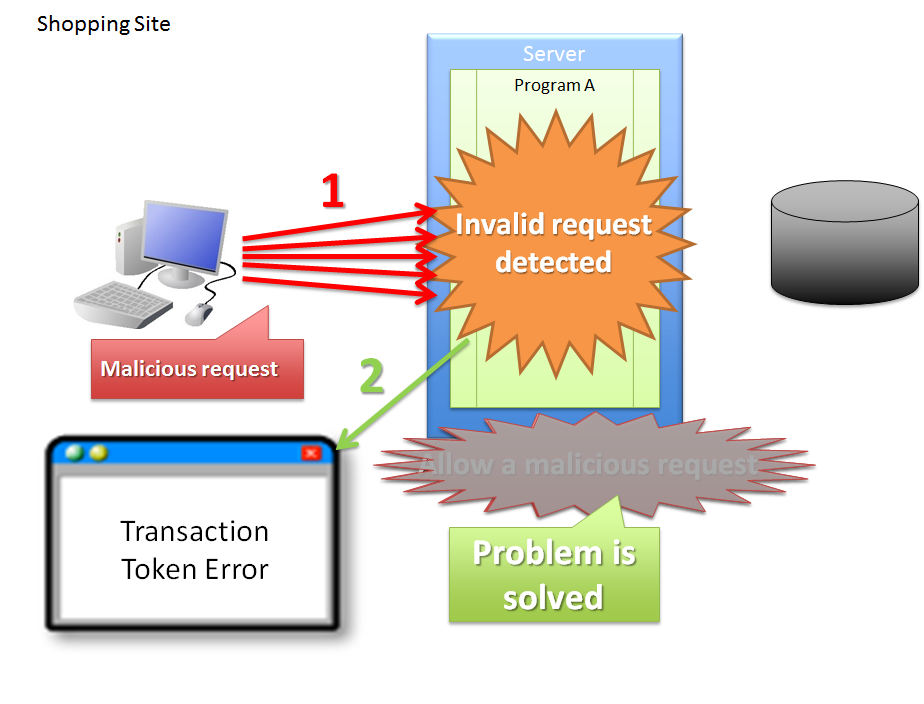
Sr. No. Description
Duplicate execution of update process at the time of double submission can be prevented by the flow shown below.
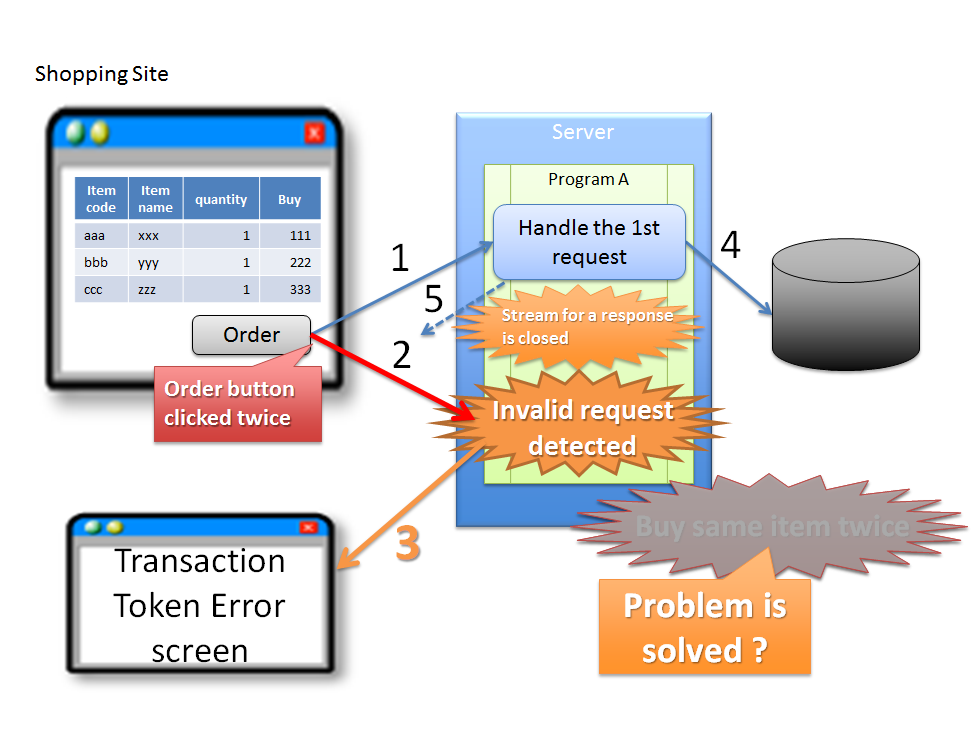
Sr. No. Description Warning
This can prevent duplicate execution of update process at the time of double submission; however this does not resolve the problem of server not being able to respond with a screen to notify the completion of process. Therefore, it is also recommended to deal with this problem by preventing double clicking of a button using JavaScript.
5.12.1.3. About NameSpace of transaction token
In the transaction token check functionality provided by the common library, it is possible to set a NameSpace in the container for storing transaction token. This enables parallel execution of update process using a tab browser or multiple windows.
5.12.1.3.1. Problems that occur when there is no NameSpace
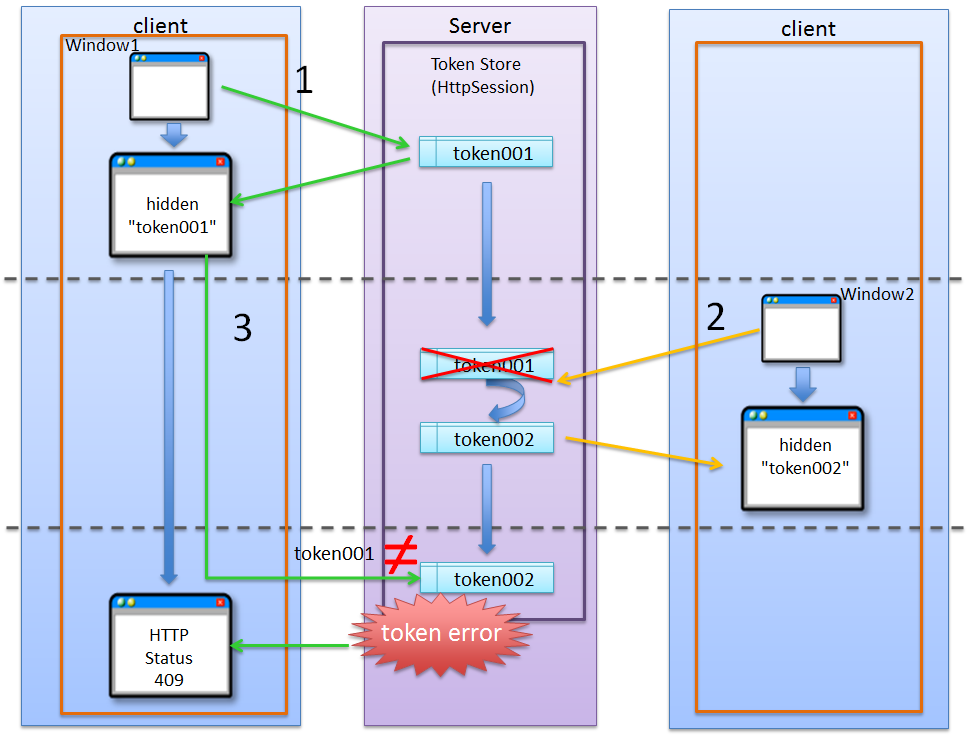
Sr. No. Description Warning
The update process cannot be executed concurrently in absence of NameSpace; hence the application becomes a low-usability application.
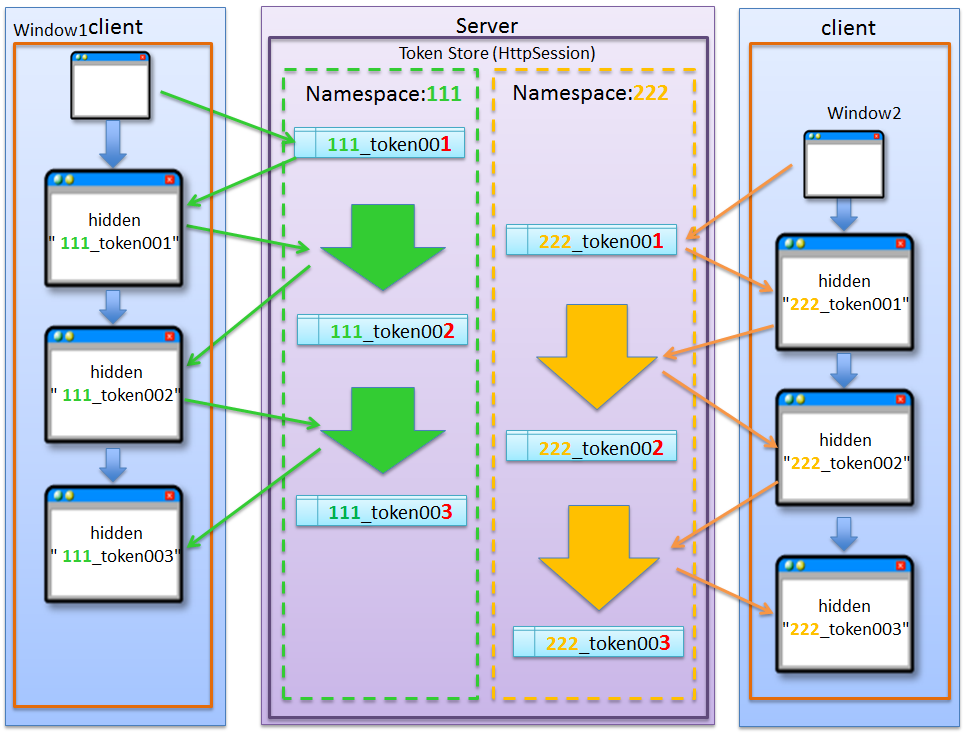
5.12.1.3.2. Behavior when NameSpace is specified
5.12.2. How to use
5.12.2.1. Preventing double clicking of button using JavaScript
Todo
TBD
The check method in JavaScript will be described in detail in subsequent versions.
5.12.2.2. Using PRG (Post-Redirect-Get) pattern
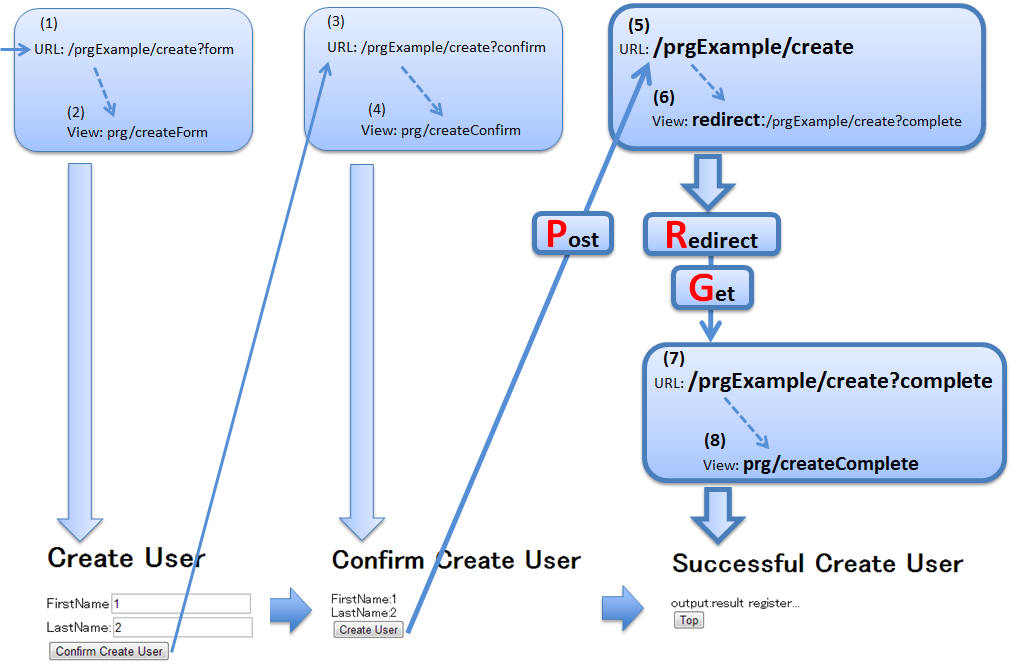
- Controller
@Controller
@RequestMapping("prgExample")
public class PostRedirectGetExampleController {

    @Inject
    UserService userService;

    @ModelAttribute
    public PostRedirectGetForm setUpForm() {
        PostRedirectGetForm form = new PostRedirectGetForm();
        return form;
    }

    @RequestMapping(value = "create",
                    method = RequestMethod.GET,
                    params = "form") // (1)
    public String createForm(
        PostRedirectGetForm postRedirectGetForm,
        BindingResult bindingResult) {
        return "prg/createForm"; // (2)
    }

    @RequestMapping(value = "create",
                    method = RequestMethod.POST,
                    params = "confirm") // (3)
    public String createConfirm(
        @Validated PostRedirectGetForm postRedirectGetForm,
        BindingResult bindingResult) {
        if (bindingResult.hasErrors()) {
            return "prg/createForm";
        }
        return "prg/createConfirm"; //  (4)
    }

    @RequestMapping(value = "create",
                    method = RequestMethod.POST) // (5)
    public String create(
        @Validated PostRedirectGetForm postRedirectGetForm,
        BindingResult bindingResult,
        RedirectAttributes redirectAttributes) {
        if (bindingResult.hasErrors()) {
            return "prg/createForm";
        }

        // omitted

        String output = "result register..."; // (6)
        redirectAttributes.addFlashAttribute("output", output); // (6)
        return "redirect:/prgExample/create?complete"; // (6)
    }

    @RequestMapping(value = "create",
                    method = RequestMethod.GET,
                    params = "complete") // (7)
    public String createComplete() {
        return "prg/createComplete"; // (8)
    }
}
Sr. No. Description "prgExample/create?complete"byGETmethod.When data is to be delivered to redirect destination, addFlashAttribute method ofRedirectAttributesis called and the data to be delivered is added.addAttribute method ofModelcannot deliver data to the redirect destination.ViewResolverdefined inspring-mvc.xml, it is omitted from the return value of the handler method.Note
- At the time of redirecting, assign “redirect:” as the prefix of transition information to be returned by the handler method as the return value.
- When the data is to be delivered to the process of redirect destination, call addFlashAttribute method of
RedirectAttributesand add the data to be delivered.
createForm.jsp
<h1>Create User</h1>
<div id="prgForm">
  <form:form
    action="${pageContext.request.contextPath}/rpgExample/create"
    method="post" modelAttribute="postRedirectGetForm">
    <form:label path="firstName">FirstName</form:label>
    <form:input path="firstName" /><br>
    <form:label path="lastName">LastName:</form:label>
    <form:input path="lastName" /><br>
    <form:button name="confirm">Confirm Create User</form:button>
  </form:form>
</div>
createConfirm.jsp
<h1>Confirm Create User</h1>
<div id="prgForm">
  <form:form
    action="${pageContext.request.contextPath}/rpgExample/create"
    method="post"
    modelAttribute="postRedirectGetForm">
    FirstName:${f:h(postRedirectGetForm.firstName)}<br>
    <form:hidden path="firstName" />
    LastName:${f:h(postRedirectGetForm.lastName)}<br>
    <form:hidden path="lastName" />
    <form:button>Create User</form:button> <%-- (6) --%>
  </form:form>
</div>
Sr. No. Description
createComplete.jsp
<h1>Successful Create User Completion</h1>
<div id="prgForm">
  <form:form
    action="${pageContext.request.contextPath}/rpgExample/create"
    method="get" modelAttribute="postRedirectGetForm">
    output:${f:h(output)}<br> <%-- (7) --%>
    <form:button name="backToTop">Top</form:button>
  </form:form>
</div>
Sr. No. Description RedirectAttributes.In the above example,"output"is the attribute name to refer to the delivered data.
5.12.2.3. Using transaction token check
5.12.2.3.1. Transaction token check provided by common library
Transaction token check functionality of common library provides @org.terasoluna.gfw.web.token.transaction.TransactionTokenCheck annotation to perform the following tasks:
- Creation of NameSpace for transaction token
- Starting the transaction
- Token value check in the transaction
- Ending the transaction
The transaction token check can be performed declaratively by assigning @TransactionTokenCheck annotation for the
Controller class and the handler methods of the Controller class.
5.12.2.3.2. Attributes of @TransactionTokenCheck annotation
The attributes that can be specified in @TransactionTokenCheck annotation are explained below.
@TransactionTokenCheckAnnotation Parameter List¶Sr. No. Attribute Name Contents default Example
value None value = "create"value =part can be omitted if there is only one argument.
namespace None namespace = "create"Synonymous withvalue = "create". It is used as an alternative to value attribute since value attribute cannot be used while using@TransactionTokenCheckas a meta-annotation.
type IN Note
It is recommended that the value to be set in value attribute or namespace attribute should be same as the config value of “value” attribute for
@RequestMappingannotation.Note
In “type” attribute, NONE and END can be specified; however, the description is omitted as normally they are not used.
5.12.2.3.3. Format of transaction token
Format for the transaction token used in the transaction token check of common library is as follows:

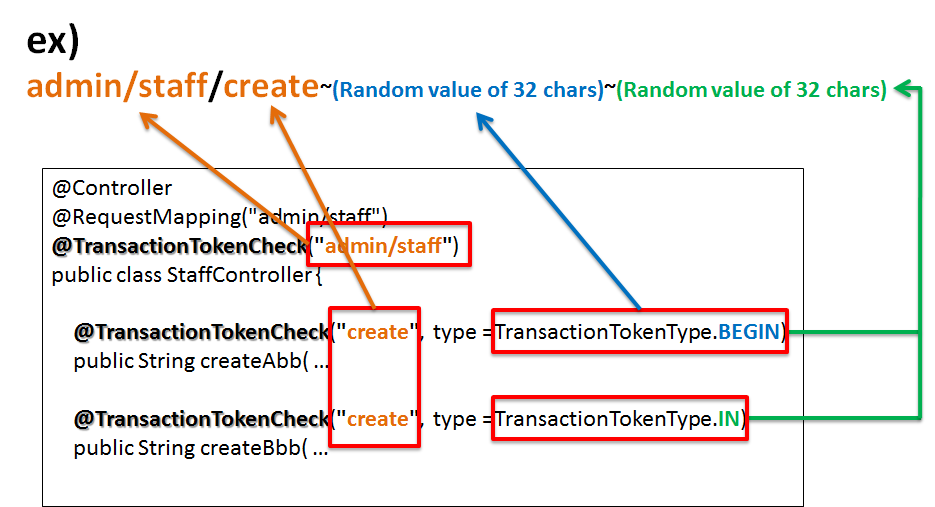
Sr. No. Components Description NameSpace
- NameSpace is an element for assigning a logical name to identify a series of screen transitions.
- By setting a NameSpace, it is possible to prevent the requests belonging to different Namespaces from interfering with each other and it is also possible to increase the number of screen transitions that can operate in parallel.
- The value specified in the “value” attribute of
@TransactionTokenCheckannotation is used as the value to be used for NameSpace.- When both “value” attribute of the “class” annotation and “value” attribute of the “method” annotation are specified, the value which concatenates both the values with
"/"is used as NameSpace. When the same value is specified in multiple methods, the methods belong to same NameSpace.- When the “value” attribute is specified only in “class” annotation, all the NameSpaces of the transaction tokens generated in that class will be the value specified in “class” annotation.
- When the “value” attribute is specified only in “method” annotation, the NameSpace of the generated transaction tokens will be the value specified in “method” annotation. When the same value is specified in multiple methods, the methods belong to same NameSpace.
- When both “value” attribute of “class” annotation and “value” attribute of “method” annotation are omitted, the method belong to the global token. For global token, refer to Global Tokens.
TokenKey
TokenKey is an element for identifying the transactions stored in the Namespace.
TokenKey is generated upon execution of a method wherein
TransactionTokenType.BEGINis declared in the “type” attribute of@TransactionTokenCheckannotation.TransactionTokenType.BEGIN, a new transaction will be stored as a valid transaction by discarding the TokenKey with the oldest date and time of execution (Least Recently Used (LRU)).TokenValue
- TokenValue is an element for storing the token value of the transaction.
- TokenValue is generated upon execution of the method wherein
TransactionTokenType.BEGINorTransactionTokenType.INis declared in the “type” attribute of@TransactionTokenCheckannotation.Warning
When the “value” attribute is specified only in “method” annotation and if the same value is specified in another Controller, it should be noted that it will be handled as a request for carrying out a series of screen transitions. “value” attribute should be specified by this method only when the screen transitions across Controllers are to be treated as the same transaction.
Basically, it is recommended not to use the method wherein “value” attribute is specified only in “method” annotation.
Note
The method for specifying NameSpace is classified according to creation granularity of the Controller,
- when “value” attributes of both “class” annotation and “method” annotation are specified
- when “value” attribute is specified only in “class” annotation
5.12.2.3.4. Lifecycle of transaction token
The lifecycle (Generate, Update, Discard) control of transaction token is performed in the following scenarios.
Sr. No. Lifecycle Control Description TransactionTokenType.BEGINis specified in “type” attribute of@TransactionTokenCheckannotation, is terminated.TransactionTokenType.INis specified in “type” attribute of@TransactionTokenCheckannotation, is terminated.@TransactionTokenCheckannotation, is called, the transaction token specified in the request parameter is discarded and unnecessary transaction is terminated.[2]If a new transaction starts when number of transaction tokens (TokenKey) that can be stored in NameSpace has reached the maximum limit, the transaction token with the oldest date and time of execution is discarded and the transaction is forcibly terminated.[3]When exceptions such as system error occur, the transaction token specified in the request parameter is discarded and the transaction is terminated.Note
A maximum limit is provided for the number of transaction tokens (TokenKey) which can be stored in a NameSpace. When the maximum limit is reached while generating a new transaction token, a new transaction is managed as a valid transaction, by discarding the transaction token which has the TokenKey with the oldest date and time of execution (Least Recently Used (LRU)).
The maximum limit of transaction tokens that can be stored for each NameSpace is 10 by default. To change the maximum limit, refer to How to change the maximum limit of transaction tokens .
- A default value (10) is specified as the maximum limit for the number of transaction tokens that can be stored in the NameSpace.
@TransactionTokenCheck("name")is specified as the class annotation of Controller.- Transaction tokens of the same NameSpace have reached the maximum limit.
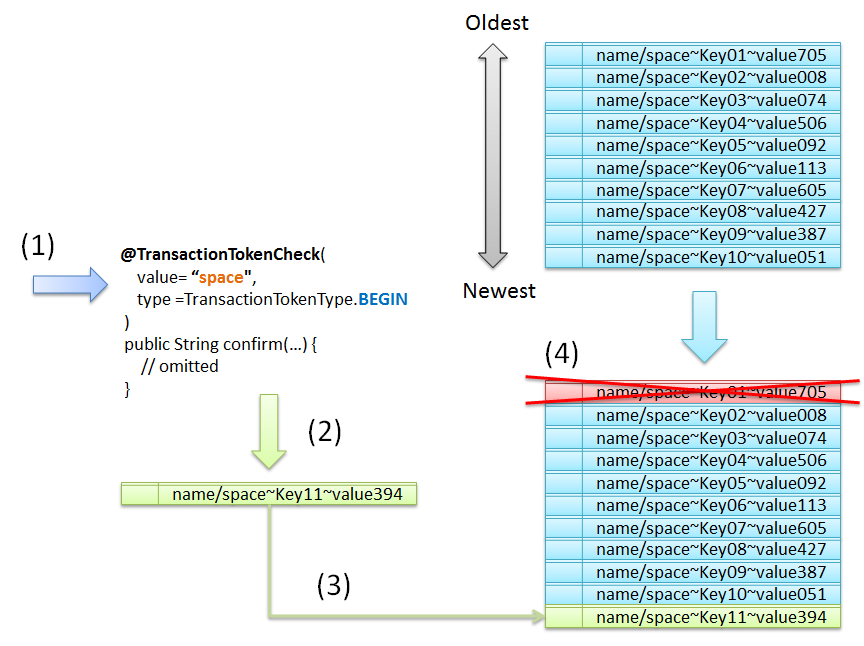
Sr. No. Description
5.12.2.3.5. Settings for using a transaction token check
The settings for using the transaction token check provided by the common library are shown below.
spring-mvc.xml
<mvc:interceptors>
    <mvc:interceptor> <!-- (1) -->
        <mvc:mapping path="/**" /> <!-- (2) -->
        <mvc:exclude-mapping path="/resources/**" /> <!-- (2) -->
        <mvc:exclude-mapping path="/**/*.html" /> <!-- (2) -->
        <!-- (3) -->
        <bean
            class="org.terasoluna.gfw.web.token.transaction.TransactionTokenInterceptor" />
    </mvc:interceptor>
</mvc:interceptors>

<bean id="requestDataValueProcessor"
    class="org.terasoluna.gfw.web.mvc.support.CompositeRequestDataValueProcessor">
    <constructor-arg>
        <util:list>
            <!-- (4) -->
            <bean class="org.terasoluna.gfw.web.token.transaction.TransactionTokenRequestDataValueProcessor" />
            <!-- omitted -->
        </util:list>
    </constructor-arg>
</bean>
Sr. No. Description HandlerInterceptorto generate and check transaction tokens.HandlerInterceptoris to be applied.In the above example, it is applicable to all the requests except the requests under /resources and the requests to HTML.TransactionTokenInterceptor) to generate and check transaction tokens using@TransactionTokenCheckannotation.TransactionTokenRequestDataValueProcessor) for automatic embedding of the transaction token to the Hidden area using<fomr:form>tag of Spring MVC.
5.12.2.3.6. Settings for handling transaction token errors
InvalidTransactionTokenException to the following settings.ExceptionCodeResolverdefined inapplicationContext.xmlSystemExceptionResolverdefined inspring-mvc.xml
For adding the settings, refer to the following:
5.12.2.3.7. How to use transaction token check in Controller
- Controller
@Controller
@RequestMapping("transactionTokenCheckExample")
@TransactionTokenCheck("transactionTokenCheckExample") // (1)
public class TransactionTokenCheckExampleController {

    @RequestMapping(params = "first", method = RequestMethod.GET)
    public String first() {
        return "transactionTokenCheckExample/firstView";
    }

    @RequestMapping(params = "second", method = RequestMethod.POST)
    @TransactionTokenCheck(type = TransactionTokenType.BEGIN) // (2)
    public String second() {
        return "transactionTokenCheckExample/secondView";
    }

    @RequestMapping(params = "third", method = RequestMethod.POST)
    @TransactionTokenCheck // (3)
    public String third() {
        return "transactionTokenCheckExample/thirdView";
    }

    @RequestMapping(params = "fourth", method = RequestMethod.POST)
    @TransactionTokenCheck // (3)
    public String fourth() {
        return "transactionTokenCheckExample/fourthView";
    }

    @RequestMapping(params = "fifth", method = RequestMethod.POST)
    @TransactionTokenCheck // (3)
    public String fifth() {
        return "redirect:/transactionTokenCheckExample?complete";
    }

    @RequestMapping(params = "complete", method = RequestMethod.GET)
    public String complete() { // (4)
        return "transactionTokenCheckExample/fifthView";
    }

}
Sr. No. Description @RequestMappingwhich is the recommended pattern of this guideline is specified.@TransactionTokenCheck(type = TransactionTokenType.IN)is specified.@TransactionTokenCheckannotation is not specified.Note
- When BEGIN is specified in the “type” attribute of
@TransactionTokenCheckannotation, transaction token is not checked since a new TokenKey is generated.- When IN is specified in the “type” attribute of
@TransactionTokenCheckannotation, it is checked whether the token value specified in the request and the token value stored on the server are the same.
5.12.2.3.8. How to use transaction token check in View (JSP)
<form:form> tag is recommended as a method to submit it as a request parameter after carrying out Settings for using a transaction token check.firstView.jsp
<h1>First</h1>
<form:form method="post" action="transactionTokenCheckExample">
  <input type="submit" name="second" value="second" />
</form:form>
secondView.jsp
<h1>Second</h1>
<form:form method="post" action="transactionTokenCheckExample"><!-- (1) -->
  <input type="submit" name="third" value="third" />
</form:form>
thirdView.jsp
<h1>Third</h1>
<form:form method="post" action="transactionTokenCheckExample"><!-- (1) -->
  <input type="submit" name="fourth" value="fourth" />
</form:form>
fourthView.jsp
When
<form:form>tag is used<h1>Fourth</h1> <form:form method="post" action="transactionTokenCheckExample"><!-- (1) --> <input type="submit" name="fifth" value="fifth" /> </form:form>
When ``<form>`` tag of HTML is used
<h1>Fourth</h1>
<form method="post" action="transactionTokenCheckExample">
  <t:transaction /><!-- (2) -->
  <!-- (3) -->
  <input type="hidden" name="${f:h(_csrf.parameterName)}"
                       value="${f:h(_csrf.token)}"/>
  <input type="submit" name="fifth" value="fifth" />
</form>
fifthView.jsp
<h1>Fifth</h1>
<form:form method="get" action="transactionTokenCheckExample">
  <input type="submit" name="first" value="first" />
</form:form>
Sr. No. Description <form:form>tag is used in JSP and if BEGIN or IN is specified in “type” attribute of@TransactionTokenCheckannotation, the Value ofname="_TRANSACTION_TOKEN"is automatically embedded as a hidden tag.<form>tag of HTML is used, a hidden tag same as (1) is embedded using<t:transaction />.<form>tag of HTML is used, csrf token necessary for CSRF token check provided by Spring Security needs to be embedded as a hidden item.For csrf token necessary for CSRF token check, refer to Coordination by using Spring MVC.Note
If
<form:form>tag is used, the parameters necessary for CSRF token check are also automatically embedded. Refer to Coordination while using HTML form for the parameters necessary for CSRF token check.Note
<t:transaction />is a JSP tag library provided by the common library. For the “t:” used in (2), refer to Creating common JSP for include.
- Example of Output HTML
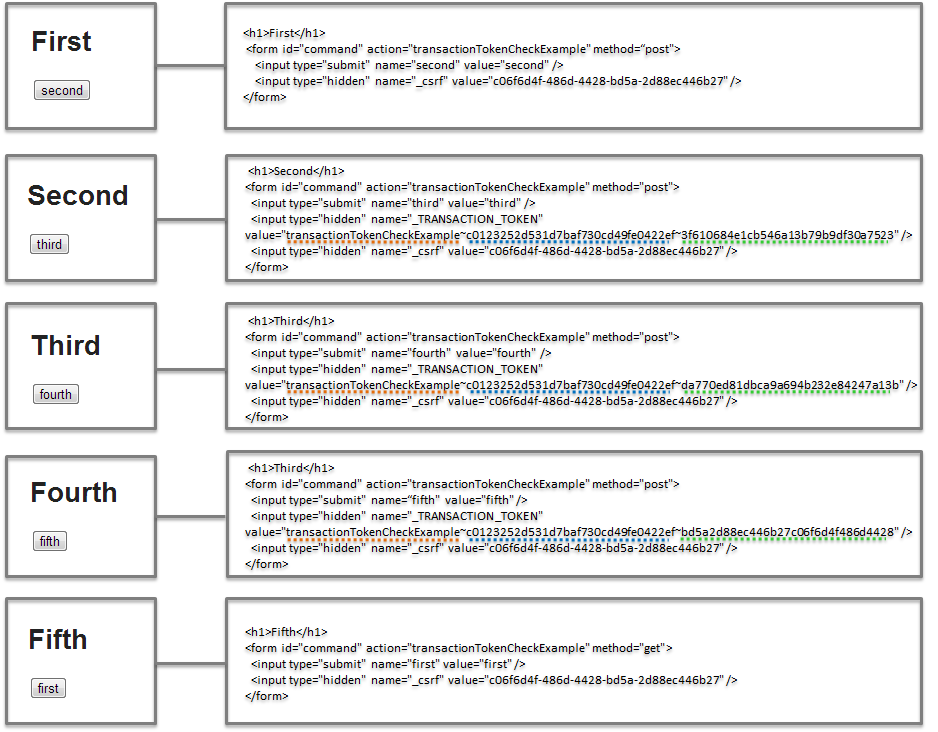
Following observations can be made upon verifying the output HTML.
- For NameSpace, the value specified in “value” attribute of the class annotation is set.In the above example,
"transactionTokenCheckExample"(underlined in orange) is the NameSpace. - For TokenKey, the value that was issued at the start of the transaction is circulated and set.In the above example,
"c0123252d531d7baf730cd49fe0422ef"(underlined in blue) is the TokenKey. - Value to be set for TokenValue varies depending on request.In the above example,
"3f610684e1cb546a13b79b9df30a7523","da770ed81dbca9a694b232e84247a13b","bd5a2d88ec446b27c06f6d4f486d4428"(underlined in green) are TokenValues.
5.12.2.3.9. When multiple usecases are to be implemented in one Controller
- Controller
@Controller
@RequestMapping("transactionTokenChecFlowkExample")
@TransactionTokenCheck("transactionTokenChecFlowkExample") // (1)
public class TransactionTokenCheckFlowExampleController {

    @RequestMapping(value = "flowOne",
                    params = "first",
                    method = RequestMethod.GET)
    public String flowOneFirst() {
        return "transactionTokenChecFlowkExample/flowOneFirstView";
    }

    @RequestMapping(value = "flowOne",
                    params = "second",
                    method = RequestMethod.POST)
    @TransactionTokenCheck(value = "flowOne",
                           type = TransactionTokenType.BEGIN) // (2)
    public String flowOneSecond() {
        return "transactionTokenChecFlowkExample/flowOneSecondView";
    }

    @RequestMapping(value = "flowOne",
                    params = "third",
                    method = RequestMethod.POST)
    @TransactionTokenCheck(value = "flowOne",
                           type = TransactionTokenType.IN)   // (2)
    public String flowOneThird() {
        return "transactionTokenChecFlowkExample/flowOneThirdView";
    }

    @RequestMapping(value = "flowTwo",
                   params = "first",
                    method = RequestMethod.GET)
    public String flowTwoFirst() {
        return "transactionTokenChecFlowkExample/flowTwoFirstView";
    }

    @RequestMapping(value = "flowTwo",
                    params = "second",
                    method = RequestMethod.POST)
    @TransactionTokenCheck(value = "flowTwo",
                           type = TransactionTokenType.BEGIN) // (3)
    public String flowTwoSecond() {
        return "transactionTokenChecFlowkExample/flowTwoSecondView";
    }

    @RequestMapping(value = "flowTwo",
                    params = "third",
                    method = RequestMethod.POST)
    @TransactionTokenCheck(value = "flowTwo",
                           type = TransactionTokenType.IN) // (3)
    public String flowTwoThird() {
        return "transactionTokenChecFlowkExample/flowTwoThirdView";
    }

    @RequestMapping(value = "flowThree",
                    params = "first",
                    method = RequestMethod.GET)
    public String flowThreeFirst() {
        return "transactionTokenChecFlowkExample/flowThreeFirstView";
    }

    @RequestMapping(value = "flowThree",
                    params = "second",
                    method = RequestMethod.POST)
    @TransactionTokenCheck(value = "flowThree",
                           type = TransactionTokenType.BEGIN) // (4)
    public String flowThreeSecond() {
        return "transactionTokenChecFlowkExample/flowThreeSecondView";
    }

    @RequestMapping(value = "flowThree",
                    params = "third",
                    method = RequestMethod.POST)
    @TransactionTokenCheck(value = "flowThree",
                           type = TransactionTokenType.IN) // (4)
    public String flowThreeThird() {
        return "transactionTokenChecFlowkExample/flowThreeThirdView";
    }

}
Sr. No. Description @RequestMappingwhich is a recommended pattern of this guideline, is specified."flowOne".In the above example, the value same as the “value” attribute of@RequestMappingwhich is a recommended pattern of this guideline, is specified."flowTwo".In the above example, the value same as the “value” attribute of@RequestMappingwhich is a recommended pattern of this guideline, is specified."flowThree".In the above example, the value same as the “value” attribute of@RequestMappingwhich is a recommended pattern of this guideline, is specified.Note
Allocating a NameSpace for each usecase enables transaction token check for each usecase.
5.12.2.3.10. Typical example of using transaction token check
See the example below wherein transaction token check is applied for the usecase which carries out a simple screen transition such as “Input Screen-> Confirmation Screen-> Completion Screen”.
- Controller
@Controller
@RequestMapping("user")
@TransactionTokenCheck("user") // (1)
public class UserController {

    // omitted

    @RequestMapping(value = "create", params = "form")
    public String createForm(UserCreateForm form) { // (2)
      return "user/createForm";
    }

    @RequestMapping(value = "create",
                  params = "confirm",
                  method = RequestMethod.POST)
    @TransactionTokenCheck(value = "create",
                         type = TransactionTokenType.BEGIN) // (3)
    public String createConfirm(@Validated
    UserCreateForm form, BindingResult result) {

        // omitted

        return "user/createConfirm";
    }

    @RequestMapping(value = "create", method = RequestMethod.POST)
    @TransactionTokenCheck(value = "create") // (4)
    public String create(@Validated
    UserCreateForm form, BindingResult result) {

        // omitted

        return "redirect:/user/create?complete";
    }

    @RequestMapping(value = "create", params = "complete")
    public String createComplete() { // (5)
        return "user/createComplete";
    }

    // omitted

}
Sr. No. Description "user"is set as “class” annotation.In the above example, the value same as “value” attribute of@RequestMappingannotation which is a recommended pattern, is specified.@TransactionTokenCheckannotation is not specified in the example given above.@TransactionTokenCheckannotation is not specified in the example given above.Warning
It is necessary to specify the View (JSP) for the transition destination of handler method wherein
@TransactionTokenCheckannotation is defined. If other than View (JSP) of the redirect destination is specified as transition destination, the value of TransactionToken changes in the next process always resulting in the TransactionToken error.
5.12.2.3.11. Exclusion control of parallel processing while using a session
When a form object is stored in a session using @SessionAttribute annotation,
and if multiple screen transitions of the same processing are performed in parallel, screen operations may interfere with each other and the values displayed on the screen and the values stored in the session may no longer match.
Transaction token check function can be used to prevent requests from non-conforming screens as the invalid requests.
The maximum limit of transaction tokens that can be stored for each NameSpace is set to 1.
spring-mvc.xml
<mvc:interceptor>
    <mvc:mapping path="/**" />
    <!-- omitted -->
    <bean
        class="org.terasoluna.gfw.web.token.transaction.TransactionTokenInterceptor">
        <constructor-arg value="1"/> <!-- (1) -->
    </bean>
</mvc:interceptor>
Sr. No. Description Note
When form objects etc. are stored in session using
@SessionAttributeannotation, the requests from the screen displaying old data can be prevented as invalid requests by setting number of transaction token stored for each NameSpace to “1”.
5.12.3. How to extend
5.12.3.1. How to manage the lifecycle of transaction tokens using a program
It is possible to receive org.terasoluna.gfw.web.token.transaction.TransactionTokenContext as an argument for handler method of Controller and manage the lifecycle of transaction tokens programmatically by adding the settings give below.
spring-mvc.xml
<mvc:annotation-driven>
  <mvc:argument-resolvers>
    <!-- (1) -->
    <bean
      class="org.terasoluna.gfw.web.token.transaction.TransactionTokenContextHandlerMethodArgumentResolver" />
  </mvc:argument-resolvers>
</mvc:annotation-driven>
Sr. No. Description <mvc:argument-resolvers>element, set the class (TransactionTokenContextHandlerMethodArgumentResolver) which passes the object (TransactionTokenContext) managing the lifecycle of transaction tokens programmatically, as an argument for methods of Controller.When it is not necessary to manage the lifecycle of transaction tokens using a program, this setting is not required.Note
This setting is not required as the transaction tokens that can no longer be used are automatically discarded when the tokens that can be stored in a NameSpace exceeds the maximum limit.
5.12.3.2. How to change the maximum limit of transaction tokens
The maximum limit of transaction tokens that can be stored on 1 NameSpace can be changed by performing settings given below.
spring-mvc.xml
<mvc:interceptors>
    <mvc:interceptor>
        <mvc:mapping path="/**" />
        <mvc:exclude-mapping path="/resources/**" />
        <mvc:exclude-mapping path="/**/*.html" />
        <bean
            class="org.terasoluna.gfw.web.token.transaction.TransactionTokenInterceptor" />
        <constructor-arg value="5"/> <!-- (1) -->
    </mvc:interceptor>
</mvc:interceptors>
Sr. No. Description TransactionTokenInterceptor.The default value (value that is set when the default constructor is used) is 10.In the above example, the default value (10) is changed to 5.
5.12.4. Appendix
5.12.4.1. Transaction Token Check in case that the cache of browser is disabled
If the cache of web browser is disabled due to Cache-Control in HTTP response header,
the message will display which tells the cache has been expired before transaction token error
in case of the illegal operation flow in “Transaction Token Check”
Concretely, the following screen will display when the browser back button is clicked (8). This is an example of Internet Explorer 11.
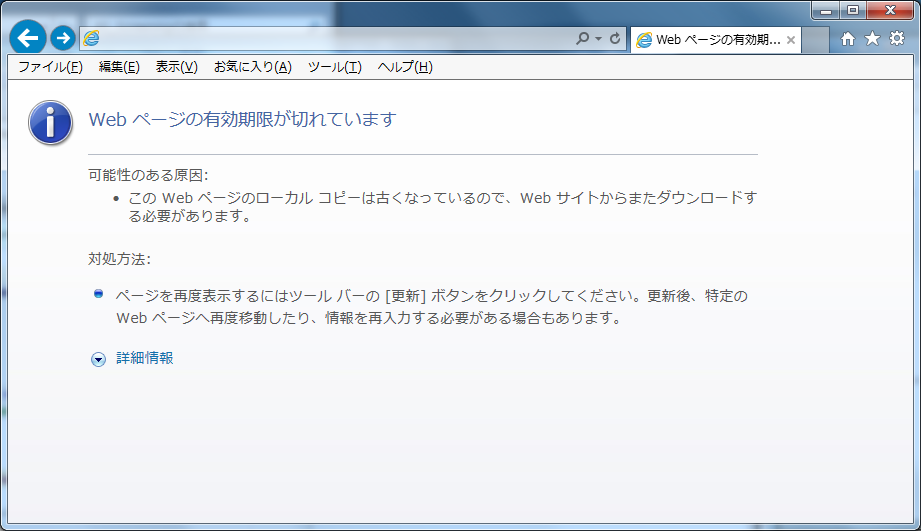
There is no problem because the double submit itself is prevented.
In blank projects after 5.0.0.RELEASE, it is configured so that the cache is disabled by Spring Security.
If showing the transaction error screen is preferred instead of the screen above,
excluding <sec:cache-control /> is required.
However, <sec:cache-control /> should be configured from the point of view of security.
5.12.4.2. Global Tokens
@TransactionTokenCheck annotation is not specified, it is handled as global transaction token."globalToken" (fixed value) is used for the NameSpace of global transaction tokens.Note
When only a single screen transition is to be allowed as an overall application, it can be implemented by setting the maximum limit of transaction tokens that can be stored for each NameSpace to 1 and using the global token.
The settings and implementation example when only a single screen transition is to be allowed as an overall application are shown below.
5.12.4.2.1. Changing the maximum limit of transaction tokens that can be stored for each NameSpace
The maximum limit of transaction tokens that can be stored for each NameSpace is set to 1.
spring-mvc.xml
<mvc:interceptor>
    <mvc:mapping path="/**" />
    <!-- omitted -->
    <bean
        class="org.terasoluna.gfw.web.token.transaction.TransactionTokenInterceptor">
        <constructor-arg value="1"/> <!-- (1) -->
    </bean>
</mvc:interceptor>
Sr. No. Description
5.12.4.2.2. Implementation of Controller
The value is not specified in “value” attribute of @TransactionTokenCheck annotation, in order to make it the NameSpace for global tokens.
- Controller
@Controller
@RequestMapping("globalTokenCheckExample")
public class GlobalTokenCheckExampleController { // (1)

    @RequestMapping(params = "first", method = RequestMethod.GET)
    public String first() {
        return "globalTokenCheckExample/firstView";
    }

    @RequestMapping(params = "second", method = RequestMethod.POST)
    @TransactionTokenCheck(type = TransactionTokenType.BEGIN) // (2)
    public String second() {
        return "globalTokenCheckExample/secondView";
    }

    @RequestMapping(params = "third", method = RequestMethod.POST)
    @TransactionTokenCheck // (2)
    public String third() {
        return "globalTokenCheckExample/thirdView";
    }

    @RequestMapping(params = "fourth", method = RequestMethod.POST)
    @TransactionTokenCheck // (2)
    public String fourth() {
        return "globalTokenCheckExample/fourthView";
    }

    @RequestMapping(params = "fifth", method = RequestMethod.POST)
    public String fifth() {
        return "globalTokenCheckExample/fifthView";
    }

}
Sr. No. Description @TransactionTokenCheckannotation is not specified as the class annotation.@TransactionTokenCheckannotation to be specified as “method” annotation is not specified.
- Example of Output HTML
JSP used is same as the one created in How to use transaction token check in View (JSP) .Other details are same except change in action from"transactionTokenCheckExample"to"globalTokenCheckExample".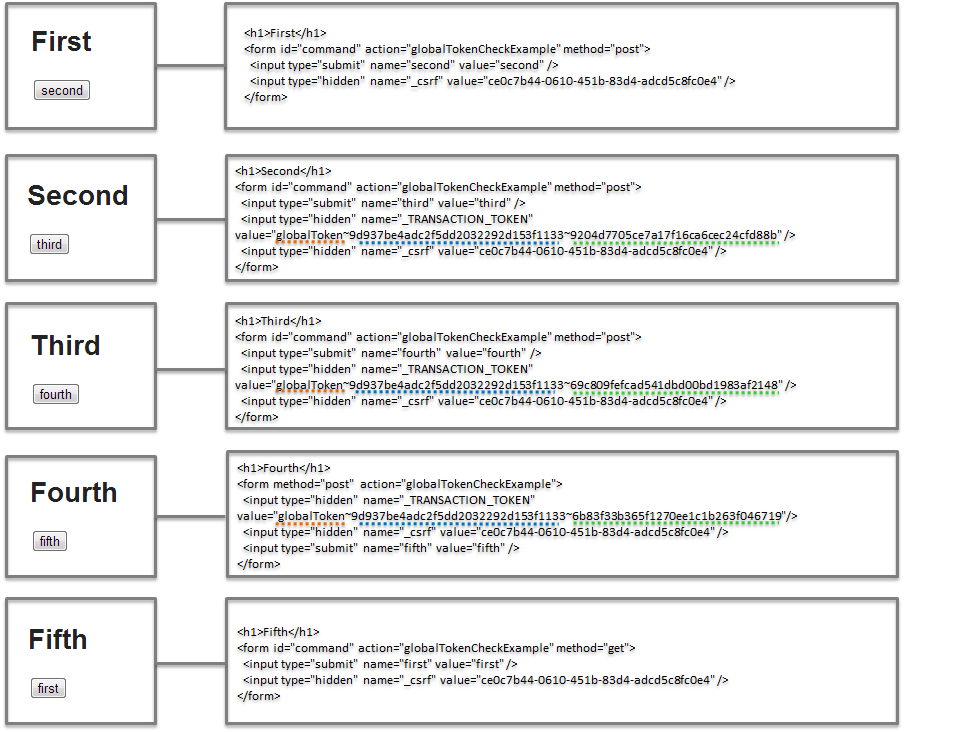
Following observations can be made upon verifying the output HTML.
- For NameSpace, a fixed value called
"globalToken"is set. - For TokenKey, the value that was issued while starting the transaction is circulated and set.In the above example,
"9d937be4adc2f5dd2032292d153f1133"(underlined in blue) is the TokenKey. - Value to be set for TokenValue varies depending on request.In the above example,
"9204d7705ce7a17f16ca6cec24cfd88b","69c809fefcad541dbd00bd1983af2148","6b83f33b365f1270ee1c1b263f046719"(underlined in green) are TokenValues.
The behavior when the maximum limit of transaction tokens for each NameSpace is set to 1 and global token is used, is explained below.
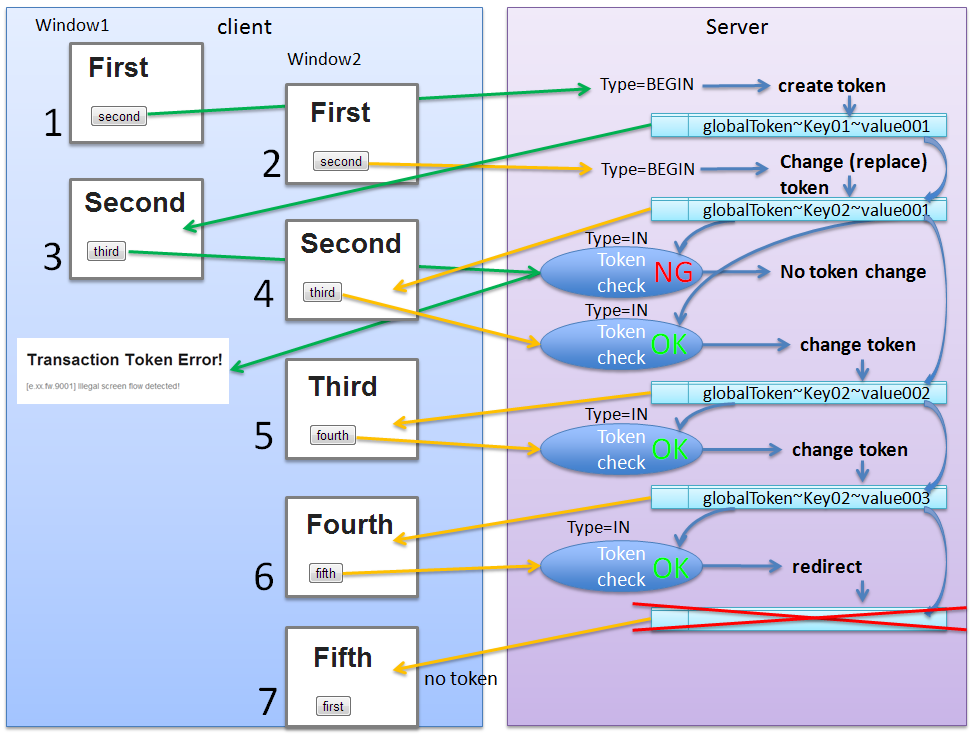
Sr. No. Description Note
The transaction token existing on the server is automatically deleted when a new global token is generated.
5.12.4.3. Quick Reference
Number Number of tokens stored for each NameSpace NameSpace value specified in class NameSpace value specified in method Example of generated token Business limitations