5.8. Session Management
Caution
This version is already obsolete. Please check the latest guideline.
Table of Contents
- Overview
- How to use
- How to extend
- Appendix
5.8.1. Overview
This chapter explains Session Management in a Web application.
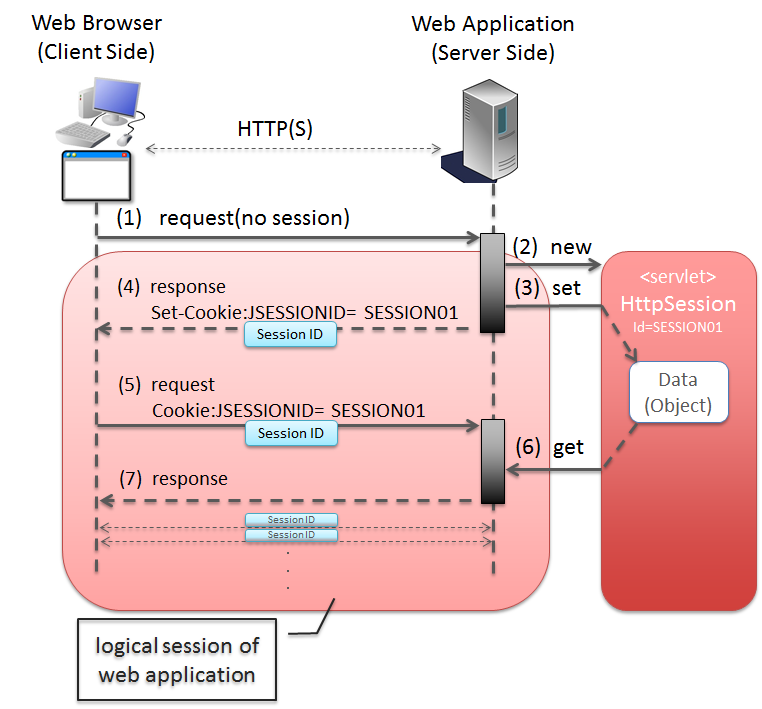
Sr. No. Description HttpSessionobject for storing the session with Web browser. Session ID is issued at the time ofHttpSessionobject creation.HttpSessionobject.HttpSessionobject corresponding to the session ID linked from the Web browser and maps it with the request.HttpSessionobject associated with the request.Same data can be accessed across requests.Note
About the parameter name to link session ID
In JavaEE Serlvet specifications, the default parameter name to link a session ID is JSESSIONID.
5.8.1.1. Session lifecycle
Note
"Session"mentioned in the following explanation refers tojavax.servlet.http.HttpSessionobject provided by Servlet API.HttpSessionobject is the Java object representing the logical session described above.
5.8.1.1.1. Generating a session
When Web application is created by the method recommended in this guideline, session can be generated by any one of the following processes.
Sr. No. Description
RedirectAttributesinterface.When a session is already established, new session is not generated.For details onRedirectAttributesand Flash scope, refer to Passing data while redirecting request.
@SessionAttributesannotation.The specified model (form object, domain object etc.) is stored in session. When a session is already established, new session is not generated.For details on how to use@SessionAttributesannotation, refer to Using @SessionAttributes annotation.
Note
In Sr. Nos. 4, 5, 6 mentioned above, whether the session is used or not is specified by Controller implementation whereas, session generation timing is controlled by the framework. In other words,
HttpSessionAPI need not be used directly as Controller process.
5.8.1.1.2. Storing attributes in a session
When Web application is created by the methods recommended in this guideline, attributes (objects) are stored in session by any one of the following processes.
Sr. No. Description
RedirectAttributesinterface.Object specified in the addFlashAttribute method ofRedirectAttributesinterface, is stored in an area called Flash scope in the session.For details onRedirectAttributesand Flash scope, refer to Passing data while redirecting request.
@SessionAttributesannotation.The specified model (form object, domain object etc.) is stored in session.For the details on how to use@SessionAttributesannotation, refer to, Using @SessionAttributes annotation.
Note
Timing to store the object in session is controlled by the framework. Hence, setAttribute method of
HttpSessionobject is not called as Controller process.
5.8.1.1.3. Deleting attributes from a session
When Web application is created by the methods recommended in this guideline, attributes (objects) are deleted from a session by any one of the following processes.
Sr. No. Description
RedirectAttributesinterface, is deleted from the Flash scope area of session.
SessionStatusobject is called as Controller process.Object specified by@SessionAttributesannotation is deleted from the session.Note
Timing to delete the object is controlled by the framework. Hence, removeAttribute method of
HttpSessionobject is not called as Controller process.
5.8.1.1.4. Discarding a session
When Web application is created by the methods recommended in this guideline, session is discarded using any one of the following processes.
Sr. No. Description
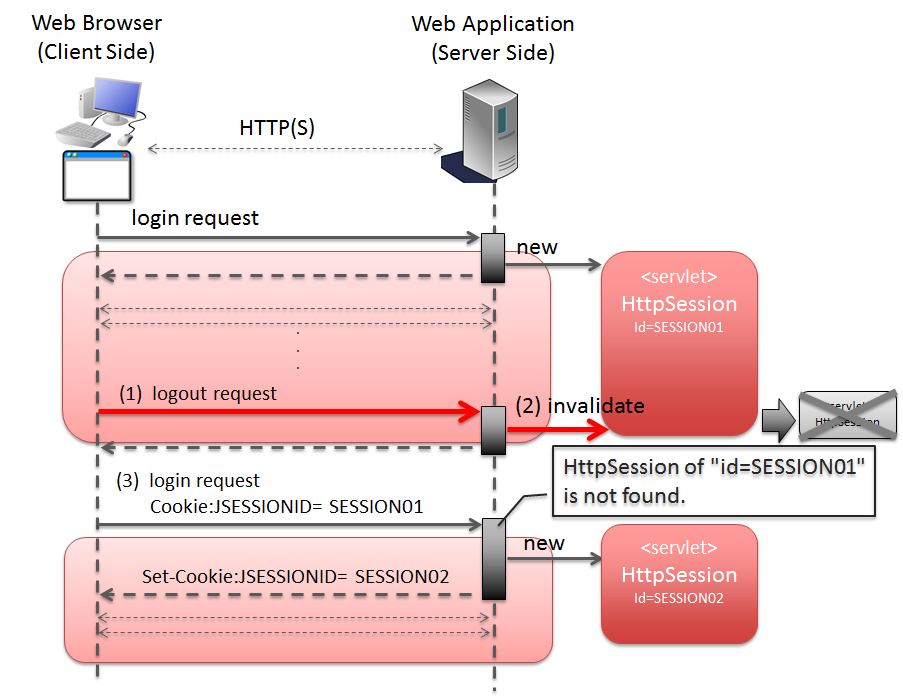
The scenario in which a session is discarded explicitly is illustrated below.
Sr. No. Description HttpSessionobject corresponding to the session ID linked from Web browser.At this point,HttpSessionobject with the ID,"SESSION01", disappears from server side.HttpSessionobject corresponding to the requested session ID does not exist.In the above example, a session with ID"SESSION02"is being generated.
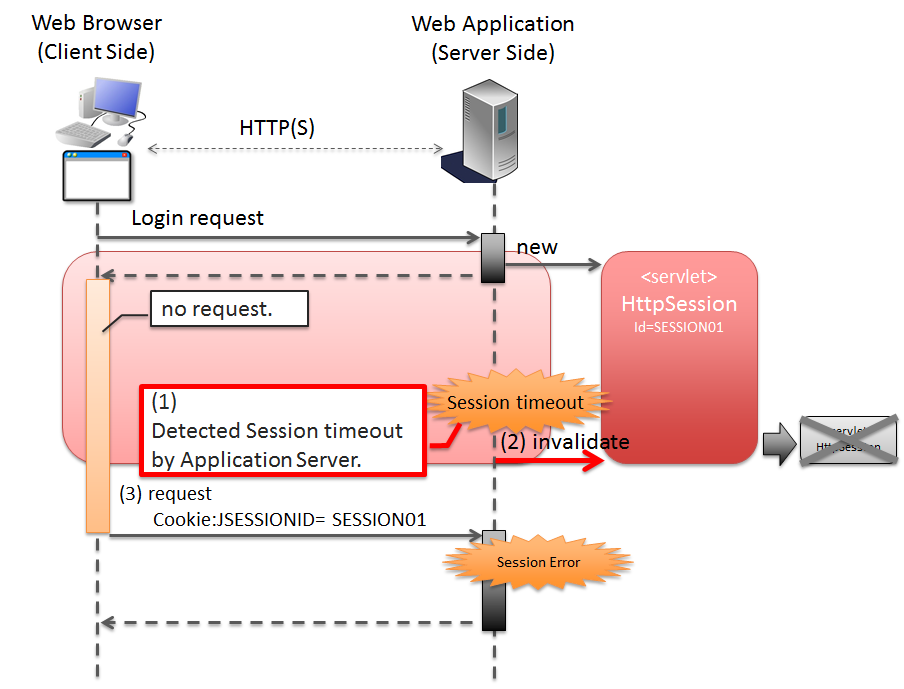
The scenario in which a session is automatically discarded due to timeout is illustrated below.
Sr. No. Description HttpSessionobject corresponding to the session ID requested from the Web browser, does not exist.Note
Designing session timeout
When data needs to be stored in the session, the design should include ‘session timeout’. It is recommended to set the timeout as short as possible, especially when the data to be stored is large.
Note
Default session timeout period
Default session timeout period differs depending on application server.
- Tomcat: 1800 seconds (30 minutes)
- WebLogic: 3600 seconds (60 minutes)
- WebSphere: 1800 seconds (30 minutes)
- JBoss: 1800 seconds (30 minutes)
5.8.1.1.5. Detecting a request after session timeout
When Web application is created by the method recommended in this guideline, a request subsequent to session timeout is detected by any one of the following processes.
Sr. No. Description
HandlerInterceptorof Spring MVC.
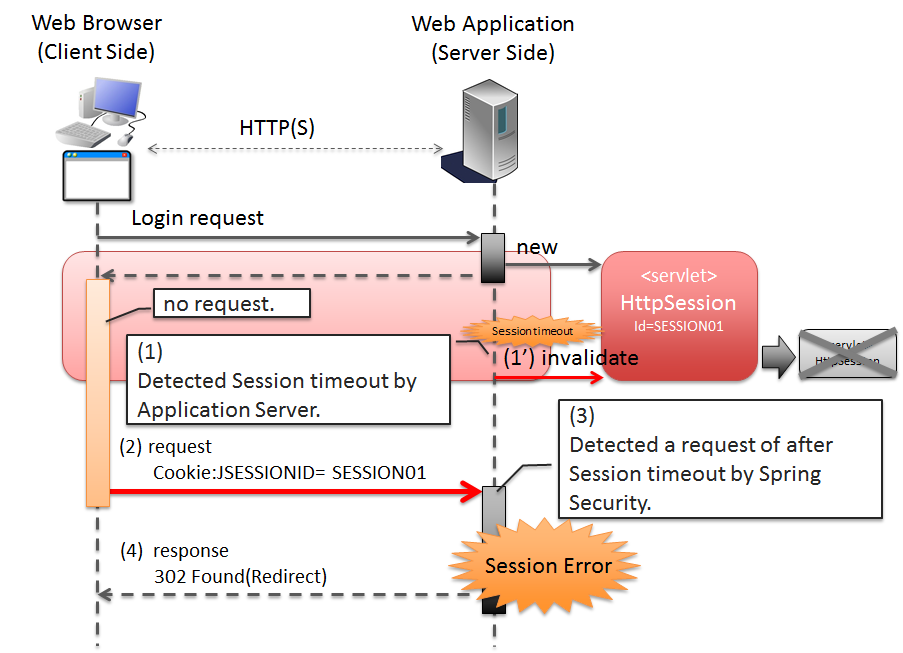
The scenario in which session timeout is detected using session check process provided by Spring Security, is illustrated below.
Sr. No. Description HttpSessionobject corresponding to the session ID linked from client, does not exist.In default Spring Security implementation, response is sent to the request for redirecting to URL to display the error screen.Note
Necessity of session timeout check
For the processes having precondition, “Data should be stored in session”, session timeout check should always be performed. If this check is not performed, unexpected system errors and operations may occur, as data required by the process cannot be fetched.
5.8.1.2. About using a session
Note
Rather than simply storing the data in session, this guideline initially recommends to consider a policy wherein session is not used. Further, if session is used, it recommends storing only the absolutely required data in it.
Note
Storing the data applicable to following conditions has proved better.
5.8.1.3. Advantages and disadvantages of using session
The advantages and disadvantages of using session are as follows:
Advantages
- Data can be shared across multiple screens (multiple requests) easily when a single process is composed in multiple screens such as a Wizard Screens.
- By storing the fetched data in session, number of executions of data acquisition can be reduced.
Disadvantages
- When the screen with same process is opened in multiple browsers or various tabs, data consistency cannot be maintained, as mutual operations interfere with the data stored in session.In order to maintain data consistency, control is required so that screen with the same process cannot be opened in multiple browsers or tabs.This control can be implemented by using Transaction token check provided by common library, however it results in reduced usability.
- Session data is usually stored in application server memory; hence memory usage also increases with increase in data stored in the session.If unnecessary data that is no longer used in a process is left as it is, it gets excluded from garbage collection process, leading to memory exhaustion. Such data needs to be deleted from session at a stage when it is rendered unnecessary.The timing to delete unnecessary data from session needs to be designed separately.
- Storing process data in session may lower scalability of application server.
Note
Any one of the following methods is required to scale out the application server.
- Performing session replication and sharing the session information with all application servers.When performing session replication, the load on replication process increases in proportion to the data stored in session and number of application servers for replication.Therefore, issues owing to scale out such as, possible degradation in response time etc. need to be considered.
- Distributing all requests of the same session to the same application server, using load balancer.When requests are distributed to the same application server and if the server is down, the process cannot be continued by another application server.Therefore, it needs to be noted that, this method may not be feasible in applications that demand high availability (service level).
Scale out method should be determined upon considering each of these points.
5.8.1.3.1. Advantages and disadvantages of not using session
Advantages
- As data is not stored at server side, even if multiple browsers and tabs are used, their operations do not interfere with each other. Therefore, multiple screens of the same process can be started without impairing the usability.
- As data is not stored at server side, continuous utilization of memory can be controlled.
- Number of factors that lower the scalability of application server are reduced.
Disadvantages
- Data required for server processing needs to be sent as request parameter. As a result, even the items that are not displayed on the screen need to be specified as hidden items.Thus, JSP implementation code increases.This can be minimized by creating JSP tag library.
- Amount of data flowing to the network increases, as all the data required for server processing needs to be sent through requests.
- Data required for screen display needs to be fetched each time. Hence, number of executions of data acquisition increases.
5.8.1.4. About the data to be stored in session
Following points need to be considered for the data to be stored in session.
- It should be serializable object (object implementing
java.io.Serializable). - It should not be a large object that can cause memory exhaustion.
5.8.1.4.1. Serializable objects
Cases where data is input/output to disk are as follows:
- When application server is stopped while a session is active, the session and the data stored in it are saved to the disk.The saved session and data stored in it, are restored with the start of application server.Support status for this data restoring operation differs depending on application server.
- If session storage area is about to overflow or if the session is not accessed for a particular period of time since the last access, there is a possibility of session swap-out.The swapped-out session is swapped-in when the session is accessed again.Conditions etc. for swap-out differ depending on application server.
Cases where data is input/output to network are as follows:
- To perform replication of session in another application server, data stored in the session is sent to that application server via network.
5.8.1.4.2. Amount of data to be stored in session
It is recommended that the data to be stored in session should be as compact as possible.
When large amount of data is stored in session, it fatally degrades the performance. Hence, it is recommended to design such that, large amount of data will not be stored in session.
The main causes of performance degradation are as follows:
- When storing large amount of data in session, application server settings need to be enabled such that session is easily swapped-out so as to prevent memory exhaustion.Swap-out is a “Heavy” process. Hence, it occurring very frequently may affect the overall application performance.Support status for swap-out operation or setting method, differs depending on application server.
- When carrying out session replication, serialization and deserialization of an object are performed.Serialization and deserialization of an object with large capacity being “heavy” processes, may affect performance, such as response time.
To make the session data compact, storing the data applicable to the following conditions in request scope instead of session scope, should be considered.
- Read-only data that cannot be edited by screen operations.If latest data is fetched at a time when it is required, and if the fetched data is displayed in View (JSP) by storing it in request scope, it need not be stored in session.
- Data that can be edited by screen operations. It can be shared only in the screen operations of a use case.If data can be shared in all screen transitions as hidden HTML fields, it need not be stored in session.
5.8.1.5. Points to be considered in case of application server clustering
- For systems that require high availability (service level), if one AP server is down, it should be possible to continue the processing on another AP server.To be able to continue processing on another AP server when one AP server is down, session information needs to be shared amongst all AP servers. Hence, session replication needs to be carried out by application servers that are configured as a cluster.As an alternate method, session information can be shared by setting the session storage location to cache server such as Oracle Coherence or database.It would be better to consider setting the session storage location to a cache server like Oracle Coherence or database if, number of AP servers, amount of data stored in session and number of sessions that can be pasted simultaneously are in large quantity.
- For systems that do not require high availability (service level), processing need not be continued on another server if the AP server is down.Therefore, session information need not be shared amongst all AP servers. Thus, it is alright if all the requests in a same session are distributed to the same AP server, using load balancer functionality.
Warning
When the Web application is created by methods recommended in this guideline, either of the above mechanisms needs to be applied to store the following data in session.
- User information authenticated by the Spring Security authentication process.
- Token values issued by Spring Security CSRF token check.
- Token values issued by the transaction token check provided by common library.
5.8.1.6. About storage location of session
5.8.2. How to use
This guideline recommends using any one of the following methods to store data in session.
Warning
HttpSession API can be called directly by specifying the HttpSession object as an argument of Controller processing method. However,
as a rule, this guideline strongly recommends not to use the HttpSession API directly.
HttpSession API may be used directly only for those processes that cannot be implemented otherwise. However,
in most of the business processes, it is not necessary to use the HttpSession API directly. Therefore, set such that HttpSession object is not specified as an argument of the Controller processing method.
5.8.2.1. Using @SessionAttributes annotation
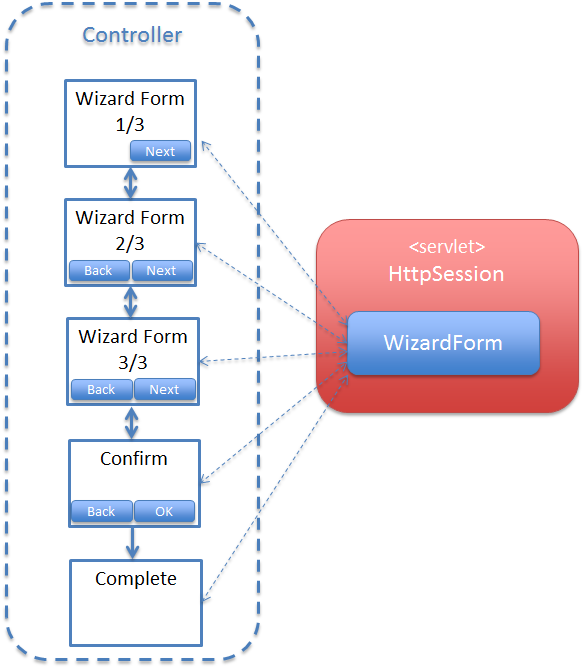
@SessionAttributes annotation is used for sharing data during screen transitions in Controller.
@SessionAttributes annotation, should be considered.5.8.2.1.1. Specifying the object to be stored in session
Specify the object to be stored in session by specifying @SessionAttributes annotation in “class”.
@Controller
@RequestMapping("wizard")
@SessionAttributes(types = { WizardForm.class, Entity.class }) // (1)
public class WizardController {
    // ...
}
Sr. No. Description @SessionAttributesannotation, specify the object type to be stored in session.Amongst the objects added toModelobject using@ModelAttributeannotation or addAttribute method ofModel, the objects matching with the type specified in “types” attribute, are stored in session.In the above example, objects ofWizardFormclass andEntityclass are stored in session.Note
Management unit for life cycle
Life cycles of the objects stored in session using
@SessionAttributesannotation, are managed at Controller level.When setComplete method of
SessionStatusobject is called, all the objects specified with `` @ SessionAttribute `` annotation are deleted from session. Therefore, to store the objects having different life cycles in session, it is necessary to divide the Controller.Warning
Points to be considered when using @SessionAttribute annotation
As described above, life cycle is managed at Controller level. However, when the object with the same attribute name in multiple Controllers, is stored in session using
@SessionAttributeannotation, its life cycle is managed across Controllers.In case of a process wherein, screen can be operated simultaneously by opening another window or tab, it can cause an error as the same object is being accessed. Therefore, to use the class of the same form object in multiple Controllers, first different values (attribute names) should be specified in “value” attribute of
@ModelAttributeannotation. Then the same values should be specified in “value” attribute of@SessionAttributesannotation.
@Controller
@RequestMapping("wizard")
@SessionAttributes(value = { "wizardCreateForm" }) // (2)
public class WizardController {

    // ...

    @ModelAttribute(value = "wizardCreateForm")
    public WizardForm setUpWizardForm() {
        return new WizardForm();
    }

    // ...
}
Sr. No. Description @SessionAttributesannotation.Among the objects added toModelobject using@ModelAttributeannotation or addAttribute method ofModel, the objects matching with the attribute name specified invalueattribute, are stored in session.In the above example, objects with attribute name"wizardCreateForm"are stored in session.
5.8.2.1.2. Adding object to session
Object can be added to session using the following two methods.
- Method with
@ModelAttributeannotation is used to return the object to be added to the session. - addAttribute method of
Modelobject is used to add the object stored in session.
Object added to Model object is stored in session as per the type of @SessionAttributes annotation and value of “value” attribute.
Hence, there is no need to consider the session when implementation is carried out using processing method of Controller.
@ModelAttribute annotation, is explained below.@ModelAttribute(value = "wizardForm") // (1) public WizardForm setUpWizardForm() { return new WizardForm(); }
Sr. No. Description Modelobject.In the above example, the object returned is stored in session, with attribute name"wizardForm".When “value” attribute is specified, method with@ModelAttributeannotation is no longer called by the subsequent requests after the object is stored in session. Thus, it has an advantage wherein, unnecessary objects are not generated.Warning
Operation in case “value” attribute of @ModelAttribute annotation is omitted
When “value” attribute is omitted, method with
@ModelAttributeannotation is called by all requests in order to generate default attribute name. Therefore, it has a disadvantage of unnecessary objects being generated. Hence, This method should not be used when storing objects in session.@ModelAttribute // (1) public WizardForm setUpWizardForm() { return new WizardForm(); }
Sr. No. Description @ModelAttributeannotation to generate and return the object to be added in session.In the above example, object returned with attribute name"wizardForm"annotation, is stored in session.
Model object is explained below.@RequestMapping(value = "update/{id}", params = "form1") public String updateForm1(@PathVariable("id") Integer id, WizardForm form, Model model) { Entity loadedEntity = entityService.getEntity(id); model.addAttribute(loadedEntity); // (3) beanMapper.map(loadedEntity, form); return "wizard/form1"; }
Sr. No. Description Modelobject.In the above example, the object fetched from domain layer with the attribute name"entity"is stored in session.
5.8.2.1.3. Fetching the object stored in session
Model object as per the attribute value of @SessionAttributes annotation.@RequestMapping(value = "save", method = RequestMethod.POST) public String save(@Validated({ Wizard1.class, Wizard2.class, Wizard3.class }) WizardForm form, // (1) BindingResult result, Entity entity, // (2) RedirectAttributes redirectAttributes) { // ... return "redirect:/wizard/save?complete"; }
Sr. No. Description Modelobject.In the above example, object stored in session scope with attribute name"wizardForm"is passed to argument form.For details onWizard1.class,Wizard2.class,Wizard3.classspecified by@Validatedannotation, refer to Example of screen transition implementation using @SessionAttributes in wizard format of Appendix."entity", is passed to argument “entity”.
When the object to be passed to the argument of Controller processing method does not exist in Model object, the operation changes depending on whether @ModelAttribute annotation is specified or not.
- When
@ModelAttributeannotation is not specified, a new object is created and passed as argument. The created object is stored inModelobject and subsequently in session as well.
Note
Redirect operations
Created object is not stored in session if it is redirected to a transition destination. Therefore, when referring to the created object in redirect process, it is necessary to store the object in Flash scope using addFlashAttribute method of
RedirectAttributes.
- When
@ModelAttributeannotation is specified,org.springframework.web.HttpSessionRequiredExceptionoccurs.
@RequestMapping(value = "save", method = RequestMethod.POST)
public String save(@Validated({ Wizard1.class, Wizard2.class,
        Wizard3.class }) WizardForm form, // (3)
        BindingResult result,
        @ModelAttribute Entity entity, // (4)
        RedirectAttributes redirectAttributes) {
    // ...
    return "redirect:/wizard/save?complete";
}
Sr. No. Description Wizard1.class,Wizard2.class,Wizard3.class) using@Validatedannotation.For details on input validation, refer to Input Validation.@ModelAttributeannotation is specified in argument and when the target object that does not exist in session is called,HttpSessionRequiredExceptionoccurs.HttpSessionRequiredExceptionoccurs due to client operations such as browser back, directly accessing specified URL etc. Therefore, the exception needs to be handled as client error.
Following are the settings to handle HttpSessionRequiredException as client error.
- spring-mvc.xml
<bean class="org.terasoluna.gfw.web.exception.SystemExceptionResolver">
    <property name="exceptionCodeResolver" ref="exceptionCodeResolver" />
    <!-- ... -->
    <property name="exceptionMappings">
        <map>
            <!-- ... -->
            <entry key="HttpSessionRequiredException "
                   value="common/error/operationError" /> <!-- (5) -->
        </map>
    </property>
    <property name="statusCodes">
        <map>
            <!-- ... -->
            <entry key="common/error/operationError" value="400" /> <!-- (6) -->
        </map>
    </property>
    <!-- ... -->
</bean>
Sr. No. Description HttpSessionRequiredExceptiontoexceptionMappingsofSystemExceptionResolverprovided by common library.In the above example,/WEB-INF/views/common/error/operationError.jspis specified as the transition destination at the time of exception.statusCodesofSystemExceptionResolver, specify the HTTP response code that is generated whenHttpSessionRequiredExceptionoccurs.In the above example, Bad Request (400) is specified as the HTTP response code at the time of exception.
- applicationContext.xml
<bean id="exceptionCodeResolver"
    class="org.terasoluna.gfw.common.exception.SimpleMappingExceptionCodeResolver">
    <!-- Setting and Customization by project. -->
    <property name="exceptionMappings">
        <map>
            <!-- ... -->
            <entry key="HttpSessionRequiredException" value="w.xx.0003" /> <!-- (7) -->
        </map>
    </property>
    <property name="defaultExceptionCode" value="e.xx.0001" /> <!-- (8) -->
</bean>
Sr. No. Description HttpSessionRequiredExceptiontoexceptionMappingsofSimpleMappingExceptionCodeResolverprovided by common library.In the above example,"w.xx.0003"is specified as the exception code at the time of exception.When this setting is not added, default exception code is output to log.
5.8.2.1.4. Deleting the object stored in session
@SessionAttributes, call setComplete method of org.springframework.web.bind.support.SessionStatus from the processing method of Controller.SessionStatus object, the object specified in attribute value of @SessionAttributes annotation, is deleted from session.Note
Time when the object is deleted from session
By calling setComplete method of
SessionStatusobject, the object specified in attribute value of@SessionAttributesannotation is deleted from session. However, the actual time when the object is deleted is different than when setComplete method is called.setComplete method of
SessionStatusobject changes only the internal flag, whereas, the actual deletion of object is carried out by the framework, after the processing method of Controller is completed.Note
Referring object from View (JSP)
Object is deleted from session by calling the setComplete method of
SessionStatusobject. However, it can be referred from View (JSP) as the same object remains inModelobject.
The objects stored in session need to be deleted from the following 3 locations.
- Request to display completion screen. (Mandatory)Delete unnecessary objects, since the objects stored in session are not accessed once completion screen is displayed.
Warning
Reason for deletion
The objects stored in session are outside the scope of garbage collection process. As a result, if unnecessary objects are not deleted, it leads to memory exhaustion. Moreover, storing unnecessary objects in session results in session swap-out which is a heavy process and may affect the overall application performance.
- Request to stop the consecutive screen operations. (Mandatory)Events such as “Go Back to Menu” or “Cancel” etc. to stop the consecutive screen operations, do not access the objects stored in session. Therefore, unnecessary objects should be deleted from session.
- Request for initial display of input screen. (Optional)
Warning
Reason for deletion
When the browser or tab is closed during screen operations, information entered during input, remains in the form object stored in session. As a result, this information is displayed on screen if it is not deleted at the time of initial display. However, in cases where it is alright to display this information on screen, it is not mandatory to delete the information using request for initial display.
Example given below illustrates implementation of object deletion by using a request to display completion screen.
// (1)
@RequestMapping(value = "save", method = RequestMethod.POST)
public String save(@ModelAttribute @Validated({ Wizard1.class,
        Wizard2.class, Wizard3.class }) WizardForm form,
        BindingResult result, Entity entity,
        RedirectAttributes redirectAttributes) {
    // ...
    return "redirect:/wizard/save?complete"; // (2)
}

// (3)
@RequestMapping(value = "save", params = "complete", method = RequestMethod.GET)
public String saveComplete(SessionStatus sessionStatus) {
    sessionStatus.setComplete(); // (4)
    return "wizard/complete";
}
Sr. No. Description SessionStatusobject and delete the object from session.Display process for View (JSP) is not affected directly as the same object remains inModelobject.
Example given below illustrates implementation of object deletion by using a request to stop consecutive operations.
// (1)
@RequestMapping(value = "save", params = "cancel", method = RequestMethod.POST)
public String saveCancel(SessionStatus sessionStatus) {
    sessionStatus.setComplete(); // (2)
    return "redirect:/wizard/menu"; // (3)
}
Sr. No. Description SessionStatusobject and delete the object from session.
Example given below illustrates implementation of object deletion by using a request for initial display of input screen.
// (1)
@RequestMapping(value = "create", method = RequestMethod.GET)
public String initializeCreateWizardForm(SessionStatus sessionStatus) {
    sessionStatus.setComplete();              // (2)
    return "redirect:/wizard/create?form1";   // (3)
}

// (4)
@RequestMapping(value = "create", params = "form1")
public String createForm1() {
    return "wizard/form1";
}
Sr. No. Description SessionStatusobject.SessionStatusobject.However, as the same object remains inModelobject,if View (JSP) is called directly, the information being entered is displayed.Therefore, It should be redirected to the request for displaying input screen after deleting from session.
5.8.2.1.5. Process implementation using @SessionAttributes
For specific implementation, refer to Example of screen transition implementation using @SessionAttributes in wizard format of Appendix.
5.8.2.2. Using session-scoped bean of Spring Framework
5.8.2.2.1. Bean definition of session scope
Define session-scoped bean of Spring Framework.
There are 2 methods to define the session-scoped bean.
- Define bean using component-scan.
- Define bean in Bean definition file (XML).
How to use component-scan is shown below.
- Class
@Component
@Scope(value = "session", proxyMode = ScopedProxyMode.TARGET_CLASS) // (1)
public class SessionCart implements Serializable {

    private static final long serialVersionUID = 1L;

    private Cart cart;

    public Cart getCart() {
        if (cart == null) {
            cart = new Cart();
        }
        return cart;
    }

    public void setCart(Cart cart) {
        this.cart = cart;
    }

}
Sr. No. Description "session". Also, it be enabled the scoped-proxy by specifying aScopedProxyMode.TARGET_CLASSinproxyModeattribute.Note
To define Entity class to be handled using JPA as session scope ban, it is recommended to provide a wrapper class instead of defining it directly as session-scoped bean.
If Entity class to be handled using JPA is defined as session-scoped bean, it cannot be handled directly using the API of JPA (throws error if handled directly). Therefore, a process to convert it to Entity object that can be handled in JPA is required.
In the above example, JPA Entity class called
Cartis wrapped in a wrapper class calledSessionCartand set as session-scoped bean. With this, the process to convert it to Entity object that can be handled in JPA is no longer required; hence the process to be performed in Controller becomes simple.Note
Reason for enabling scoped-proxy
scoped-proxy needs to be enabled to inject session-scoped bean in singleton scope Controller.
- spring-mvc.xml
<context:component-scan base-package="xxx.yyy.zzz.app" /> // (2)
Sr. No. Description <context:component-scan>element. Specify a base package to scan components in thebase-packageattribute.
How to define it in Bean definition file (XML), is shown below.
- JavaBean
<beans:bean id="sessionCart" class="xxx.yyy.zzz.app.SessionCart"
            scope="session"> <!-- (3) -->
    <aop:scoped-proxy /> <!-- (4) -->
</beans:bean>
Sr. No. Description "session".<aop:scoped-proxy />element and enable scoped-proxy.
5.8.2.2.2. Using session-scoped bean
@Inject
SessionCart sessionCart; // (1)

// (2)
@ModelAttribute
public SessionCart setUpSessionCart() {
    return sessionCart;
}

@RequestMapping(value = "add")
public String addCart(@Validated ItemForm form, BindingResult result) {
    if (result.hasErrors()) {
        return "item/item";
    }
    CartItem cartItem = beanMapper.map(form, CartItem.class);
    Cart addedCart = cartService.addCartItem(sessionCart.getCart(), // (3)
            cartItem);
    sessionCart.setCart(addedCart); // (4)
    return "redirect:/cart";
}
Sr. No. Description Modelobject, so that it can be referred from View (JSP).Cartobject passed as an argument of addCartItem method ofCartServiceandtheCartobject returned with value, may form a separate instance.Therefore, the returnedCartobject is set to session-scoped bean.Session-scoped bean is stored inModelobject, by the process explained in (2).As a result,Cartobject returned by addCartItem method ofCartServicecan be referred from View (JSP) as well.
5.8.2.2.3. Deleting objects stored in session
org.springframework.web.bind.support.SessionStatus from Controller processing method,@SessionAttributes annotation.SessionStatus object,@SessionAttributes annotation.@Controller @RequestMapping("order") @SessionAttributes("scopedTarget.sessionCart") // (1) public class OrderController { @Inject SessionCart sessionCart; // ... @RequestMapping(method = RequestMethod.POST) public String order() { // ... return "redirect:/order?complete"; } @RequestMapping(params = "complete", method = RequestMethod.GET) public String complete(Model model, SessionStatus sessionStatus) { sessionStatus.setComplete(); // (2) model.addAttribute(sessionCart.getCart()); // (3) return "order/complete"; } }
Sr. No. Description @SessionAttributesannotation.Attribute name is"scopedTarget."+ Bean name.SessionStatusobject.In the above example, the object stored with attribute name"scopedTarget.sessionCart", is deleted from session.Modelobject.
5.8.2.2.4. Process implementation using session-scoped bean
For a more specific implementation, refer to Example of screen transition across multiple Controllers using session-scoped bean. of Appendix.
5.8.2.3. Debug log output of session operations
For details on common library, refer to :ref:logging_appendix_httpsessioneventlogginglistener.
5.8.2.4. Using the JSP implicit object sessionScope
To use JSP implicit object sessionScope , the session attribute value of page directive needs to be set to true.
It is set as false in the include.jsp, provided by blank project.
include.jsp is stored in the src/main/webapp/WEB-INF/views/common directory.
include.jsp
<%@ page session="true"%>     <%-- (1) --%>

<%-- omitted --%>
Sr. No. Description true.
5.8.3. How to extend
5.8.3.1. Synchronizing requests in same session
@SessionAttributes annotation or session-scoped bean.org.springframework.web.servlet.mvc.method.annotation.RequestMappingHandlerAdapter to ‘true’ and synchronize the requests in the same session.It can be implemented by creating BeanPostProcessor as follows and performing bean definition.
- Component
package com.example.app.config;

import org.slf4j.Logger;
import org.slf4j.LoggerFactory;
import org.springframework.beans.BeansException;
import org.springframework.beans.factory.config.BeanPostProcessor;
import org.springframework.web.servlet.mvc.method.annotation.RequestMappingHandlerAdapter;

public class EnableSynchronizeOnSessionPostProcessor
   implements BeanPostProcessor {
    private static final Logger logger = LoggerFactory
            .getLogger(EnableSynchronizeOnSessionPostProcessor.class);

    @Override
    public Object postProcessBeforeInitialization(Object bean, String beanName)
        throws BeansException {
        // NO-OP
        return bean;
    }

    @Override
    public Object postProcessAfterInitialization(Object bean, String beanName)
        throws BeansException {
        if (bean instance of RequestMappingHandlerAdapter) {
            RequestMappingHandlerAdapter adapter =
                (RequestMappingHandlerAdapter) bean;
            logger.info("enable synchronizeOnSession => {}", adapter);
            adapter.setSynchronizeOnSession(true); // (1)
        }
        return bean;
    }

}
Sr. No. Description trueas an argument of setSynchronizeOnSession method oforg.springframework.web.servlet.mvc.method.annotation.RequestMappingHandlerAdapter.
- spring-mvc.xml
<bean class="com.example.app.config.EnableSynchronizeOnSessionPostProcessor" /> <!-- (2) -->
Sr. No. Description BeanPostProcessorcreated in (1).
5.8.4. Appendix
5.8.4.1. Example of screen transition implementation using @SessionAttributes in wizard format
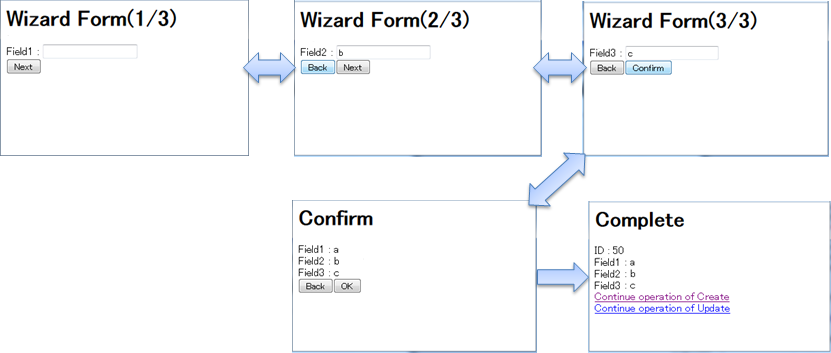
Screen transition implementation using @SessionAttributes annotation in wizard format, is explained below.
Process specifications are as follows:
- Provide screen for registering and updating entity.
- Input screen consists of 3 sub-screens wherein one field is entered on each sub-screen.
- Before saving (registering/updating), the entered values can be verified on confirmation screen.
- Input validation is performed at the time of screen transition. User is returned to input screen in case of error.
- Before saving (registering/updating), perform input validation again for all the input values and display the error screen notifying invalid operations.
- If all the input values are appropriately validated, save the input data to the database.
Basic screen transition is as follows:
Example of implementation is as follows:
- Form object
public class WizardForm implements Serializable {

    private static final long serialVersionUID = 1L;

    // (1)
    @NotEmpty(groups = { Wizard1.class })
    private String field1;

    // (2)
    @NotEmpty(groups = { Wizard2.class })
    private String field2;

    // (3)
    @NotEmpty(groups = { Wizard3.class })
    private String field3;

    // ...

    // (4)
    public static interface Wizard1 {
    }

    // (5)
    public static interface Wizard2 {
    }

    // (6)
    public static interface Wizard3 {
    }

}
Sr. No. Description Note
Verification group
When performing input validation for screen transition, only the fields on corresponding page need to be validated. In Bean Validation, verification rules can be grouped by setting the interface or class representing the verification group. In this implementation, input validation for each screen is performed by providing verification group for each screen.
- Controller
@Controller
@RequestMapping("wizard")
@SessionAttributes(types = { WizardForm.class, Entity.class }) // (7)
public class WizardController {

    @Inject
    WizardService wizardService;

    @Inject
    Mapper beanMapper;
Sr. No. Description WizardForm.class) and entity (Entity.class) object are stored in session.@ModelAttribute("wizardForm") // (8) public WizardForm setUpWizardForm() { return new WizardForm(); }
Sr. No. Description WizardForm) to be stored in session is generated. To prevent creation of unnecessary objects, “value” attribute of@ModelAttributeannotation is specified.// (9) @RequestMapping(value = "create", method = RequestMethod.GET) public String initializeCreateWizardForm(SessionStatus sessionStatus) { sessionStatus.setComplete(); return "redirect:/wizard/create?form1"; } // (10) @RequestMapping(value = "create", params = "form1") public String createForm1() { return "wizard/form1"; }
Sr. No. Description
Sr. No. Description Modelobject and store in session.In the above example, it is stored in session with attribute name"entity".// (15) @RequestMapping(value = "save", params = "form2", method = RequestMethod.POST) public String saveForm2(@Validated(Wizard1.class) WizardForm form, // (16) BindingResult result) { if (result.hasErrors()) { return saveRedoForm1(); } return "wizard/form2"; } // (17) @RequestMapping(value = "save", params = "form3", method = RequestMethod.POST) public String saveForm3(@Validated(Wizard2.class) WizardForm form, // (18) BindingResult result) { if (result.hasErrors()) { return saveRedoForm2(); } return "wizard/form3"; } // (19) @RequestMapping(value = "save", params = "confirm", method = RequestMethod.POST) public String saveConfirm(@Validated(Wizard3.class) WizardForm form, // (20) BindingResult result) { if (result.hasErrors()) { return saveRedoForm3(); } return "wizard/confirm"; }
Sr. No. Description Wizard1.class) on the first page of input screen, in “value” attribute of@Validatedannotation, so as to perform input validation of only the value entered in first page of input screen.Wizard2.class) on the second page of input screen, in “value” attribute of@Validatedannotation, so as to perform input validation of only the value entered in second page of input screen.Wizard3.class) on the third page of input screen, in “value” attribute of@Validatedannotation, so as to perform input validation of only the value entered in third page of input screen.// (21) @RequestMapping(value = "save", method = RequestMethod.POST) public String save(@ModelAttribute @Validated({ Wizard1.class, Wizard2.class, Wizard3.class }) WizardForm form, // (22) BindingResult result, Entity entity, // (23) RedirectAttributes redirectAttributes) { if (result.hasErrors()) { throw new InvalidRequestException(result); // (24) } beanMapper.map(form, entity); entity = wizardService.saveEntity(entity); // (25) redirectAttributes.addFlashAttribute(entity); // (26) return "redirect:/wizard/save?complete"; } // (27) @RequestMapping(value = "save", params = "complete", method = RequestMethod.GET) public String saveComplete(SessionStatus sessionStatus) { sessionStatus.setComplete(); return "wizard/complete"; }
Sr. No. Description Wizard1.class,Wizard2.class,Wizard3.class) of each input screen, in the “value” attribute of@Validatedannotation, to check all the values entered on input screen.Entity.classobject to be saved.For registration process, newly created object is fetched and for update process, the object stored in session by process (14), is fetched.InvalidRequestExceptionis thrown when an invalid operation is performed.Further, exception classInvalidRequestExceptionneeds to be created separately, as it is not provided by common library.Entity.classobject reflecting the input value.Entity.classobject saved by processing method of redirect destination is stored in Flash scope so that it can be referred.
Sr. No. Description
- Complete Controller source code
@Controller
@RequestMapping("wizard")
@SessionAttributes(types = { WizardForm.class, Entity.class })
// (7)
public class WizardController {

    @Inject
    EntityService wizardService;

    @Inject
    Mapper beanMapper;

    @ModelAttribute("wizardForm")
    // (8)
    public WizardForm setUpWizardForm() {
        return new WizardForm();
    }

    // (9)
    @RequestMapping(value = "create", method = RequestMethod.GET)
    public String initializeCreateWizardForm(SessionStatus sessionStatus) {
        sessionStatus.setComplete();
        return "redirect:/wizard/create?form1";
    }

    // (10)
    @RequestMapping(value = "create", params = "form1")
    public String createForm1() {
        return "wizard/form1";
    }

    // (11)
    @RequestMapping(value = "{id}/update", method = RequestMethod.GET)
    public String initializeUpdateWizardForm(@PathVariable("id") Integer id,
            RedirectAttributes redirectAttributes, SessionStatus sessionStatus) {
        sessionStatus.setComplete();
        redirectAttributes.addAttribute("id", id);
        return "redirect:/wizard/{id}/update?form1";
    }

    // (12)
    @RequestMapping(value = "{id}/update", params = "form1")
    public String updateForm1(@PathVariable("id") Integer id, WizardForm form,
            Model model) {
        Entity loadedEntity = wizardService.getEntity(id);
        beanMapper.map(loadedEntity, form); // (13)
        model.addAttribute(loadedEntity); // (14)
        return "wizard/form1";
    }

    // (15)
    @RequestMapping(value = "save", params = "form2", method = RequestMethod.POST)
    public String saveForm2(@Validated(Wizard1.class) WizardForm form, // (16)
            BindingResult result) {
        if (result.hasErrors()) {
            return saveRedoForm1();
        }
        return "wizard/form2";
    }

    // (17)
    @RequestMapping(value = "save", params = "form3", method = RequestMethod.POST)
    public String saveForm3(@Validated(Wizard2.class) WizardForm form, // (18)
            BindingResult result) {
        if (result.hasErrors()) {
            return saveRedoForm2();
        }
        return "wizard/form3";
    }

    // (19)
    @RequestMapping(value = "save", params = "confirm", method = RequestMethod.POST)
    public String saveConfirm(@Validated(Wizard3.class) WizardForm form, // (20)
            BindingResult result) {
        if (result.hasErrors()) {
            return saveRedoForm3();
        }
        return "wizard/confirm";
    }

    // (21)
    @RequestMapping(value = "save", method = RequestMethod.POST)
    public String save(@ModelAttribute @Validated({ Wizard1.class,
            Wizard2.class, Wizard3.class }) WizardForm form, // (22)
            BindingResult result, Entity entity, // (23)
            RedirectAttributes redirectAttributes) {
        if (result.hasErrors()) {
            throw new InvalidRequestException(result); // (24)
        }

        beanMapper.map(form, entity);

        entity = wizardService.saveEntity(entity); // (25)

        redirectAttributes.addFlashAttribute(entity); // (26)

        return "redirect:/wizard/save?complete";
    }

    // (27)
    @RequestMapping(value = "save", params = "complete", method = RequestMethod.GET)
    public String saveComplete(SessionStatus sessionStatus) {
        sessionStatus.setComplete();
        return "wizard/complete";
    }

    // (28)
    @RequestMapping(value = "save", params = "redoForm1")
    public String saveRedoForm1() {
        return "wizard/form1";
    }

    // (29)
    @RequestMapping(value = "save", params = "redoForm2")
    public String saveRedoForm2() {
        return "wizard/form2";
    }

    // (30)
    @RequestMapping(value = "save", params = "redoForm3")
    public String saveRedoForm3() {
        return "wizard/form3";
    }

}
- First page of input screen (JSP)
<html>
<head>
<title>Wizard Form(1/3)</title>
</head>
<body>
    <h1>Wizard Form(1/3)</h1>
    <form:form action="${pageContext.request.contextPath}/wizard/save"
        modelAttribute="wizardForm">
        <form:label path="field1">Field1</form:label> :
        <form:input path="field1" />
        <form:errors path="field1" />
        <div>
            <form:button name="form2">Next</form:button>
        </div>
    </form:form>
</body>
</html>
- Second page of input screen (JSP)
<html>
<head>
<title>Wizard Form(2/3)</title>
</head>
<body>
    <h1>Wizard Form(2/3)</h1>
    <%-- (31) --%>
    <form:form action="${pageContext.request.contextPath}/wizard/save"
        modelAttribute="wizardForm">
        <form:label path="field2">Field2</form:label> :
        <form:input path="field2" />
        <form:errors path="field2" />
        <div>
            <form:button name="redoForm1">Back</form:button>
            <form:button name="form3">Next</form:button>
        </div>
    </form:form>
</body>
</html>
Sr. No. Description
- Third page of input screen (JSP)
<html>
<head>
<title>Wizard Form(3/3)</title>
</head>
<body>
    <h1>Wizard Form(3/3)</h1>
    <%-- (32) --%>
    <form:form action="${pageContext.request.contextPath}/wizard/save"
        modelAttribute="wizardForm">
        <form:label path="field3">Field3</form:label> :
        <form:input path="field3" />
        <form:errors path="field3" />
        <div>
            <form:button name="redoForm2">Back</form:button>
            <form:button name="confirm">Confirm</form:button>
        </div>
    </form:form>
</body>
</html>
Sr. No. Description
- Confirmation screen (JSP)
<html>
<head>
<title>Confirm</title>
</head>
<body>
    <h1>Confirm</h1>
    <%-- (33) --%>
    <form:form action="${pageContext.request.contextPath}/wizard/save"
        modelAttribute="wizardForm">
        <div>
            Field1 : <c:out value="${wizardForm.field1}" />
        </div>
        <div>
            Field2 : <c:out value="${wizardForm.field2}" />
        </div>
        <div>
            Field3 : <c:out value="${wizardForm.field3}" />
        </div>
        <div>
            <form:button name="redoForm3">Back</form:button>
            <form:button>OK</form:button>
        </div>
    </form:form>
</body>
</html>
Sr. No. Description
- Completion screen (JSP)
<html>
<head>
<title>Complete</title>
</head>
<body>
    <h1>Complete</h1>
    <div>
        <div>
            ID : ${f:h(entity.id)}
        </div>
        <div>
            Field1 : ${f:h(entity.field1)}
        </div>
        <div>
            Field2 : ${f:h(entity.field2)}
        </div>
        <div>
            Field3 : ${f:h(entity.field3)}
        </div>
    </div>
    <div>
        <a href="${pageContext.request.contextPath}/wizard/create">
            Continue operation of Create
        </a>
    </div>
    <div>
        <a href="${pageContext.request.contextPath}/wizard/${entity.id}/update">
            Continue operation of Update
        </a>
    </div>
</body>
</html>
- spring-mvc.xml
<bean class="org.terasoluna.gfw.web.exception.SystemExceptionResolver">
    <property name="exceptionCodeResolver" ref="exceptionCodeResolver" />
    <!-- ... -->
    <property name="exceptionMappings">
        <map>
            <!-- ... -->
            <entry key="InvalidRequestException"
                   value="common/error/operationError" /> <!-- (34) -->
        </map>
    </property>
    <property name="statusCodes">
        <map>
            <!-- ... -->
            <entry key="common/error/operationError" value="400" /> <!-- (35) -->
        </map>
    </property>
    <!-- ... -->
</bean>
Sr. No. Description InvalidRequestExceptionthat notifies detection of invalid request when executing save process, inexceptionMappingsofSystemExceptionResolver, provided by common library.In the above example,/WEB-INF/views/common/error/operationError.jspis specified as the transition destination when exception occurs.HttpSessionRequiredExceptionoccurs instatusCodesofSystemExceptionResolver.In the above example, Bad Request (400) is specified as HTTP response code when exception occurs.
- applicationContext.xml
<bean id="exceptionCodeResolver"
    class="org.terasoluna.gfw.common.exception.SimpleMappingExceptionCodeResolver">
    <!-- Setting and Customization by project. -->
    <property name="exceptionMappings">
        <map>
            <!-- ... -->
            <entry key="InvalidRequestException" value="w.xx.0004" /> <!-- (36) -->
        </map>
    </property>
    <property name="defaultExceptionCode" value="e.xx.0001" /> <!-- (37) -->
</bean>
Sr. No. Description InvalidRequestExceptiontoexceptionMappingsofSimpleMappingExceptionCodeResolverprovided by common library.In the above example,"w.xx.0004"is specified as the exception code when an exception occurs.When this setting is not added, default exception code is output to log.
5.8.4.2. Example of screen transition across multiple Controllers using session-scoped bean.
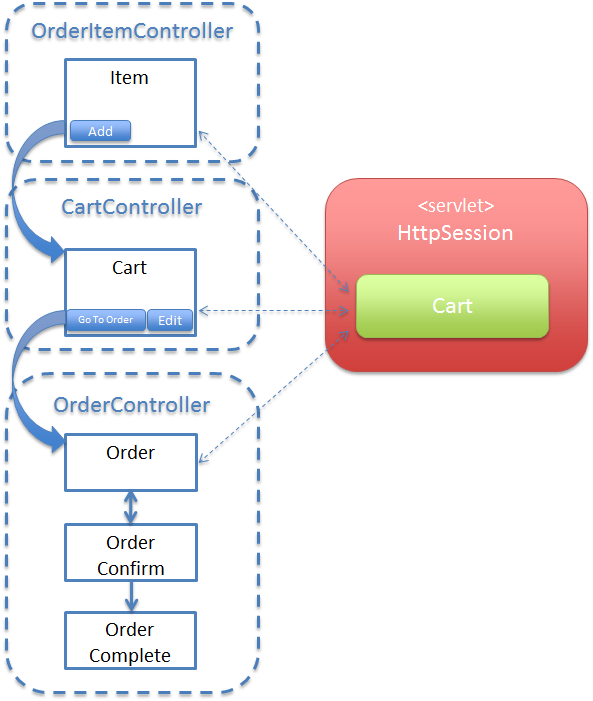
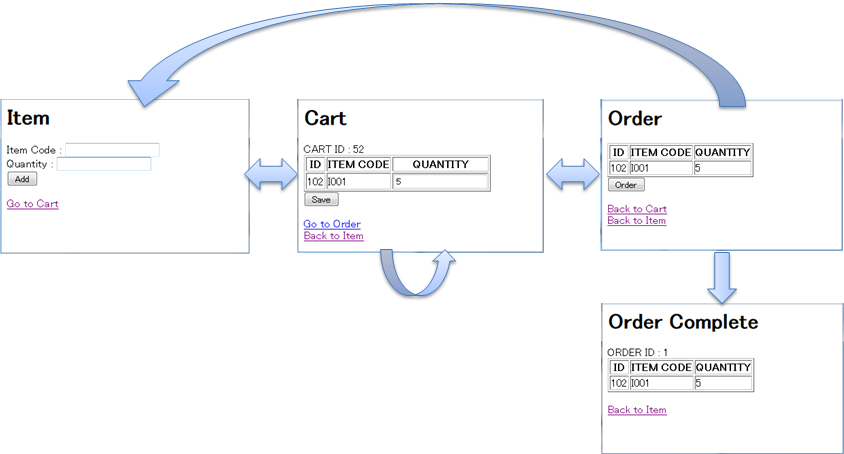
Implementation using session-scoped bean is explained with example of process of performing screen transitions across multiple Controllers.
Process specifications are as follows:
- Provide a process to add products to cart.
- Provide a process to change the quantity of products added to the cart.
- Provide a process to order the products stored in cart.
- Above 3 processes are provided as independent functions and should be set in separate Controllers (ItemController, CartController, OrderController).
- Store the cart in session as it is shared by the above 3 processes.
- Display the cart screen when products are added to cart.
Screen transition should be as follows:
Implementation is as follows:
- JavaBean to be defined as session-scoped bean.
@Component
@Scope(value = "session", proxyMode = ScopedProxyMode.TARGET_CLASS)
public class SessionCart implements Serializable {

    private static final long serialVersionUID = 1L;

    private Cart cart; // (1)

    public Cart getCart() {
        if (cart == null) {
            cart = new Cart();
        }
        return cart;
    }

    public void setCart(Cart cart) {
        this.cart = cart;
    }

}
Sr. No. Description Cart.
- ItemController
@Controller
@RequestMapping("item")
public class ItemController {

    @Inject
    SessionCart sessionCart;

    @Inject
    CartService cartService;

    @Inject
    Mapper beanMapper;

    @ModelAttribute
    public ItemForm setUpItemForm() {
        return new ItemForm();
    }

    // (2)
    @RequestMapping
    public String view(Model model) {
        return "item/item";
    }

    // (3)
    @RequestMapping(value = "add")
    public String addCart(@Validated ItemForm form, BindingResult result) {
        if (result.hasErrors()) {
            return "item/item";
        }
        CartItem cartItem = beanMapper.map(form, CartItem.class);
        Cart cart = cartService.addCartItem(sessionCart.getCart(), // (4)
                cartItem);
        sessionCart.setCart(cart); // (5)
        return "redirect:/cart"; // (6)
    }
}
Sr. No. Description Cartobject stored in session, to service method.Cartobject returned by Service method to session-scoped bean.By reflecting in session-scoped bean, it is reflected in session andModelobject.
- CartController
@Controller
@RequestMapping("cart")
public class CartController {

    @Inject
    SessionCart sessionCart;

    @Inject
    CartService cartService;

    @Inject
    Mapper beanMapper;

    @ModelAttribute
    public CartForm setUpCartForm() {
        return new CartForm();
    }

    // (7)
    @ModelAttribute("sessionCart")
    public SessionCart setUpSessionCart() {
        return sessionCart;
    }

    // (8)
    @RequestMapping
    public String cart(CartForm form) {
        beanMapper.map(sessionCart.getCart(), form);
        return "cart/cart";
    }

    // (9)
    @RequestMapping(params = "edit", method = RequestMethod.POST)
    public String edit(@Validated CartForm form, BindingResult result,
            Model model) {
        if (result.hasErrors()) {
            return "cart/cart";
        }

        Cart cart = sessionCart.getCart();
        Iterator<CartItemForm> itemForm = form.getCartItems().iterator();
        for (CartItem item : cart.getCartItems()) {
            beanMapper.map(itemForm.next(), item);
        }

        cart = cartService.saveCart(cart);
        sessionCart.setCart(cart); // (10)

        return "redirect:/cart"; // (11)
    }


}
Sr. No. Description Modelobject to refer in View (JSP).Cartobject returned by Service method, to session-scoped bean.By reflecting in session-scoped bean, it is reflected in session andModelobject.
- OrderController
@Controller
@RequestMapping("order")
@SessionAttributes("scopedTarget.sessionCart")
public class OrderController {

    @Inject
    SessionCart sessionCart;

    @ModelAttribute
    public OrderForm setUpOrderForm() {
        return new OrderForm();
    }

    // (12)
    @ModelAttribute("sessionCart")
    public SessionCart setUpSessionCart() {
        return sessionCart;
    }

    // (13)
    @RequestMapping
    public String view() {
        return "order/order";
    }

    // (14)
    @RequestMapping(method = RequestMethod.POST)
    public String order() {
        // ...
        return "redirect:/order?complete";
    }

    // (15)
    @RequestMapping(params = "complete", method = RequestMethod.GET)
    public String complete(Model model, SessionStatus sessionStatus) {
        sessionStatus.setComplete();
        return "order/complete";
    }

}
Sr. No. Description Modelobject to refer in View (JSP).
- Product screen (JSP)
<html>
<head>
<title>Item</title>
</head>
<body>
    <h1>Item</h1>
    <form:form action="${pageContext.request.contextPath}/item/add"
        modelAttribute="itemForm">
        <form:label path="itemCode">Item Code</form:label> :
        <form:input path="itemCode" />
        <form:errors path="quantity" />
        <br>
        <form:label path="quantity">Quantity</form:label> :
        <form:input path="quantity" />
        <form:errors path="quantity" />
        <div>
            <%-- (15) --%>
            <form:button>Add</form:button>
        </div>
    </form:form>
    <div>
        <a href="${pageContext.request.contextPath}/cart">Go to Cart</a>
    </div>
</body>
</html>
Sr. No. Description
- Cart screen (JSP)
<html>
<head>
<title>Cart</title>
</head>
<body>
    <h1>Cart</h1>
    <c:choose>
        <c:when test="${ empty sessionCart.cart.cartItems }">
            <div>Cart is empty.</div>
        </c:when>
        <c:otherwise>
            CART ID :
            ${f:h(sessionCart.cart.id)}
            <form:form modelAttribute="cartForm">
                <table border="1">
                    <thead>
                        <tr>
                            <th>ID</th>
                            <th>ITEM CODE</th>
                            <th>QUANTITY</th>
                        </tr>
                    </thead>
                    <tbody>
                        <c:forEach var="item"
                            items="${sessionCart.cart.cartItems}"
                            varStatus="rowStatus">
                            <tr>
                                <td>${f:h(item.id)}</td>
                                <td>${f:h(item.itemCode)}</td>
                                <td>
                                    <form:input
                                        path="cartItems[${rowStatus.index}].quantity" />
                                    <form:errors
                                        path="cartItems[${rowStatus.index}].quantity" />
                                </td>
                            </tr>
                        </c:forEach>
                    </tbody>
                </table>
                <%-- (16) --%>
                <form:button name="edit">Save</form:button>
            </form:form>
        </c:otherwise>
    </c:choose>
    <c:if test="${ not empty sessionCart.cart.cartItems }">
        <div>
            <%-- (17) --%>
            <a href="${pageContext.request.contextPath}/order">Go to Order</a>
        </div>
    </c:if>
    <div>
        <a href="${pageContext.request.contextPath}/item">Back to Item</a>
    </div>
</body>
</html>
Sr. No. Description
- Order screen (JSP)
<html>
<head>
<title>Order</title>
</head>
<body>
    <h1>Order</h1>
    <table border="1">
        <thead>
            <tr>
                <th>ID</th>
                <th>ITEM CODE</th>
                <th>QUANTITY</th>
            </tr>
        </thead>
        <tbody>
            <c:forEach var="item" items="${sessionCart.cart.cartItems}"
                varStatus="rowStatus">
                <tr>
                    <td>${f:h(item.id)}</td>
                    <td>${f:h(item.itemCode)}</td>
                    <td>${f:h(item.quantity)}</td>
                </tr>
            </c:forEach>
        </tbody>
    </table>
    <form:form modelAttribute="orderForm">
        <%-- (18) --%>
        <form:button>Order</form:button>
    </form:form>
    <div>
        <a href="${pageContext.request.contextPath}/cart">Back to Cart</a>
    </div>
    <div>
        <a href="${pageContext.request.contextPath}/item">Back to Item</a>
    </div>
</body>
</html>
Sr. No. Description
- Order Completion screen (JSP)
<html>
<head>
<title>Order Complete</title>
</head>
<body>
    <h1>Order Complete</h1>
    ORDER ID :
    ${f:h(order.id)}
    <table border="1">
        <thead>
            <tr>
                <th>ID</th>
                <th>ITEM CODE</th>
                <th>QUANTITY</th>
            </tr>
        </thead>
        <tbody>
            <c:forEach var="item" items="${order.orderItems}"
                varStatus="rowStatus">
                <tr>
                    <td>${f:h(item.id)}</td>
                    <td>${f:h(item.itemCode)}</td>
                    <td>${f:h(item.quantity)}</td>
                </tr>
            </c:forEach>
        </tbody>
    </table>
    <br>
    <div>
        <a href="${pageContext.request.contextPath}/item">Back to Item</a>
    </div>
</body>
</html>
