7.5. Removing Environment Dependency
Caution
This version is already obsolete. Please check the latest guideline.
Todo
Rewrite.
The problem of environment dependency always arises in Web application development projects.
If jdbcurl=hdbc:mysql:127.0.0.1… is written in datasource.xml file or level=”DEBUG” is written in logback.xml file and if these files are included in war file, then the Web application runs normally only on your local PC; it cannot be released on test server.
Surprisingly earlier such simple problems were ignored in most of the development projects. Moreover, the problem of difficulty in running the developed application on test server used to get noticed just before the integration test and its resolution also used to take lot of time.
This chapter explains the rules and some specific ways to overcome the problem of environment dependency.
7.5.1. Objective
All the source codes or binary files to be developed hereafter by your team should run seamlessly in all of the following scenarios.
- Running of application in AP server set in IDE (Eclipse) on all developers’ PCs
- Execution of test using JUnit plugin of IDE on all developers’ PCs
- Execution of test using build tools (Maven/ant) on all developers’ PCs
- Execution of test on CI server
- Packaging on CI server (creation of jar/war files)
- Running of application on test server
- Running of application on production server
7.5.2. Rules
To achieve the above objective, consider the following project structure.
- Make sure to have a multi-project structure.
- As far as possible, consolidate the configuration files (ex. logback.xml, jdbc.properties) having environment dependency in one project. Hereafter, this project is expressed as *-env.
- ex. terasoluna-tourreservation-env
- Projects other than *-env never have a setting for environment dependency.
- However, it is allowed to store the environment dependency configuration files for test under src/test/resources.
- Manage all software packaged binaries by storing them in package repository.
- Deploy not only *.jar files but also *.war files as work products in package repository. Consequently, these jar/war files should not include environment dependencies.
- Configure *-env project as follows:
- Store the configuration values required for operations on the developer’s PC in the file under src/main/resources, as default values.
- Store the configuration files that differ with each environment such as test server, production server, in the folder other than src/main/resources (ex. configs/test-server). Then, use “profile” function of Maven that automatically replaces the configuration values depending on environment in order to build *-env-x.y.z.jar file.
The above structure facilitates proper development in all the scenarios of software development lifecycle.
- In local development environment, check out both main project and *-env project and include env project in build path of the main project so as to do coding and testing in the local development environment.
- On CI server, execute the test and perform packaging using a build tool (Maven) and deploy the artifact in package repository whenever required.
- Application can work on test server and production server by adding *-env project built as per the application release environment, to the main project which is stored in package repository.
For details, refer to Sample application.
7.5.3. Deployment
7.5.3.1. Deployment in Tomcat
Perform the following procedure to release the Web application in Tomcat.
- Specify the profile of Maven as per the AP server environment in which the application is to be released and build *-env project.
- Place *-env-x.y.z.jar file built above in the folder of AP server decided in advance. ex. /etc/foo/bar/abcd-env-x.y.z.jar
- Unjar the *.war file deployed in package repository under [CATALINA_HOME]/webapps.
- Add /etc/foo/bar/*.jar to class path using VirtualWebappLoader function of Tomcat.
- The above setting should be described in [CATALINA_HOME]/conf/[contextPath].xml file.
- Refer to configs folder of terasoluna-shopping-env sample and http://tomcat.apache.org/tomcat-7.0-doc/api/org/apache/catalina/loader/VirtualWebappLoader.html for details.
- VirtualWebappLoader can also be used with Tomcat6.x.
Note
- autoDeploy attribute of Host tag of [CATALINA_HOME]/conf/server.xml should be set to false. Otherwise [CATALINA_HOME]/conf/[contextPath].xml gets deleted each time web application is restarted.
- When autoDeploy is disabled, Web application does not start by just placing the war file in [CATALINA_HOME]/webapps. war file should always be unjarred (unzipped).
7.5.3.2. Deployment to other application server
When releasing the Web application on application servers (Example: Resin, Websphere, Weblogic) where a mechanism for adding a class path for each web application (which is provided in VirtualWebappLoader of Tomcat) is not provided, the method to release it after adding *-env-x.y.z.jar file under WEB-INF/lib of war file is the easiest.
- Specify profile of Maven as per the AP server environment in which application is to be released and build *-env project.
- Copy *.war file deployed in the package repository to the working directory.
- Add it under WEB-INF/lib of war file using add option of jar command as follows.
- Release foo-x.y.z.war on AP server.
7.5.3.3. Continuous deployment
Continuous deployment is constantly releasing the target software through continuous looping of project (source code tree) structure, version control, inspection, build operations and lifecycle management.
During development, release the software of SNAPSHOT version in the package repository and development AP server and execute the test. To release the software officially, tagging to source code tree in VCS needs be performed after assigning a version number. In this way, the flow of build and deployment slightly differs in the snapshot release and official release.
To deploy the application on AP server that provides Web service, irrespective of snapshot version or official release version, a group of environment dependency configuration files and *.war file should be deployed in a set as per the target release AP server environment.
Separating the operation of registering libraries (jar, war) without environment dependency settings, in Maven repository and the operation of actually deploying them on AP server facilitates deployment.
Note
In Maven, it is automatically distinguished whether it is a SNAPSHOT version or RELEASE version according to the contents of <version> tag of pom.xml.
- It is considered as SNAPSHOT if it ends with -SNAPSHOT. Example: <version>1.0-SNAPSHOT</version>
- It is considered as RELEASE if it does not end with -SNAPSHOT. Example: <version>1.0</version>
Please note that there are 2 types of repositories in Maven package repository i.e. snapshot repository and release repository with a few limitations.
- Software of SNAPSHOT version cannot be registered in release repository. release repository also cannot be registered in snapshot repository.
- In release repository, artifact having the same GAV information can be registered only once. (GAV=groupId, artifactId, version)
- In snapshot repository, artifact having the same GAV information can be re-registered many times.
7.5.3.3.1. Operations of SNAPSHOT version
A simple delivery flow of SNAPSHOT version software is as shown in the following figure.
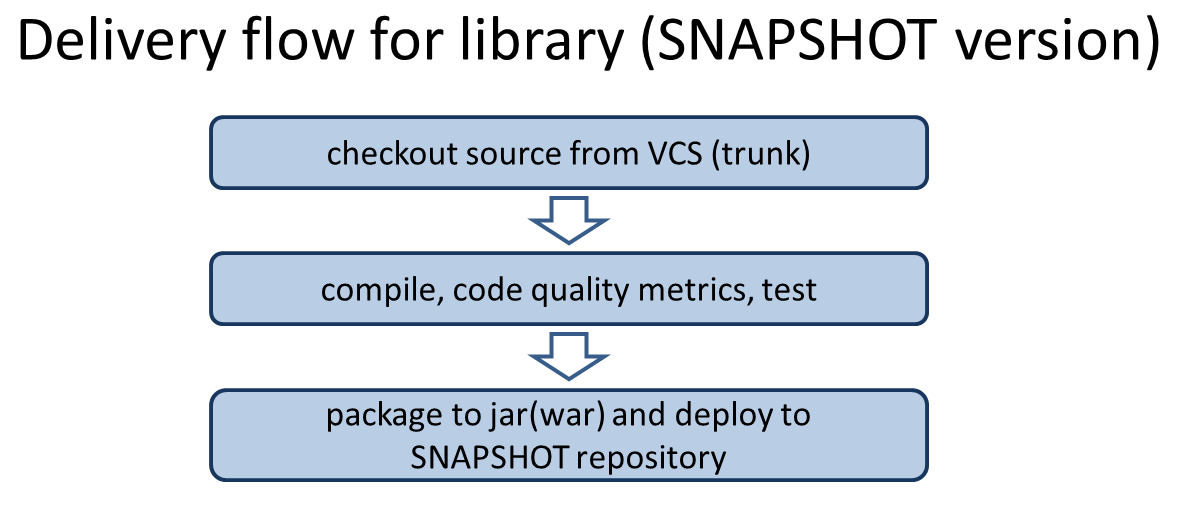
- Check out the source code from development trunk.
- Compile, measure the code metrics and execute test.
- In case of compilation error, certain violations of code metrics or in case the test fails, the subsequent operations should be stopped.
- Upload (mvn deploy) the artifact (jar, war file) on Maven package repository server.
Todo
Screen capture needs to be added later on
7.5.3.3.2. Operations of RELEASE version
In case of official release, since it is necessary to assign the version number, the flow becomes slightly more complex than the SNAPSHOT release.
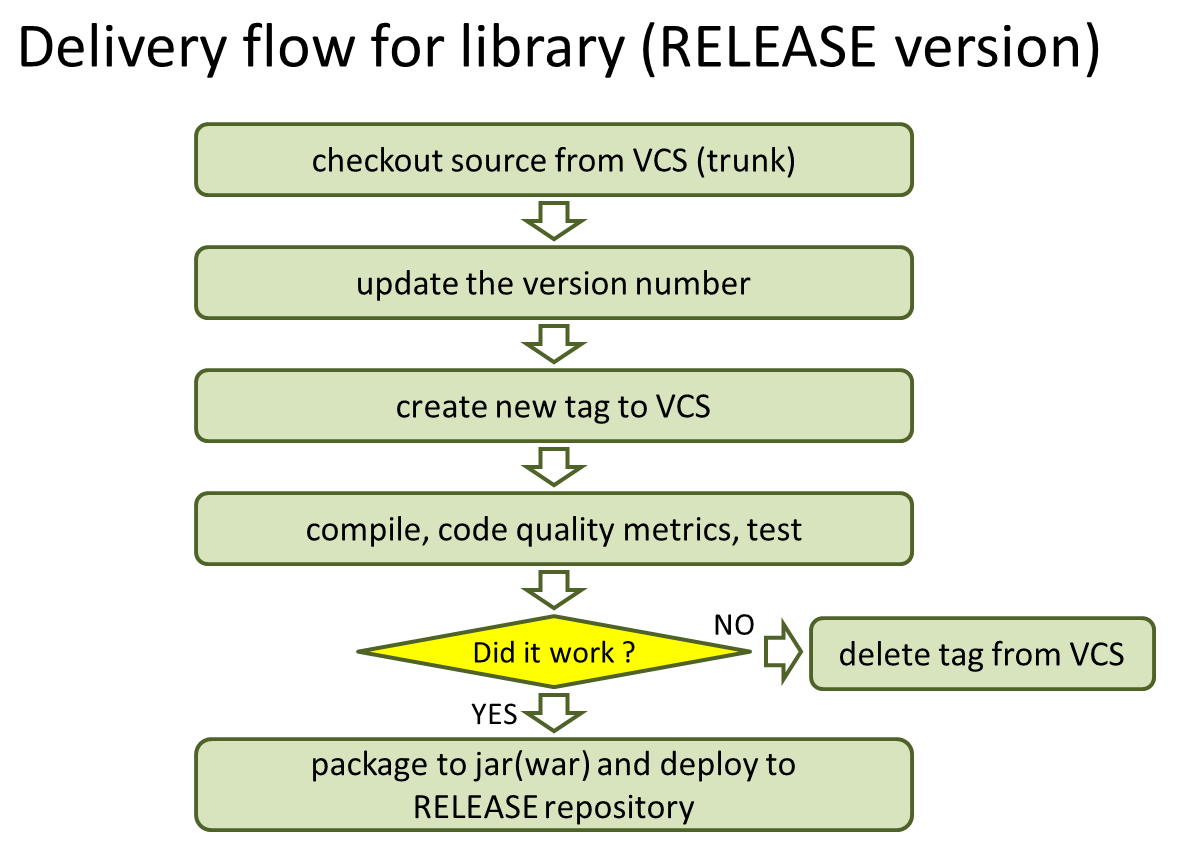
- Decide the version number to be assigned for release. (Example:1.0.1)
- Check out the source code from development trunk (or release branch).
- Change <version> tag of pom.xml. (Example:<version>1.0.1</version>)
- Assign tag to VCS. (Example: tags/1.0.1)
- Compile, measure the code metrics and execute test.
- In case of compilation error, certain violations of code metrics or in case the test fails, the subsequent operations should be stopped.
- If the test fails, delete the tag of VCS.
- Upload (mvn deploy) the artifact (jar, war file) on Maven package repository server.
Todo
Here, should the version tag of pom.xml of trunk source tree be written at the end till it is replaced by the next SNAPSHOT version and committed?
Note
<version> tag of pom.xml file can be changed in versions-maven-plugin .
mvn versions:set -DnewVersion=1.0.0
Version tag in pom.xml can be edited as <version>1.0.0</version> by the above commands.
Todo
Screen capture needs to be added later on
7.5.3.3.3. Release on Application Server
To release the application on AP server that provides Web service, release the *.war file registered in Maven package repository and the group of environment dependency configuration files in a set according to the target release AP server environment. This has same flow irrespective of snapshot release or official release.
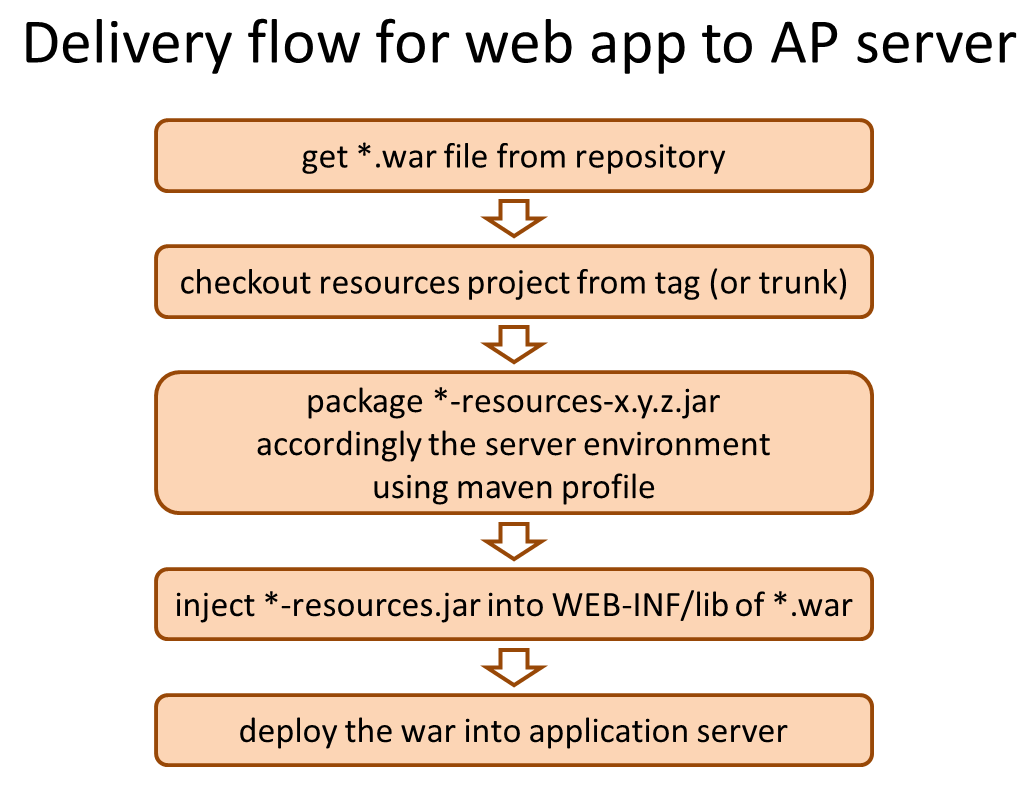
- Download war file of the version to be released from Maven package repository.
- Check out *-resources project (that consolidates environment dependency configuration files) from VCS.
- Using “profile” function of Maven, replace the contents with group of configuration files according to the target release environment, package the resources project and create *-resources-x.y.z.jar.
- Add the created *-resources-x.y.z.jar file under WEB-INF/lib folder of war file.
- In case of Tomcat, instead of adding *-resources-x.y.z.jar to war file, copy it to any path of Tomcat server and specify that path in the extended class path of VirtualWebappLoader. Refer to Removing Environment Dependency for details.
- Deploy the war file on application server.
Note
War file can be downloaded from Maven package repository with “get goal” of maven-dependency-plugin.
mvn org.apache.maven.plugins:maven-dependency-plugin:2.5:get \
 -DgroupId=com.example \
 -DartifactId=mywebapp \
 -Dversion=0.0.1-SNAPSHOT \
 -Dpackaging=war \
 -Ddest=${WORKSPACE}/target/mywebapp.war
With this, mywebapp.war file is downloaded under the target directory.
Package of environment dependency configuration files can be added to mywebapp.war file using the following commands.
mkdir -p $WORKSPACE/target/WEB-INF/lib
cd $WORKSPACE/target
cp ./mywebapp-resources*.jar WEB-INF/lib
jar -ufv mywebapp.war WEB-INF/lib
Todo
Screen capture needs to be added later on