3.4. Implementation of Application Layer
Index
- Implementing Controller
- Creating Controller class
- Mapping request and handler method
- Mapping request and handler method
- Overview of sample application
- Request URL
- Mapping request and handler method
- Implementing form display
- Implementing the display of user input confirmation screen
- Implementing ‘redisplay of form’
- Implementing ‘create new user’ business logic
- Implementing notification of create new user process completion
- Placing multiple buttons on HTML form
- Source code of controller of sample application
- Regarding arguments of handler method
- Passing data to screen (View)
- Retrieving values from URL path
- Retrieving request parameters individually
- Retrieving request parameters collectively
- Performing input validation
- Passing data while redirecting request
- Passing request parameters to redirect destination
- Inserting values in redirect destination URL path
- Acquiring values from Cookie
- Writing values in Cookie
- Retrieving pagination information
- Retrieving uploaded file
- Displaying result message on the screen
- Regarding return value of handler method
- Implementing the process
- Implementing form object
- Implementing View
- Implementing JSP
- Creating common JSP for include
- Displaying value stored in model
- Displaying numbers stored in model
- Displaying date and time stored in model
- Generate request URL
- Binding form object to HTML form
- Displaying input validation errors
- Displaying message of processing result
- Displaying codelist
- Displaying fixed text content
- Switching display according to conditions
- Repeated display of collection elements
- Displaying link for pagination
- Switching display according to authority
- Implementing JavaScript
- Implementing style sheet
- Implementing JSP
- Implementing common logic
- Prevention of double submission
- Usage of session
This chapter explains implementation of application layer of a web application that uses HTML forms.
Note
Refer to the following page for the implementation required for Ajax development and REST API.
Implementation of application layer is given in the following 3 steps.
- Controller receives the request, calls business logic, updates model, decides View. Thereby, controls one complete round of operations after receiving the request.It is the most important part in the implementation of application layer.
- Form object transfers the values between HTML form and application.
- View (JSP) acquires the data from model (form object, domain object etc.) and generates screen (HTML).
3.4.1. Implementing Controller
- Provides a method to receive the request.Receives requests by implementing methods to which
@RequestMappingannotation is assigned. - Performs input validation of request parameter.For request which requires input validation of request parameters, it can be performed by specifying
@Validatedannotation to form object argument of method which receives the request.Perform single item check using Bean Validation and correlation check using Spring Validator or Bean Validation. - Calls business logic.Controller does not implement business logic but delegates by calling Service method.
- Reflects the output of business logic to Model.The output can be referred in View by reflecting domain object returned from Service method to
Model. - Returns View name corresponding to business logic output.Controller does not implement the logic of rendering the view. Rendering is done in View technologies like JSP etc.Controller only returns the name of the view in which the rendering logic is implemented.The View corresponding to view name is resolved by
ViewResolverprovided by Spring Framework.
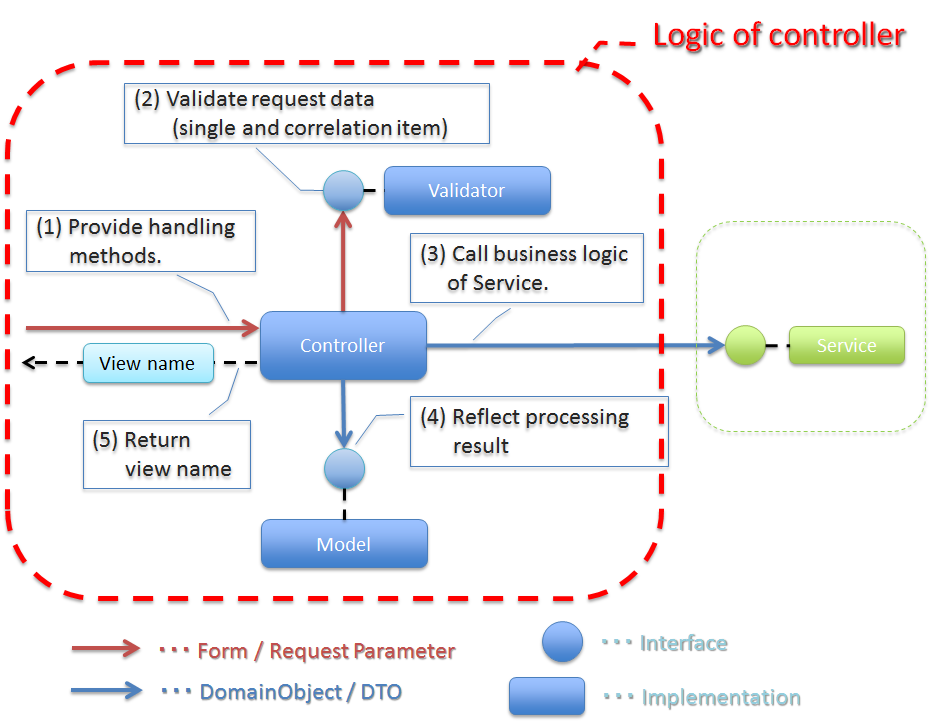
Picture - Logic of controller
Note
It is recommended that controller implements only the routing logic such as calling business logic, reflecting output of the business logic to Model, deciding the View name is implemented in the Controller.
The implementation of Controller is explained by focusing on the following points.
- Creating Controller class
- Mapping request and handler method
- Regarding arguments of handler method
- Regarding return value of handler method
3.4.1.1. Creating Controller class
org.springframework.web.servlet.mvc.Controller interface (Interface-based Controller). However, it is preferred to avoid using it as it is Deprecated from Spring 3 onwards.@Controller public class SampleController { // ... }
3.4.1.2. Mapping request and handler method
@RequestMapping annotation is assigned to the method that receives request.@RequestMapping is added, is called as “handler method”.@RequestMapping(value = "hello") public String hello() { // ... }
The rules for mapping the incoming request with a handler method can be specifying as attributes of @RequestMapping annotation.
Sr. No. Attribute name Description
value
method RequestMethodtype) which needs to be mapped (multiple methods allowed).GET/POST are mainly used for mapping requests from HTML form, while other HTTP methods (such as PUT/DELETE) are used for mapping requests from REST APIs as well.
params
headers
consumes
produces Note
Combination of mapping
Complex mapping can be performed by combining multiple attributes, but considering maintainability, mapping should be defined and designed in the simplest way possible . It is recommended to consider combining 2 attributes (value attribute and any other 1 attribute).
- Mapping with request path
- Mapping by HTTP method
- Mapping by request parameter
- Mapping using request header
- Mapping using Content-Type header
- Mapping using Accept header
@Controller // (1) @RequestMapping("sample") // (2) public class SampleController { // ... }
Sr. No. Description With @Controller, it is recognized as Annotation-based controller class and becomes the target of component scan.All the handler methods in this class are mapped to URLs with “sample” by adding @RequestMapping("sample")annotation at class level.
3.4.1.2.1. Mapping with request path
In case of the following definition, if the URL "sample/hello" is accessed, then hello() method is executed.
@RequestMapping(value = "hello") public String hello() {
"sample/hello" or "sample/bonjour" is accessed, then hello() method is executed.@RequestMapping(value = {"hello", "bonjour"}) public String hello() {
Pattern can be specified instead of a specific value for request path. For details of specifying patterns, refer to reference documentation of Spring Framework.
- URI Template Patterns
- URI Template Patterns with Regular Expressions
- Path Patterns
- Patterns with Placeholders
3.4.1.2.2. Mapping by HTTP method
In case of the following definition, if the URL "sample/hello" is accessed with POST method, then hello() method is executed.
For the list of supported HTTP methods, refer to Javadoc of RequestMethod.
When not specified, all supported HTTP methods are mapped.
@RequestMapping(value = "hello", method = RequestMethod.POST) public String hello() {
"sample/hello" is accessed with GET or HEAD method, then hello() method is executed.@RequestMapping(value = "hello", method = {RequestMethod.GET, RequestMethod.HEAD}) public String hello() {
3.4.1.2.3. Mapping by request parameter
"sample/hello?form" is accessed, then hello() method is executed.@RequestMapping(value = "hello", params = "form") public String hello() {
"sample/hello?form&formType=foo" is accessed, then hello() method is executed.@RequestMapping(value = "hello", params = {"form", "formType=foo"}) public String hello(@RequestParam("formType") String formType) {
Supported formats are as follows.
Sr. No. Format Explanation
paramName Mapping is performed when request parameter of the specified parameName exists.
!paramName Mapping is performed when request parameter of the specified parameName does not exist.
paramName=paramValue Mapping is performed when value of the specified parameName is paramValue.
paramName!=paramValue Mapping is performed when value of the specified parameName is not paramValue.
3.4.1.2.4. Mapping using request header
Refer to the details on the following page to mainly use the controller to map REST API and Ajax requests.
3.4.1.2.5. Mapping using Content-Type header
Refer to the details on the following page to mainly use the controller to map REST API and Ajax requests.
3.4.1.2.6. Mapping using Accept header
Refer to the details on the following page to mainly use the controller to map REST API and Ajax requests.
3.4.1.3. Mapping request and handler method
Mapping by the following method is recommended.
- Grouping of URL of request is done for each unit of business flow or functional flow.URL grouping means defining
@RequestMapping(value = "xxx")as class level annotation. - Use the same URL for requests for screen transitions within same functional flowThe same URL means the value of ‘value’ attribute of
@RequestMapping(value = "xxx")must be same.Determining which handler method is used for a particular request with same functional flow is performed using HTTP method and HTTP parameters.
The following is an example of mapping between incoming request and handler method by a sample application with basic screen flow.
3.4.1.3.1. Overview of sample application
Functional overview of sample application is as follows.
- Provides functionality of performing CRUD operations of Entity.
- Following 5 operations are provided.
Sr. No. Operation name Overview
Fetching list of Entities Fetch list of all the created Entities to be displayed on the list screen.
Create Entity Create a new Entity with the specified contents. Screen flow (form screen, confirmation screen, completion screen) exists for this process.
Fetching details of Entity Fetch Entity of specified ID to be displayed on the details screen.
Entity update Update Entity of specified ID. Screen flow (form screen, confirmation screen, completion screen) exists for this process.
Entity delete Delete Entity of specified ID.
- Screen flow of all functions is as follows.It is not mentioned in screen flow diagram however, when input validation error occurs, form screen is displayed again.
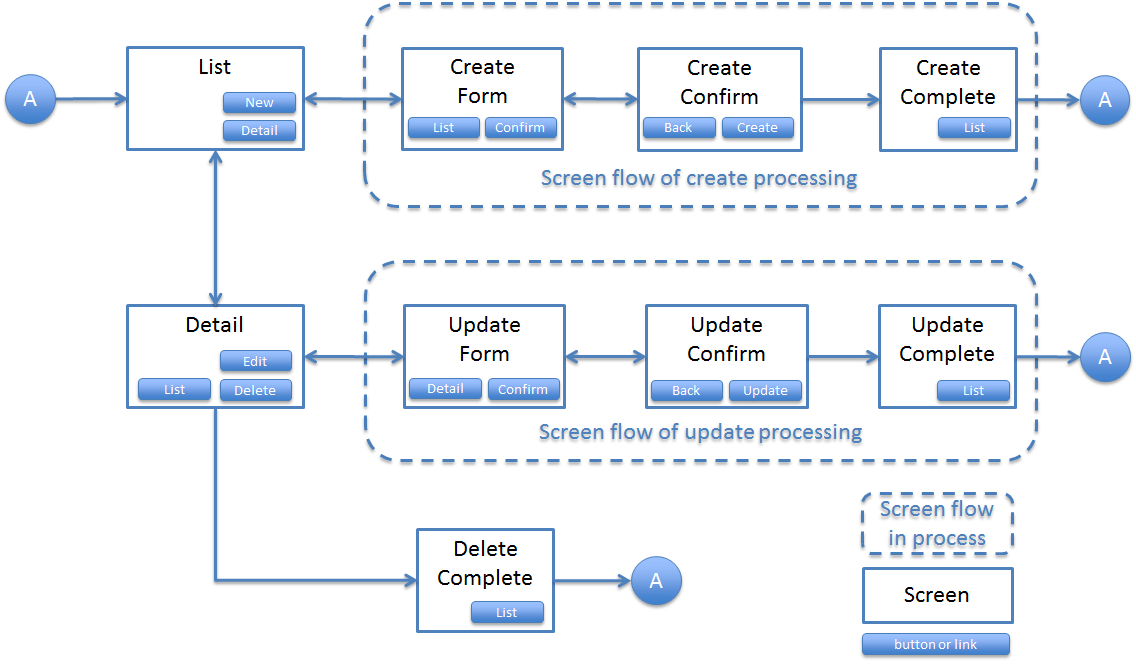
Picture - Screen flow of entity management function
3.4.1.3.2. Request URL
Design the URL of the required requests.
- Request URLs of all the requests required by the process flow are grouped.This functionality performs CRUD operations of Entity called ABC, therefore URL that starts with
"/abc/"is considered. Design request URL for each operation of the functionality.
Sr. No. Operation name URL for each operation (pattern)
Fetching list of Entities /abc/list
Create Entity /abc/create
Fetching details of Entity /abc/{id}
Entity update /abc/{id}/update
Entity delete /abc/{id}/delete Note
"{id}"specified in URL of ‘Fetching details of Entity’, ‘Entity update’, ‘Entity delete’ operations is called as, URI Template Pattern and any value can be specified. In this sample application, Entity ID is specified.Assigned URL of each operation of screen flow diagram is mapped as shown below:

Picture - Screen flow of entity management function and corresponding assigned URL
3.4.1.3.3. Mapping request and handler method
Fetching list of Entities /abc/list List display GET - list
Create New Entity /abc/create Form display - form createForm
Displaying input confirmation POST confirm createConfirm
Form re-display POST redo createRedo
Entity Creation POST - create
Displaying completion of Entity Creation GET complete createComplete
Fetching details of Entity /abc/{id} Display details of Entity GET - read
Entity update /abc/{id}/update Displaying Form - form updateForm
Displaying confirmation of user input POST confirm updateConfirm
Form re-display POST redo updateRedo
Update POST - update
Displaying completion of update process GET complete updateComplete
Entity delete /abc/{id}/delete Delete POST - delete
Displaying completion of delete process GET complete deleteComplete
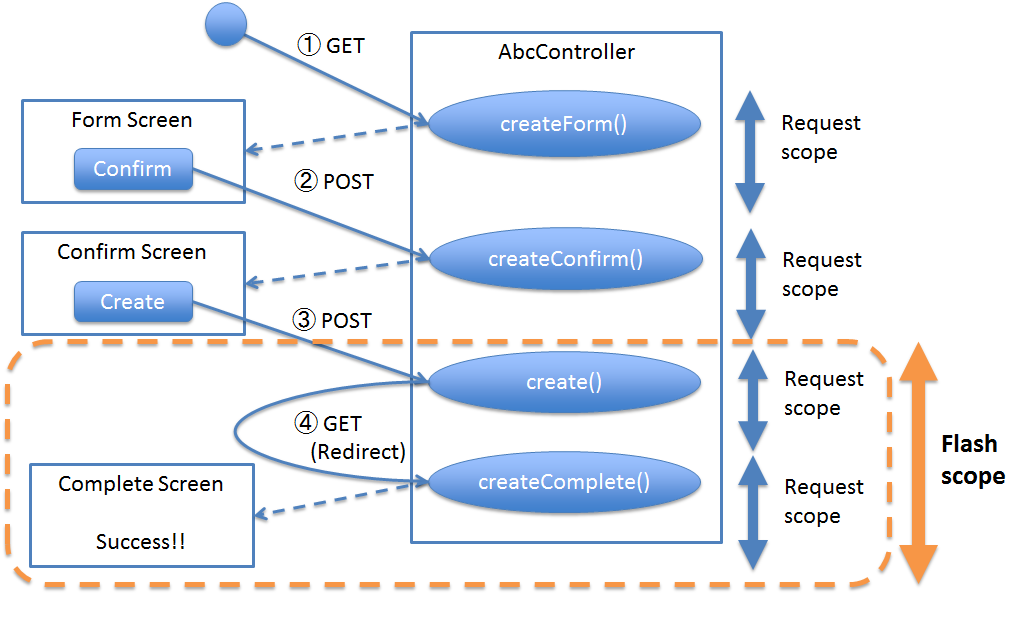
"/abc/create" and determining the handler method is done based on combination of HTTP method and HTTP parameters.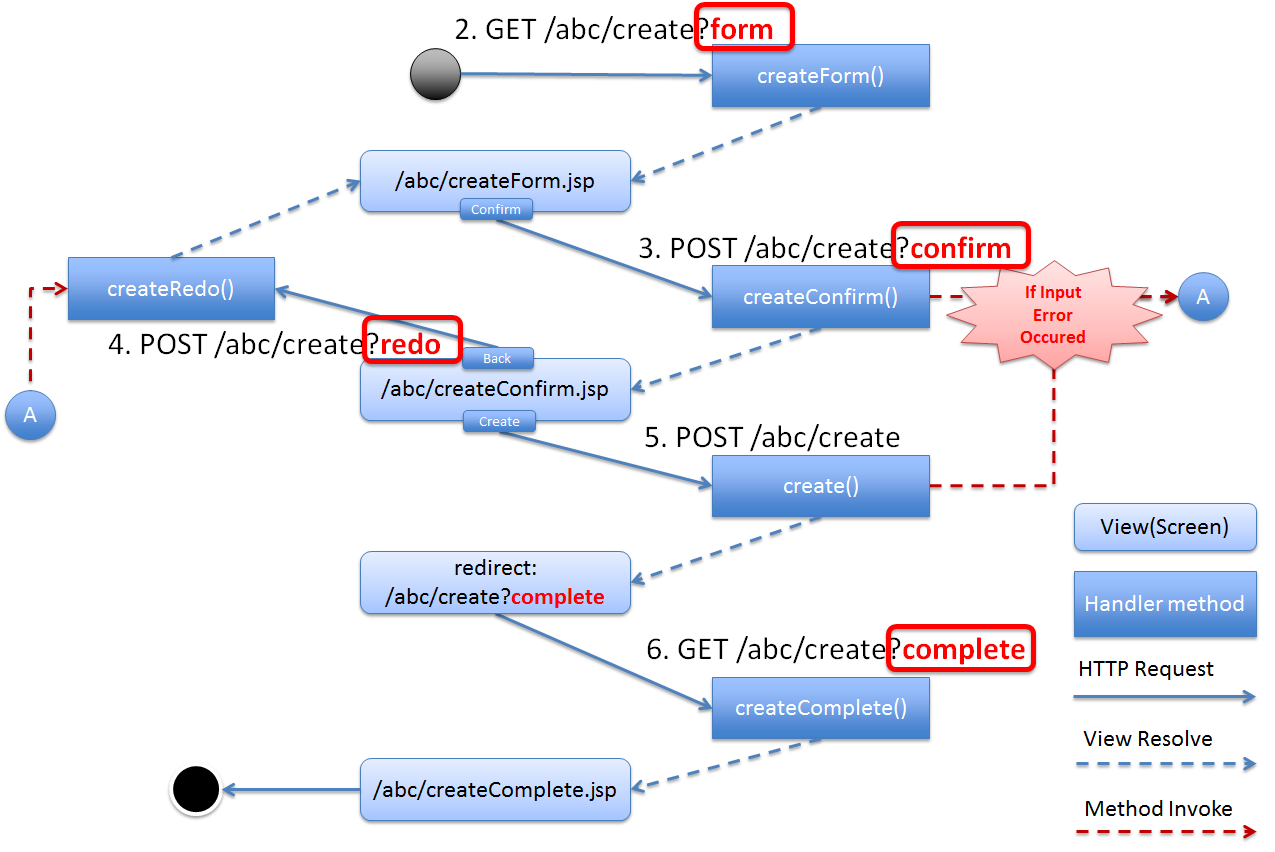
Picture - Request flow of entity create processing
@RequestMapping.- Implementing form display
- Implementing the display of user input confirmation screen
- Implementing ‘redisplay of form’
- Implementing ‘create new user’ business logic
- Implementing notification of create new user process completion
- Placing multiple buttons on HTML form
3.4.1.3.4. Implementing form display
In order to display the form, form is specified as HTTP parameter.
@RequestMapping(value = "create", params = "form") // (1) public String createForm(AbcForm form, Model model) { // omitted return "abc/createForm"; // (2) }
Sr. No. Description Specify "form"as value ofparamsattribute.Return view name of JSP to render form screen. Note
In this handler method,
methodattribute is not specified since it is not required for HTTP GET method.
Example of implementation of sections other than handler method is explained below.
Besides implementing the handler method for form display, points mentioned below are required:
- Implement generation process of form object. Refer to Implementing form object for the details of form object.
- Implement View of form screen. Refer to Implementing View for the details of View.
Use the following form object.
public class AbcForm implements Serializable { private static final long serialVersionUID = 1L; @NotEmpty private String input1; @NotNull @Min(1) @Max(10) private Integer input2; // omitted setter&getter }
Creating an object of AbcForm.
@ModelAttribute public AbcForm setUpAbcForm() { return new AbcForm(); }
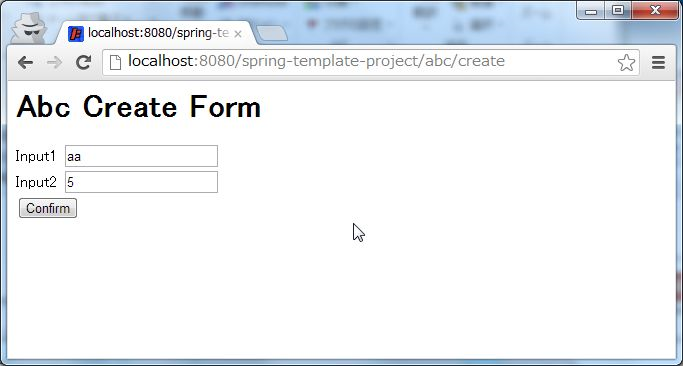
Create view(JSP) of form screen.
<h1>Abc Create Form</h1> <form:form modelAttribute="abcForm" action="${pageContext.request.contextPath}/abc/create"> <form:label path="input1">Input1</form:label> <form:input path="input1" /> <form:errors path="input1" /> <br> <form:label path="input2">Input2</form:label> <form:input path="input2" /> <form:errors path="input2" /> <br> <input type="submit" name="confirm" value="Confirm" /> <!-- (1) --> </form:form>
Sr. No. Description Specify name="confirm"parameter for submit button to transit to confirmation screen.
The operations are explained below.
"abc/create?form" URL.form is specified in the URL as an HTTP parameter, createForm method of controller is called and form screen is displayed.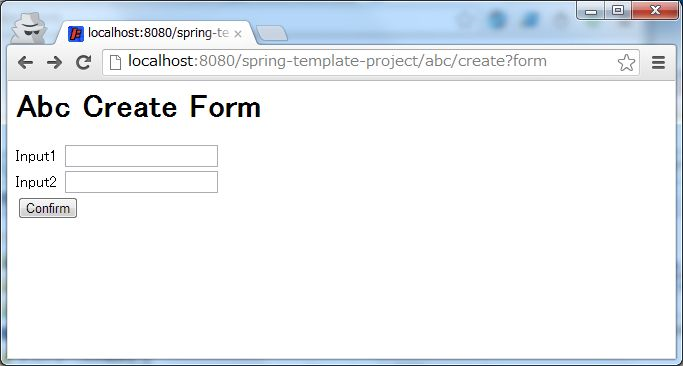
3.4.1.3.5. Implementing the display of user input confirmation screen
To check user input in the form, data is sent by POST method and confirm is specified as HTTP parameter.
@RequestMapping(value = "create", method = RequestMethod.POST, params = "confirm") // (1) public String createConfirm(@Validated AbcForm form, BindingResult result, Model model) { if (result.hasErrors()) { return createRedo(form, model); // return "abc/createForm"; (2) } // omitted return "abc/createConfirm"; // (3) }
Sr. No. Description Specify “RequestMethod.POST” in methodattribute and “confirm” inparamsattribute.In case of input validation errors, it is recommended to call the handler method of form re-display. Return view-name of JSP to render the screen for user input confirmation. Note
POST method is specified to prevent displaying confidential information such as password and other personal information etc. in the address bar. (Needless to say that these security measures not sufficient and needs more secure measures such as SSL etc.)
Example of implementation of sections other than handler method is explained below.
Besides implementing handler method for user input confirmation screen, points mentioned below are required.
- Implement view of user-input confirmation screen. Refer to Implementing View for the details of view.
Create the view (JSP) for user input confirmation screen.
<h1>Abc Create Form</h1> <form:form modelAttribute="abcForm" action="${pageContext.request.contextPath}/abc/create"> <form:label path="input1">Input1</form:label> ${f:h(abcForm.input1)} <form:hidden path="input1" /> <!-- (1) --> <br> <form:label path="input2">Input2</form:label> ${f:h(abcForm.input2)} <form:hidden path="input2" /> <!-- (1) --> <br> <input type="submit" name="redo" value="Back" /> <!-- (2) --> <input type="submit" value="Create" /> <!-- (3) --> </form:form>
Sr. No. Description The values entered on form screen is set as the hidden fields of HTML form since they must be sent back to the server when Create or Back buttons are clicked. Specify name="redo"parameter for submit button to return to form screen.Parameter name need not be specified for submit button. Submit button will do the actual create operation. Note
In the above example, HTML escaping is performed as an XSS countermeasure using
f:h()function while displaying the user input values. For details, refer to Cross Site Scripting.
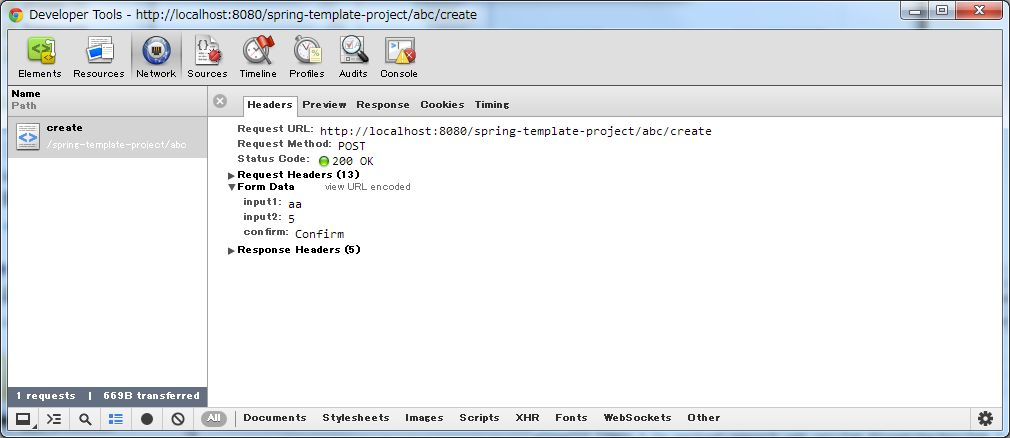
The operations are explained below.
"aa" in Input1 and "5" in Input2 and click Confirm button on form screen."abc/create?confirm" URI gets accessed using POST method.confirm is present in the URI, createConfirm method of controller is called and user input confirmation screen is displayed.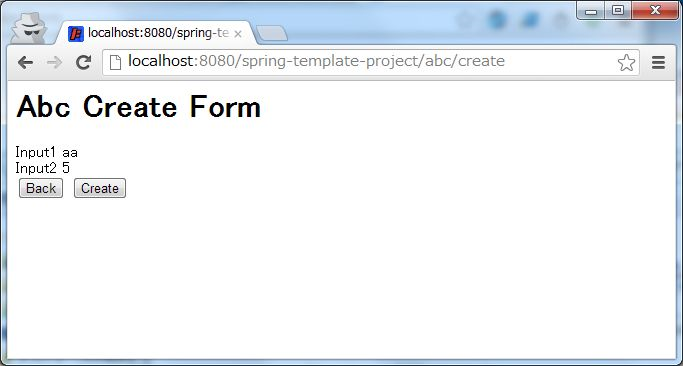
Since HTTP parameters are sent across through HTTP POST method after clicking the Confirm button, it does not appear in URI. However, “confirm” is included as HTTP parameter.
3.4.1.3.6. Implementing ‘redisplay of form’
“redo” is specified as HTTP parameter to indicate that form needs to be redisplayed.
@RequestMapping(value = "create", method = RequestMethod.POST, params = "redo") // (1) public String createRedo(AbcForm form, Model model) { // omitted return "abc/createForm"; // (2) }
Sr. No. Description Specify “RequestMethod.POST” in methodattribute and “redo” inparamsattribute.Return view name of JSP to render the form screen.
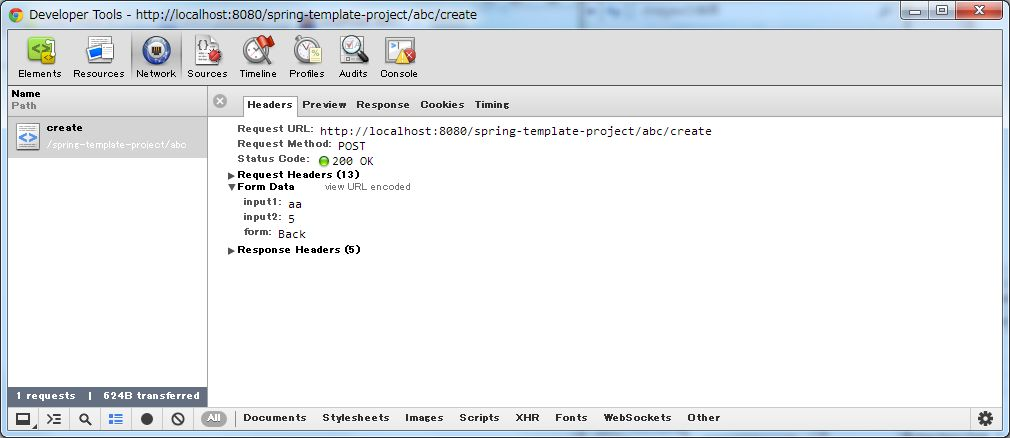
Operation is described below.
createRedo method of controller is invoked and form screen is redisplayed.Since HTTP parameters are sent across through HTTP POST method after clicking the Back button, it does not appear in URI. However, “redo” is included as HTTP parameter. Moreover, since input values of form had been sent as hidden fields, input values can be restored on redisplayed form screen.
Note
In order to implement back button functionality, setting onclick="javascript:history.back()" is also one of the ways.
Both the methods differ in the following ways. Appropriate method must be selected as per requirement.
- Behavior when Back button on browser is clicked.
- Behavior when page having Back button is accessed and Back button is clicked.
- History of browser
3.4.1.3.7. Implementing ‘create new user’ business logic
@RequestMapping(value = "create", method = RequestMethod.POST) // (1) public String create(@Validated AbcForm form, BindingResult result, Model model) { if (result.hasErrors()) { return createRedo(form, model); // return "abc/createForm"; } // omitted return "redirect:/abc/create?complete"; // (2) }
Sr. No. Description Specify RequestMethod.POSTinmethodattribute. Do not specifyparamsattribute.Return URL to the request needs to be redirected as view name in order to use PRG pattern. Note
It can be redirected to “/xxx” by returning “redirect:/xxx” as view name.
Warning
PRG pattern is used to avoid double submission when the browser gets reloaded by clicking F5 button. However, as a countermeasure for double submission, it is necessary to use TransactionTokenCheck functionality. For details of TransactionTokenCheck, refer to Double Submit Protection .
Operation is described below.
"abc/create" URL is accessed through POST method."/abc/create?complete"). Hence HTTP status is changed to 302.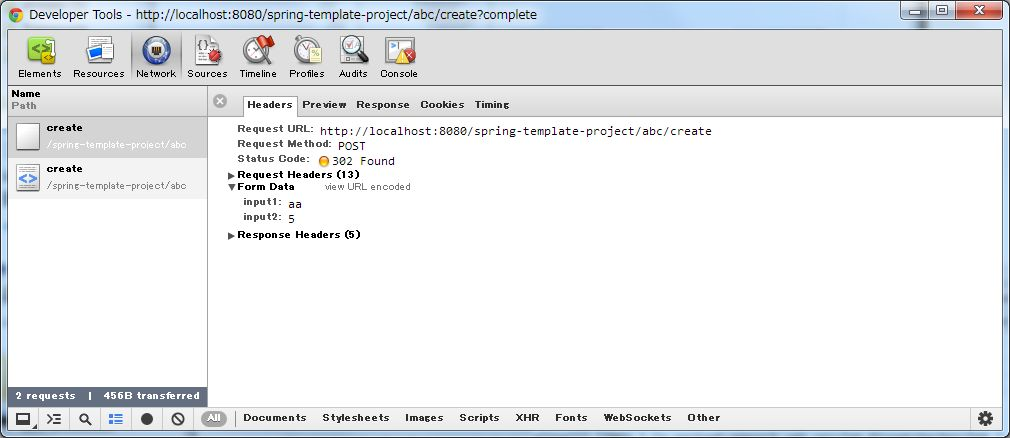
3.4.1.3.8. Implementing notification of create new user process completion
In order to notify the completion of create process, complete must be present in the request as HTTP parameter.
@RequestMapping(value = "create", params = "complete") // (1) public String createComplete() { // omitted return "abc/createComplete"; // (2) }
Sr. No. Description Specify "complete"inparamsattribute.Return View name of JSP to render the create completion screen. Note
In this handler method,
methodattribute is not specified since it is not required for HTTP GET method.
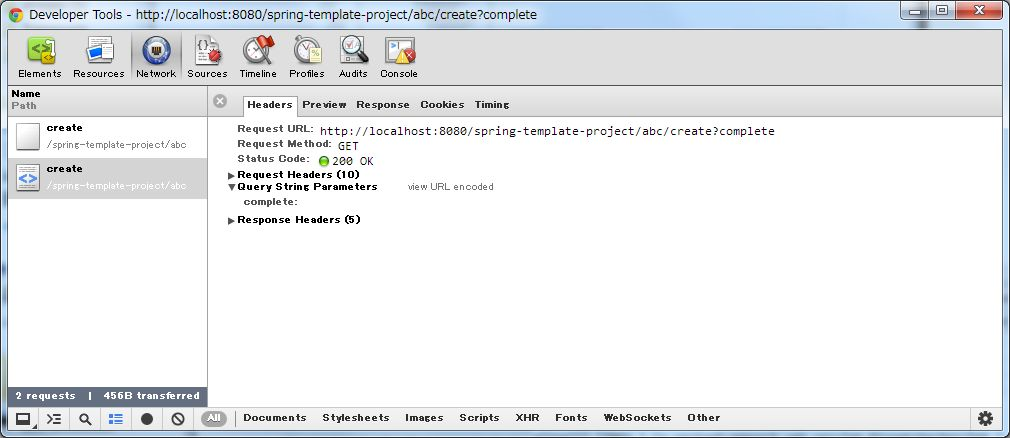
Operation is described below.
"/abc/create?complete") is specified as redirect destination.complete, createComplete() method of controller is called and create completion screen is displayed.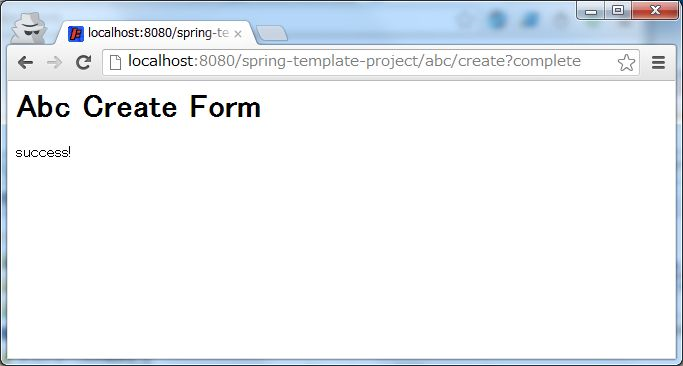
Note
Since PRG pattern is used, even if browser is reloaded, create completion screen is only re-displayed without re-executing create process.
3.4.1.3.9. Placing multiple buttons on HTML form
To place multiple buttons on a single form, send HTTP parameter to identify the corresponding button and so that the handler method of controller can be switched. An example of Create button and Back button on input confirmation screen of sample application is explained here.
‘Create’ button to perform ‘user creation’ and ‘Back’ button to redisplay ‘create form’ exists on the form of input confirmation screen as shown below.
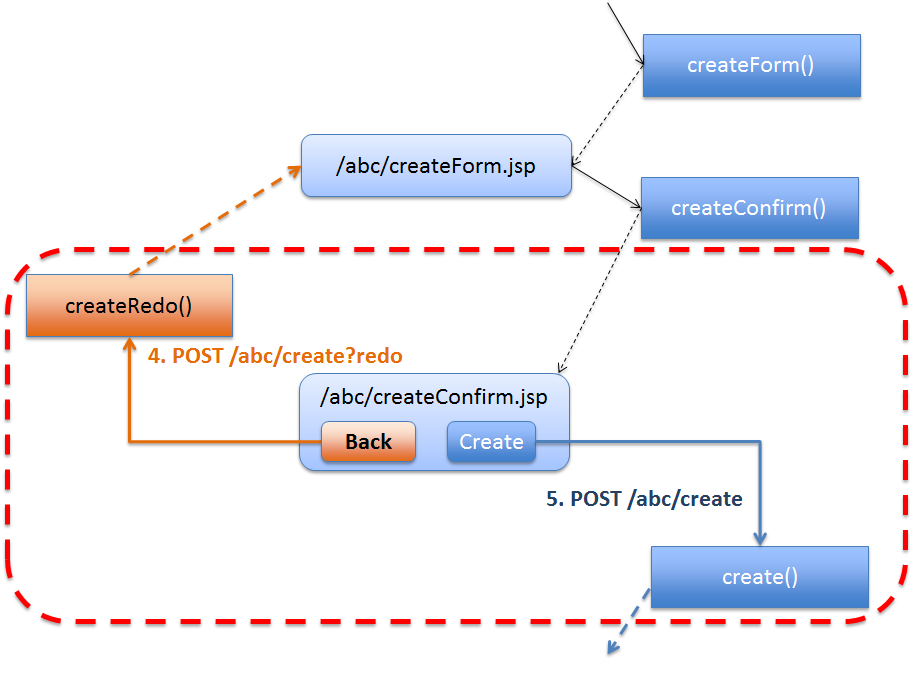
Picture - Multiple button in the HTML form
To redisplay ‘create form’ using request ( "/abc/create?redo" ) when Back button is clicked,
the following code is required in HTML form.
<input type="submit" name="redo" value="Back" /> <!-- (1) --> <input type="submit" value="Create" />
Sr. No. Description In input confirmation screen ( "abc/createConfirm.jsp"), specifyname="redo"parameter for Back button.
For the operations when Back button is clicked, refer to Implementing ‘redisplay of form’.
3.4.1.3.10. Source code of controller of sample application
@Controller @RequestMapping("abc") public class AbcController { @ModelAttribute public AbcForm setUpAbcForm() { return new AbcForm(); } // Handling request of "/abc/create?form" @RequestMapping(value = "create", params = "form") public String createForm(AbcForm form, Model model) { // omitted return "abc/createForm"; } // Handling request of "POST /abc/create?confirm" @RequestMapping(value = "create", method = RequestMethod.POST, params = "confirm") public String createConfirm(@Validated AbcForm form, BindingResult result, Model model) { if (result.hasErrors()) { return createRedo(form, model); } // omitted return "abc/createConfirm"; } // Handling request of "POST /abc/create?redo" @RequestMapping(value = "create", method = RequestMethod.POST, params = "redo") public String createRedo(AbcForm form, Model model) { // omitted return "abc/createForm"; } // Handling request of "POST /abc/create" @RequestMapping(value = "create", method = RequestMethod.POST) public String create(@Validated AbcForm form, BindingResult result, Model model) { if (result.hasErrors()) { return createRedo(form, model); } // omitted return "redirect:/abc/create?complete"; } // Handling request of "/abc/create?complete" @RequestMapping(value = "create", params = "complete") public String createComplete() { // omitted return "abc/createComplete"; } }
3.4.1.4. Regarding arguments of handler method
The arguments of handler method can be used to fetch various values; however, as a principle rule, the following should not be fetched using arguments of handler method of controller.
- ServletRequest
- HttpServletRequest
- org.springframework.web.context.request.WebRequest
- org.springframework.web.context.request.NativeWebRequest
- java.io.InputStream
- java.io.Reader
- java.io.OutputStream
- java.io.Writer
- java.util.Map
- org.springframework.ui.ModelMap
Note
When generalized values like getAttribute/setAttribute of HttpServletRequest and get/put of Map are allowed, liberal use of these can degrade the maintainability of
the project with an increase in project size.
For the above reason, using HttpSession is not reccomended in the case when there are alternatives.
When common parameters (request parameters) need to be stored in JavaBean and passed as an argument to a method of controller, it can be implemented using Implementing HandlerMethodArgumentResolver as described later.
Arguments depending on the purpose of usage are described below.
- Passing data to screen (View)
- Retrieving values from URL path
- Retrieving request parameters individually
- Retrieving request parameters collectively
- Performing input validation
- Passing data while redirecting request
- Passing request parameters to redirect destination
- Inserting values in redirect destination URL path
- Acquiring values from Cookie
- Writing values in Cookie
- Retrieving pagination information
- Retrieving uploaded file
- Displaying result message on the screen
3.4.1.4.1. Passing data to screen (View)
To pass data to be displayed on screen (View), fetch org.springframework.ui.Model (Hereafter called as Model) as argument of handler method and
add the data (Object) to Model object.
- SampleController.java
@RequestMapping("hello") public String hello(Model model) { // (1) model.addAttribute("hello", "Hello World!"); // (2) model.addAttribute(new HelloBean("Bean Hello World!")); // (3) return "sample/hello"; // returns view name }
- hello.jsp
Message : ${f:h(hello)}<br> <%-- (4) --%> Message : ${f:h(helloBean.message)}<br> <%-- (5) --%>
- HTML of created by View(hello.jsp)
Message : Hello World!<br> <!-- (6) --> Message : Bean Hello World!<br> <!-- (6) -->
Sr. No. Description Fetch Modelobject as argument.addAttributemethod ofModelobject received as argument, and add the data toModelobject.For example,"HelloWorld!"string is added to the attribute name"hello".addAttributemethod is omitted, the class name beginning with lower case letter will become the attribute name.For example, the result ofmodel.addAttribute("helloBean", new HelloBean());is same as the result ofmodel.addAttribute(new HelloBean());Modelobject by specifying “${Attribute name}”.For example, HTML escaping is performed using “${f:h(Attribute name)}” function of EL expression.For details of functions of EL expression that perform HTML escaping, refer to Cross Site Scripting.Modelcan be acquired by specifying “${Attribute name.property name}”.Note
Even though the
Modelis not used, it can be specified as an argument. Even if it is not required at the initial stage of implementation, it can be used later (so that the signature of methods need not be changed in future).Note
The value can also be referred from the module which is not managed under Spring MVC (for example, ServletFilter, etc.) since
addAttributeinModelperforms asetAttributeinHttpServletRequest.
3.4.1.4.2. Retrieving values from URL path
@PathVariable annotation to argument of handler method of controller.@PathVariable annotation, value of @RequestMapping annotation must contain those values in the form of variables (for example, {id}).@RequestMapping("hello/{id}/{version}") // (1) public String hello( @PathVariable("id") String id, // (2) @PathVariable Integer version, // (3) Model model) { // do something return "sample/hello"; // returns view name }
Sr. No. Description @RequestMappingannotation. Specify path variable in “{variable name}” format.For example, 2 path variables such as"id"and"version"are specified.@PathVariableannotation.For example, when the URL"sample/hello/aaaa/1"is accessed, the string"aaaa"is passed to argument “id”.@PathVariableannotation can be omitted. When it is omitted, the argument name is considered as the request parameter name.In the above example, when the URL"sample/hello/aaaa/1"is accessed, value"1"is passed to argument “version”.However, in this method compilation needs to be done by specifying either of:
-goption (mode to output debug information)-parametersoption added from Java8 (mode to generate metadata for reflection in the method parameters)Note
Binding argument can be of any data type other than string. In case of different data type,
org.springframework.beans.TypeMismatchExceptionis thrown and default response is 400 (Bad Request). For example, when the URL"sample/hello/aaaa/v1"is accessed, an exception is thrown since"v1"cannot be converted into Integer type.Warning
When omitting the value attribute of
@PathVariableannotation, the application to be deployed needs to be compiled by specifying-goption or-parametersoption which is added from Java8. When these options are specified, there is a likely impact on memory and processing performance since information or processing required for debugging gets appended to the class after compilation. Basically, it is recommended to explicitly specify the value attribute.
3.4.1.4.3. Retrieving request parameters individually
To retrieve request parameters individually, add @RequestParam annotation to argument.
@RequestMapping("bindRequestParams") public String bindRequestParams( @RequestParam("id") String id, // (1) @RequestParam String name, // (2) @RequestParam(value = "age", required = false) Integer age, // (3) @RequestParam(value = "genderCode", required = false, defaultValue = "unknown") String genderCode, // (4) Model model) { // do something return "sample/hello"; // returns view name }
Sr. No. Description @RequestParamannotation.For example, when the URL"sample/hello?id=aaaa"is accessed, the string"aaaa"is passed to argument “id”.@RequestParamannotation can be omitted. When it is omitted, the argument name becomes the request parameter name.For example, when the URL"sample/hello?name=bbbb&...."is accessed, string"bbbb"is passed to argument “name”.However, in this method compilation needs to be done by specifying either of:
-goption (mode to output debug information)-parametersoption added from Java8 (mode to generate metadata for reflection in the method parameters)falsein therequiredattribute.For example, when it is accessed where request parameteragedoes not exist,nullis passed to argument “age”.genderCodedoes not exist,"unknown"is passed to argument “genderCode”.Note
When it is accessed without specifying mandatory parameters,
org.springframework.web.bind.MissingServletRequestParameterExceptionis thrown and default operation is responded with 400 (Bad Request). However, when defaultValue attribute is specified, the value specified in defaultValue attribute is passed without throwing exception.Note
Binding argument can be of any data type. In case the data type do not match,
org.springframework.beans.TypeMismatchExceptionis thrown and default response is 400 (Bad Request). For example, when"sample/hello?age=aaaa&..."URL is accessed, exception is thrown sinceaaaacannot be converted into Integer.
Binding to form object must be done only when any of the following conditions are met.
- If request parameter is an item in the HTML form.
- If request parameter is not an item in HTML form, however, input validation other than mandatory check needs to be performed.
- If error details of input validation error needs to be output for each parameter.
- If there are 3 or more request parameters. (maintenance and readability point of view)
3.4.1.4.4. Retrieving request parameters collectively
Following is an example that shows the difference between handler method that fetches each request parameter using @RequestParam and the same handler method when fetching request parameters in a form object
Handler method that receives request parameter separately using @RequestParam is as shown below.
@RequestMapping("bindRequestParams") public String bindRequestParams( @RequestParam("id") String id, @RequestParam String name, @RequestParam(value = "age", required = false) Integer age, @RequestParam(value = "genderCode", required = false, defaultValue = "unknown") String genderCode, Model model) { // do something return "sample/hello"; // returns view name }
public class SampleForm implements Serializable{ private static final long serialVersionUID = 1477614498217715937L; private String id; private String name; private Integer age; private String genderCode; // omit setters and getters }Note
Request parameter name should match with form object property name.
- When parameters
"id=aaa&name=bbbb&age=19&genderCode=men?tel=01234567"are sent to the above form object,- the values of
id,name,age,genderCodematching with the property name, are stored, howevertelis not included in form object, as it does not have matching property name.Make changes such that request parameters which were being fetched individually using
@RequestParamnow get fetched as form object.@RequestMapping("bindRequestParams") public String bindRequestParams(@Validated SampleForm form, // (1) BindingResult result, Model model) { // do something return "sample/hello"; // returns view name }
Sr. No. Description Receive SampleFormobject as argument.Note
When form object is used as argument, unlike
@RequestParam, mandatory check is not performed. When using form object, Performing input validation should be performed as described below.
Warning
Domain objects such as Entity, etc. can also be used as form object without any changes required. However, the parameters such as password for confirmation, agreement confirmation checkbox, etc. should exist only on WEB screen. Since the fields depending on such screen items should not be added to domain objects, it is recommended to create class for form object separate from domain object. When a domain object needs to be created from request parameters, values must first be received in form object and then copied to domain object from form object.
3.4.1.4.5. Performing input validation
When performing input validation for the form object, add @Validated annotation to form object argument, and specify org.springframework.validation.BindingResult (Hereafter
called as BindingResult) to argument immediately after form object argument.
Refer to Input Validation for the details of input validation.
Add annotations required in input validation to the fields of form object class.
public class SampleForm implements Serializable { private static final long serialVersionUID = 1477614498217715937L; @NotNull @Size(min = 10, max = 10) private String id; @NotNull @Size(min = 1, max = 10) private String name; @Min(1) @Max(100) private Integer age; @Size(min = 1, max = 10) private Integer genderCode; // omit setters and getters }
@Validated annotation to form object argument.@Validated annotation before the handler method of controller is executed. The check result is stored in the argument BindingResult which immediately follows form object argument.BindingResult.@RequestMapping("bindRequestParams") public String bindRequestParams(@Validated SampleForm form, // (1) BindingResult result, // (2) Model model) { if (result.hasErrors()) { // (3) return "sample/input"; // back to the input view } // do something return "sample/hello"; // returns view name }
Sr. No. Description Add @Validatedannotation toSampleFormargument, and mark it as target for input validation.Specify BindingResultin the argument where input validation result is stored.Check if input validation error exists. If there is an error, trueis returned.
3.4.1.4.6. Passing data while redirecting request
To redirect after executing a handler method ofcontroller and to pass data along with it, fetch org.springframework.web.servlet.mvc.support.RedirectAttributes (Henceforth called as RedirectAttributes) as an argument of handler method,
and add the data to RedirectAttributes object.
- SampleController.java
@RequestMapping("hello") public String hello(RedirectAttributes redirectAttrs) { // (1) redirectAttrs.addFlashAttribute("hello", "Hello World!"); // (2) redirectAttrs.addFlashAttribute(new HelloBean("Bean Hello World!")); // (3) return "redirect:/sample/hello?complete"; // (4) } @RequestMapping(value = "hello", params = "complete") public String helloComplete() { return "sample/complete"; // (5) }
- complete.jsp
Message : ${f:h(hello)}<br> <%-- (6) --%> Message : ${f:h(helloBean.message)}<br> <%-- (7) --%>
- HTML of created by View(complete.jsp)
Message : Hello World!<br> <!-- (8) --> Message : Bean Hello World!<br> <!-- (8) -->
Sr. No. Description Fetch RedirectAttributesobject as argument of the handler method of controller.addFlashAttributemethod ofRedirectAttributesand add the data toRedirectAttributesobject.For example, the string data"HelloWorld!"is added to attribute name"hello".addFlashAttributemethod is omitted, the class name beginning with lower case letter becomes the attribute name.For example, the result ofmodel.addFlashAttribute("helloBean", new HelloBean());is same asmodel.addFlashAttribute(new HelloBean());.RedirectAttributesobject can be obtained by specifying “${attribute name}”.For example, HTML escaping is performed using “${f:h(attribute name)}” function of EL expression.For the details of functions of EL expression that performs HTML escaping, refer to Cross Site Scripting.RedirectAttributescan be obtained from JavaBean by using “${Attribute name.Property name}”.
Warning
The data cannot be passed to redirect destination even though it is added to Model.
Note
It is similar to the addAttribute method of Model. However survival time of data differs.
In addFlashAttribute of RedirectAttributes, the data is stored in a scope called flash scope.
Data of only 1 request (G in PRG pattern) can be referred after redirect. The data from the second request onwards is deleted.
Picture - Survival time of flush scope
3.4.1.4.7. Passing request parameters to redirect destination
When request parameters are to be set dynamically to redirect destination, add the values to be passed to RedirectAttributes object of argument.
@RequestMapping("hello") public String hello(RedirectAttributes redirectAttrs) { String id = "aaaa"; redirectAttrs.addAttribute("id", id); // (1) // must not return "redirect:/sample/hello?complete&id=" + id; return "redirect:/sample/hello?complete"; }
Sr. No. Description name and request parameter value in argument ``valueand calladdAttributemethod ofRedirectAttributesobject.In the above example, it is redirected to"/sample/hello?complete&id=aaaa".
Warning
In the above example, the result is the same as of return "redirect:/sample/hello?complete&id=" + id; (as shown in the commented out line in the above example).
However, since URL encoding is also performed if addAttribute method of RedirectAttributes object is used,
the request parameters that needs to be inserted dynamically should be set to the request parameter using addAttribute method and should not be set to redirect URL specified as return value.
The request parameters which are not to be inserted dynamically (“complete” as in the above example), can be directly specified in the redirect URL specified as the return value.
3.4.1.4.8. Inserting values in redirect destination URL path
To insert values in redirect destination URL path dynamically, add the value to be inserted in RedirectAttributes object of argument as shown in the example to set request parameters.
@RequestMapping("hello") public String hello(RedirectAttributes redirectAttrs) { String id = "aaaa"; redirectAttrs.addAttribute("id", id); // (1) // must not return "redirect:/sample/hello/" + id + "?complete"; return "redirect:/sample/hello/{id}?complete"; // (2) }
Sr. No. Description addAttributemethod ofRedirectAttributesobject."/sample/hello/aaaa?complete".
Warning
In the above example, the result is same as of "redirect:/sample/hello/" + id + "?complete"; (as shown in the commented out line in the above example).
However, since URL encoding is also performed when using addAttribute method of RedirectAttributes object,
the path values to be inserted dynamically should be inserted using addAttribute method and path variable and should not be set to redirect URL specified as return value.
3.4.1.4.9. Acquiring values from Cookie
Add @CookieValue annotation to the argument of handler method to acquire the values from a cookie.
@RequestMapping("readCookie") public String readCookie(@CookieValue("JSESSIONID") String sessionId, Model model) { // (1) // do something return "sample/readCookie"; // returns view name }
Sr. No. Description valueattribute of@CookieValueannotation.In the above example, “JSESSIONID” value is passed from cookie to sessionId argument.
Note
- As in the case of
@RequestParam, it hasrequiredattribute anddefaultValueattribute. Also, the data type of the argument need not be String. - Refer to Retrieving request parameters individually for details.
3.4.1.4.10. Writing values in Cookie
addCookie method of HttpServletResponse object directly and add the value to cookie.@RequestMapping("writeCookie") public String writeCookie(Model model, HttpServletResponse response) { // (1) Cookie cookie = new Cookie("foo", "hello world!"); response.addCookie(cookie); // (2) // do something return "sample/writeCookie"; }
Sr. No. Description Specify HttpServletResponseobject as argument to write to cookie.Cookieobject and add toHttpServletResponseobject.For example,"hello world!"value is assigned to Cookie name"foo".
Tip
No difference compared to use of HttpServletResponse which fetched as an argument of handler method, however, org.springframework.web.util.CookieGenerator class is provided by Spring
as a class to write values in cookie. It should be used if required.
3.4.1.4.11. Retrieving pagination information
org.springframework.data.domain.Pageable (henceforth called as Pageable) object as an argument of handler method enables to handle pagination related information (page count, fetch record count) easily.Refer to Pagination for details.
3.4.1.4.12. Retrieving uploaded file
Uploaded file can be obtained in 2 ways.
- Provide
MultipartFileproperty in form object. - Use
org.springframework.web.multipart.MultipartFileas an argument of handler method having@RequestParamannotation.
Refer to File Upload for details.
3.4.1.4.13. Displaying result message on the screen
Model object or RedirectAttributes object can be obtained as an argument of handler method and
result message of business logic execution can be displayed by adding ResultMessages object to Model or RedirectAttributes.
Refer to Message Management for details.
3.4.1.5. Regarding return value of handler method
For return values of handler methods, various values can be fetched ; however, only the following values should be used.
- String (for logical name of view)
Return types depending on the purpose of usage are described below:
3.4.1.5.1. HTML response
ViewResolver when generating HTML using JSP will be an inherited class of UrlBasedViewResolver (InternalViewResolver and``TilesViewResolver``, etc).InternalViewResolver for JSP is given below; however, it is recommended to use TilesViewResolver when the screen layout is in a templated format.TilesViewResolver.- spring-mvc.xml
Example of definition when <bean> element is to be used
<!-- (1) --> <bean class="org.springframework.web.servlet.view.InternalResourceViewResolver"> <property name="prefix" value="/WEB-INF/views/" /> <!-- (2) --> <property name="suffix" value=".jsp" /> <!-- (3) --> <property name="order" value="1" /> <!-- (4) --> </bean>Example of definition when using
<mvc:view-resolvers>element added from Spring Framework 4.1<mvc:view-resolvers> <mvc:jsp prefix="/WEB-INF/views/" /> <!-- (5) --> </mvc:view-resolvers>
- SampleController.java
@RequestMapping("hello") public String hello() { // omitted return "sample/hello"; // (6) }
Sr. No. Description Define InternalViewResolverfor JSP.Specify base directory (prefix of file path) where JSP files are stored.
By specifying prefix, there is no need to specify physical storage location of JSP files at the time of returning View name in Controller.
Specify extension (suffix of file path) of JSP file.
By specifying suffix, specifying extension of JSP files at the time of returning View name in Controller is no longer needed.
Specify execution order when multiple
ViewResolverare specified.It can be specified in the range of
Integerand executed sequentially from smallest value.Define
InternalViewResolverfor JSP using<mvc:jsp>element added from Spring Framework 4.1.
- In
prefixattribute, specify base directory (prefix of file path) where JSP file is stored.- It need not be explicitly specified in
suffixattribute as".jsp"is used as default value.Note
When
<mvc:view-resolvers>element is used, it is possible to defineViewResolverin simple way. Hence this guideline recommends to use<mvc:view-resolvers>.When View name "sample/hello"is the return value of handler method,"/WEB-INF/views/sample/hello.jsp"is called and HTML is sent as response.
Note
HTML output is generated using JSP in the above example, however, even if HTML is generated using other template engine such as Velocity, FreeMarker, return value of handler method will be "sample/hello".
ViewResolver takes care of task to determine which template engine is to be used.
3.4.1.5.2. Responding to downloaded data
"application/octet-stream"), it is recommended to create a viewModel and returnsBeanNameViewResolver provided by Spring Framework is recommended.- spring-mvc.xml
Example of definition when
<bean>element is to be used<!-- (1) --> <bean class="org.springframework.web.servlet.view.BeanNameViewResolver"> <property name="order" value="0"/> <!-- (2) --> </bean> <bean class="org.springframework.web.servlet.view.InternalResourceViewResolver"> <property name="prefix" value="/WEB-INF/views/" /> <property name="suffix" value=".jsp" /> <property name="order" value="1" /> </bean>Example of definition when using
<mvc:view-resolvers>element added from Spring Framework 4.1<mvc:view-resolvers> <mvc:bean-name /> <!-- (3) --> <mvc:jsp prefix="/WEB-INF/views/" /> </mvc:view-resolvers>
- SampleController.java
@RequestMapping("report") public String report() { // omitted return "sample/report"; // (4) }
- XxxExcelView.java
@Component("sample/report") // (5) public class XxxExcelView extends AbstractExcelView { // (6) @Override protected void buildExcelDocument(Map<String, Object> model, HSSFWorkbook workbook, HttpServletRequest request, HttpServletResponse response) throws Exception { HSSFSheet sheet; HSSFCell cell; sheet = workbook.createSheet("Spring"); sheet.setDefaultColumnWidth(12); // write a text at A1 cell = getCell(sheet, 0, 0); setText(cell, "Spring-Excel test"); cell = getCell(sheet, 2, 0); setText(cell, (Date) model.get("serverTime")).toString()); } }
Sr. No. Description Define
BeanNameViewResolver.
BeanNameViewResolveris a class that resolves View by searching for the bean which matches with the returned View name, from application context.When InternalViewResolverfor JSP andTilesViewResolverare to be used together, it is recommended to give it a higher priority compared to theseViewResolver. In the above example, by specifying"0", View is resolved byBeanNameViewResolverprior toInternalViewResolver.Define
BeanNameViewResolverusing<mvc:bean-name>element added from Spring Framework 4.1.When defining
ViewResolverusing<mvc:view-resolvers>element, definition order ofViewResolverspecified in child element will be the priority order. In the above example, by defining it above (<mvc:jsp>) element in order to defineInternalViewResolverfor JSP, View is resolved byBeanNameViewResolverprior toInternalViewResolverfor JSP.Note
When
<mvc:view-resolvers>element is used, it is possible to defineViewResolverin a simple way. Hence, this guideline recommends to use<mvc:view-resolvers>.When View name "sample/report"is the return value of handler method, the data generated by View instance which is registered in step (5), is responded as download data.Register View object as Bean by specifying View name to the name of component.
In above example,
x.y.z.app.views.XxxExcelViewinstance is registered as a bean with bean name (view name) as"sample/report".Example of View implementation.
Implementation of View class that inherits
org.springframework.web.servlet.view.document.AbstractExcelViewand generates Excel data.
3.4.1.6. Implementing the process
Note
Controller should be used only for routing purposes (mapping requests to corresponding business logic) and deciding the screen transition for each request as well as setting model data. Thereby, controller should be simple as much as possible. By consistently following this policy, the contents of controller become clear which ensures maintainability of controller even if the size of development is large.
Operations to be performed in controller are shown below:
- Correlation check of input value
- Calling business logic
- Reflecting values to domain object
- Reflecting values to form object
3.4.1.6.1. Correlation check of input value
Validation class which implements org.springframework.validation.Validator interface.Validator to org.springframework.web.bind.WebDataBinder.@Inject PasswordEqualsValidator passwordEqualsValidator; // (1) @InitBinder protected void initBinder(WebDataBinder binder){ binder.addValidators(passwordEqualsValidator); // (2) }
Sr. No. Description Inject Validatorthat performs correlation check.ValidatortoWebDataBinder.Adding the above toWebDataBinderenables correlation check by executingValidatorbefore the handler method gets called.
3.4.1.6.2. Calling business logic
Execute business logic by injecting the Service in which business logic is implemented and calling the injected Service method.
@Inject SampleService sampleService; // (1) @RequestMapping("hello") public String hello(Model model){ String message = sampleService.hello(); // (2) model.addAttribute("message", message); return "sample/hello"; }
Sr. No. Description Servicein which business logic is implemented.Call the injected Servicemethod to execute business logic.
3.4.1.6.3. Reflecting values to domain object
@RequestMapping("hello") public String hello(@Validated SampleForm form, BindingResult result, Model model){ // omitted Sample sample = new Sample(); // (1) sample.setField1(form.getField1()); sample.setField2(form.getField2()); sample.setField3(form.getField3()); // ... // and more ... // ... String message = sampleService.hello(sample); // (2) model.addAttribute("message", message); // (3) return "sample/hello"; }
Sr. No. Description Model.
- SampleController.java
@Inject SampleHelper sampleHelper; // (1) @RequestMapping("hello") public String hello(@Validated SampleForm form, BindingResult result){ // omitted String message = sampleHelper.hello(form); // (2) model.addAttribute("message", message); return "sample/hello"; }
- SampleHelper.java
public class SampleHelper { @Inject SampleService sampleService; public String hello(SampleForm form){ // (3) Sample sample = new Sample(); sample.setField1(form.getField1()); sample.setField2(form.getField2()); sample.setField3(form.getField3()); // ... // and more ... // ... String message = sampleService.hello(sample); return message; } }
Sr. No. Description Inject object of Helper class in controller. Value is reflected to the domain object by calling the method of the injected Helper class. Delegating the process to Helper class enables to keep the implementation of controller simple. Call the Service class method to execute the business logic after creating domain object. Note
Bean conversion functionality can be used as an alternative way to delegate the process of reflecting form object values, to Helper class. Refer to Bean Mapping (Dozer) for the details of Bean conversion functionality.
3.4.1.6.4. Reflecting values to form object
@RequestMapping("hello") public String hello(SampleForm form, BindingResult result, Model model){ // omitted Sample sample = sampleService.getSample(form.getId()); // (1) form.setField1(sample.getField1()); // (2) form.setField2(sample.getField2()); form.setField3(sample.getField3()); // ... // and more ... // ... model.addAttribute(sample); // (3) return "sample/hello"; }
Sr. No. Description Modelso that data can be referred.Note
In JSP, it is recommended to refer the values from domain object instead of form object for the fields to be only displayed on the screen.
The process of reflecting value to form object should be implemented by the handler method of controller. However considering the readability of handler method in case of large amount of code, it is recommended to delegate the process to Helper class method.
- SampleController.java
@RequestMapping("hello") public String hello(@Validated SampleForm form, BindingResult result){ // omitted Sample sample = sampleService.getSample(form.getId()); sampleHelper.applyToForm(sample, form); // (1) model.addAttribute(sample); return "sample/hello"; }
- SampleHelper.java
public void applyToForm(SampleForm destForm, Sample srcSample){ destForm.setField1(srcSample.getField1()); // (2) destForm.setField2(srcSample.getField2()); destForm.setField3(srcSample.getField3()); // ... // and more ... // ... }
Sr. No. Description Note
Bean conversion functionality can be used as an alternative method to delegate the process to Helper class. Refer to Bean Mapping (Dozer) for the details of Bean conversion functionality.
3.4.2. Implementing form object
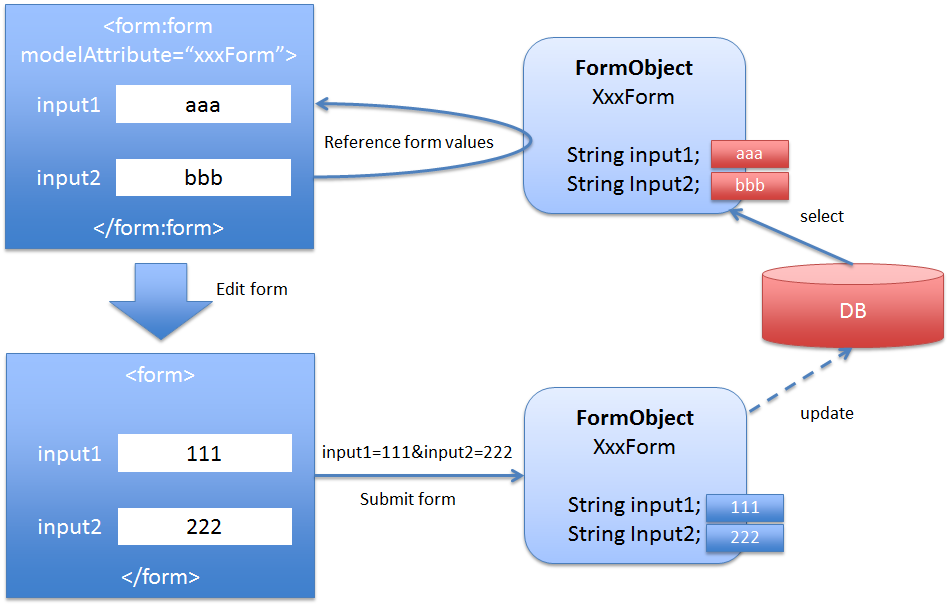
Form object is the object (JavaBean) which represents HTML form and plays the following role.
- Holds business data stored in the database so that it can be referred by HTML form (JSP).
- Holds request parameters sent by HTML form so that they can be referred by handler method of controller.
Implementation of form object can be described by focusing on the following points.
3.4.2.1. Creating form object
Create form object as a JavaBean.
Spring Framework provides the functionality to convert and bind the request parameters (string) sent by HTML form to the format defined in form object.
Hence, the fields to be defined in form object need not only be in java.lang.String format.
public class SampleForm implements Serializable { private String id; private String name; private Integer age; private String genderCode; private Date birthDate; // omitted getter/setter }Tip
Regarding the mechanism provided by Spring Framework that performs format conversion
Spring Framework executes format conversion using the following 3 mechanisms and supports conversion to basic format as standard. Refer to linked page for the details of each conversion function.
Warning
In form object, it is recommended to maintain only the fields of HTML form and not the fields which are just displayed on the screen. If display only fields are also maintained in form object, more memory will get consumed at the time of storing form object in HTTP session object causing memory exhaustion. In order to display the values of display only fields on the screen, it is recommended to add objects of domain layer (such as Entity) to request scope by using (
Model.addAttribute).
3.4.2.1.1. Number format conversion of fields
Number format can be specified for each field using @NumberFormat annotation.
public class SampleForm implements Serializable { @NumberFormat(pattern = "#,#") // (1) private Integer price; // omitted getter/setter }
Sr. No. Description priceof form object.
Attributes of @NumberFormat annotation are given below.
Sr. No. Attribute name Description
style Specify number format style. For details refer to Javadoc of NumberFormat.Style.
pattern Specify number format of Java. Refer to ‘Javadoc of DecimalFormat <http://docs.oracle.com/javase/8/docs/api/java/text/DecimalFormat.html>’_for details.
3.4.2.1.2. Date and time format conversion of fields
Date and time format for each field can be specified using @DateTimeFormat annotation.
public class SampleForm implements Serializable { @DateTimeFormat(pattern = "yyyyMMdd") // (1) private Date birthDate; // omitted getter/setter }
Sr. No. Description Specify the date and time format of request parameter sent by HTML form. For example, "yyyyMMdd"format is specified as pattern. When the value of request parameter is"20131001", Date object of 1st October, 2013 will bind to propertybirthDateof form object.
Attributes of @DateTimeFormat annotation are given below.
Sr. No. Attribute name Description
iso Specify ISO date and time format. For details refer to Javadoc of DateTimeFormat.ISO.
pattern Specify Java date and time format. Refer to ‘Javadoc of SimpleDateFormat <http://docs.oracle.com/javase/8/docs/api/java/text/SimpleDateFormat.html>’_for details.
style java.text.DateFormat.SHORT.M : Format same asjava.text.DateFormat.MEDIUM.L : Format same asjava.text.DateFormat.LONG.F : Format same asjava.text.DateFormat.FULL.- : A style meaning omissions.Example of specification and conversion)MM : Dec 9, 2013 3:37:47 AMM- : Dec 9, 2013-M : 3:41:45 AM
3.4.2.1.3. DataType conversion in controller
@InitBinder annotation can be used to define datatype conversions at controller level.
@InitBinder // (1) public void initWebDataBinder(WebDataBinder binder) { binder.registerCustomEditor( Long.class, new CustomNumberEditor(Long.class, new DecimalFormat("#,#"), true)); // (2) }@InitBinder("sampleForm") // (3) public void initSampleFormWebDataBinder(WebDataBinder binder) { // ... }
Sr. No. Description @InitBinderannotation is provided, it is called before executing the binding process and thereby default operations can be customized."#. #"format is specified for a field of type Long. This enables binding of value formatted with “,”.@InitBinderannotation.In the above example, the method is called before binding form object"sampleForm".
3.4.2.1.4. Specifying annotation for input validation
Since form object is validated using Bean Validation, it is necessary to specify the annotation which indicates constraints of the field. Refer to Input Validation for the details of input validation.
3.4.2.2. Initializing form object
Form object can also be called as form-backing bean and binding can be performed using @ModelAttribute annotation.
Initialize form-backing bean by the method having @ModelAttribute annotation.
In this guideline, such methods are called as ModelAttribute methods and defined with method names like setUpXxxForm.
@ModelAttribute // (1) public SampleForm setUpSampleForm() { SampleForm form = new SampleForm(); // populate form return form; }@ModelAttribute("xxx") // (2) public SampleForm setUpSampleForm() { SampleForm form = new SampleForm(); // populate form return form; }@ModelAttribute public SampleForm setUpSampleForm( @CookieValue(value = "name", required = false) String name, // (3) @CookieValue(value = "age", required = false) Integer age, @CookieValue(value = "birthDate", required = false) Date birthDate) { SampleForm form = new SampleForm(); form.setName(name); form.setAge(age); form.setBirthDate(birthDate); return form; }
Sr. No. Description Model. In the above example,"sampleForm"is the attribute name.The returned object is added toModeland an appropriate processmodel.addAttribute(form)is executed.Model, specify it in the value attribute of@ModelAttributeannotation. In the above example,"xxx"is the attribute name.For returned object, appropriate process “model.addAttribute(“xxx”, form)”is executed and it is returned toModel.When attribute name other than default value is specified, it is necessary to specify@ModelAttribute("xxx")at the time of specifying form object as an argument of handler method.@CookieValueannotation.
Note
When form object is to be initialized with default values, it should be done using ModelAttribute method. In point (3) in above example , value is fetched from cookie, However, fixed value defined in constant class can be set directly.
Note
Multiple ModelAttribute methods can be defined in the controller. Each method is executed before calling handler method of controller.
Warning
If ModelAttribute method is executed for each request, initialization needs to be repeated for each request and unnecessary objects will get created. So, for form objects which are required only for specific requests, should be created inside handler method of controller and not through the use of ModelAttribute method.
3.4.2.3. Binding to HTML form
Model to HTML form(JSP) using <form:xxx> tag.<form:xxx> tag, refer to Using Spring’s form tag library.<%@ taglib prefix="form" uri="http://www.springframework.org/tags/form" %> <!-- (1) --><form:form modelAttribute="sampleForm" action="${pageContext.request.contextPath}/sample/hello"> <!-- (2) --> Id : <form:input path="id" /><form:errors path="id" /><br /> <!-- (3) --> Name : <form:input path="name" /><form:errors path="name" /><br /> Age : <form:input path="age" /><form:errors path="age" /><br /> Gender : <form:input path="genderCode" /><form:errors path="genderCode" /><br /> Birth Date : <form:input path="birthDate" /><form:errors path="birthDate" /><br /> </form:form>
Sr. No. Description Define taglib to use <form:form>tag.Specify form object stored in Modelin themodelAttributeattribute of<form:form>tag.Specify property name of form object in path attribute of <form:input>tag.
3.4.2.4. Binding request parameters
It is possible to bind the request parameters sent by HTML form to form object and pass it as an argument to the handler method of controller.
@RequestMapping("hello") public String hello( @Validated SampleForm form, // (1) BindingResult result, Model model) { if (result.hasErrors()) { return "sample/input"; } // process form... return "sample/hello"; }@ModelAttribute("xxx") public SampleForm setUpSampleForm() { SampleForm form = new SampleForm(); // populate form return form; } @RequestMapping("hello") public String hello( @ModelAttribute("xxx") @Validated SampleForm form, // (2) BindingResult result, Model model) { // ... }
Sr. No. Description @ModelAttribute("xxx").
Warning
When attribute name specified by ModelAttribute method and attribute name specified in the @ModelAttribute("xxx") in the argument of handler method are different,
it should be noted that a new instance is created other than the instance created by ModelAttribute method.
When attribute name is not specified with @ModelAttribute in the argument to handler method, the attribute name is deduced as the class name with first letter in lower case.
3.4.2.4.1. Determining binding result
Error (including input validation error) that occurs while binding request parameter sent by HTML form to form object, is stored in org.springframework.validation.BindingResult.
@RequestMapping("hello") public String hello( @Validated SampleForm form, BindingResult result, // (1) Model model) { if (result.hasErrors()) { // (2) return "sample/input"; } // ... }
Sr. No. Description When BindingResultis declared immediately after form object, it is possible to refer to the error inside the handler method of controller.Calling BindingResult.hasErrors()can determine whether any error occurred in the input values of form object.
It is also possible to determine field errors, global errors (correlated check errors at class level) separately. These can be used separately if required.
Sr. No. Method Description
hasGlobalErrors()Method to determine the existence of global errors.
hasFieldErrors()Method to determine the existence of field errors.
hasFieldErrors(String field)Method to determine the existence of errors related to specified field.
3.4.3. Implementing View
View plays the following role.
- View generates response (HTML) as per the requirements of the client.View retrieves the required data from model (form object or domain object) and generates response in the format which is required by the client for rendering.
3.4.3.1. Implementing JSP
ViewResolver for calling JSP. Refer to HTML response for settings of ViewResolver.Basic implementation method of JSP is described below.
- Creating common JSP for include
- Displaying value stored in model
- Displaying numbers stored in model
- Displaying date and time stored in model
- Generate request URL
- Binding form object to HTML form
- Displaying input validation errors
- Displaying message of processing result
- Displaying codelist
- Displaying fixed text content
- Switching display according to conditions
- Repeated display of collection elements
- Displaying link for pagination
- Switching display according to authority
In this chapter, usage of main JSP tag libraries are described. However, refer to respective documents for the detailed usage since all JSP tag libraries are not described here.
Sr. No. JSP tag library name Document
Spring’s form tag library
Spring’s tag library
JSTL
Common library’s tags & el functions
- [JSP Tag Libraries and EL Functions offered by common library] of this guideline
Warning
If terasoluna-gfw-web 1.0.0.RELEASE is being used,
actiontag must be always be specified while using<form:form>tag of Spring’s form tag library.terasoluna-gfw-web 1.0.0.RELEASE has a dependency on Spring MVC(3.2.4.RELEASE). In this version of Spring MVC, if
actionattribute of<form:form>tag is not specified, it will expose a vulnerability of XSS(Cross-site scripting). For further details regarding the vulnerability, refer to CVE-2014-1904 of National Vulnerability Database (NVD).Also, terasoluna-gfw-web 1.0.1.RELEASE have been upgraded to Spring MVC(3.2.10.RELEASE and above); hence this vulnerability is not present.
3.4.3.1.1. Creating common JSP for include
Create a JSP that contains directive declaration which are required by all the JSP files of the project.
By specifying this JSP in <jsp-config>/<jsp-property-group>/<include-prelude> element of web.xml, eliminates the need to declare these directives and each and every JSP file of the project.
Further, this file is provided in blank project also.
- include.jsp
<%@ taglib uri="http://java.sun.com/jsp/jstl/core" prefix="c"%> <%-- (1) --%> <%@ taglib uri="http://java.sun.com/jsp/jstl/fmt" prefix="fmt"%> <%@ taglib uri="http://www.springframework.org/tags" prefix="spring"%> <%-- (2) --%> <%@ taglib uri="http://www.springframework.org/tags/form" prefix="form"%> <%@ taglib uri="http://www.springframework.org/security/tags" prefix="sec"%> <%@ taglib uri="http://terasoluna.org/functions" prefix="f"%> <%-- (3) --%> <%@ taglib uri="http://terasoluna.org/tags" prefix="t"%>
- web.xml
<jsp-config> <jsp-property-group> <url-pattern>*.jsp</url-pattern> <el-ignored>false</el-ignored> <page-encoding>UTF-8</page-encoding> <scripting-invalid>false</scripting-invalid> <include-prelude>/WEB-INF/views/common/include.jsp</include-prelude> <!-- (4) --> </jsp-property-group> </jsp-config>
Sr. No. Description coreandfmtare used.spring,formandsecare used./WEB-INF/views/common/include.jsp) are included at the beginning of each JSP (file specified in<url-pattern>).Note
Refer to
JSP.1.10 Directivesof JavaServer Pages Specification(Version2.2)for details of directives.Note
Refer to
JSP.3.3 JSP Property Groupsof JavaServer Pages Specification(Version2.2)for details of <jsp-property-group> element.
3.4.3.1.2. Displaying value stored in model
To display the value stored in Model (form object or domain object) in HTML, use EL expressions or JSP tag libraries provided by JSTL.
Display using EL expressions.
- SampleController.java
@RequestMapping("hello") public String hello(Model model) { model.addAttribute(new HelloBean("Bean Hello World!")); // (1) return "sample/hello"; // returns view name }
- hello.jsp
Message : ${f:h(helloBean.message)} <%-- (2) --%>
Sr. No. Description HelloBeanobject toModelobject.Modelobject can be retrieved by describing${Attribute name.Property name of JavaBean}.In this example, HTML escaping is performed using${f:h(Attribute name.Property name of JavaBean)}function of EL expression.Note
Since HTML escaping function (
f:h) is provided in the common components, always use it if EL expressions are used to output values in HTML. For details of function of EL expression that perform HTML escaping, refer to Cross Site Scripting.
Display using <c:out> tag provided by JSP tag library of JSTL.
Message : <c:out value="${helloBean.message}" /> <%-- (1) --%>
Sr. No. Description valueattribute of<c:out>tag. HTML escaping is also performed.Note
Refer to
CHAPTER 4 General-Purpose Actionsof JavaServer Pages Standard Tag Library(Version 1.2)for the details of<c:out>.
3.4.3.1.3. Displaying numbers stored in model
Use JSP tag library provided by JSTL to output format number.
<fmt:formatNumber> tag provided by JSP tag library of JSTL.Number Item : <fmt:formatNumber value="${helloBean.numberItem}" pattern="0.00" /> <%-- (1) --%>
Sr. No. Description <fmt:formatNumber>tag. Specify the format to be displayed in pattern attribute. For example, “0.00” is specified .When the value acquired in${helloBean.numberItem}is “1.2” temporarily, “1.20” is displayed on the screen.
Note
Refer to CHAPTER 9 Formatting Actions of JavaServer Pages Standard Tag Library(Version 1.2)for the details of <fmt:formatNumber>.
3.4.3.1.4. Displaying date and time stored in model
Use JSP tag library provided by JSTL to output format date and time value.
Display using <fmt:formatDate> tag provided by JSP tag library of JSTL.
Date Item : <fmt:formatDate value="${helloBean.dateItem}" pattern="yyyy-MM-dd" /> <%-- (1) --%>
Sr. No. Description valueattribute of<fmt:formatDate>tag. Specify the format to be displayed inpatternattribute. In this example, “yyyy-MM-dd” is specified.When value received for${helloBean.dateItem}is 2013-3-2, “2013-03-02” is displayed on the screen.
Note
Refer to CHAPTER 9 Formatting Actions of JavaServer Pages Standard Tag Library(Version 1.2) for details of <fmt:formatDate>.
Note
JSP tag library provided by Joda Time should be used to use org.joda.time.DateTime as date and time object type.
Refer to Date Operations (Joda Time) for the details of Joda Time.
3.4.3.1.5. Generate request URL
When a request URL (a URL for calling Controller method) is to be set for action attribute of <form> element(<form:form> element of JSP tag library) of HTML and href attribute of <a> element,
a URL is generated using either of the methods described below.
- Build a request URL as a character string
- Build a request URL using EL function which has been added from Spring Framework 4.1
Note
Although either of these methods can be used, using both the methods together in a single application should be avoided since it may result in decrease in maintainability.
package com.example.app.hello; import org.springframework.stereotype.Controller; import org.springframework.web.bind.annotation.RequestMapping; @RequestMapping("hello") @Controller public class HelloController { // (1) @RequestMapping({"", "/"}) public String hello() { return "hello/home"; } }
Sr. No. Description Request URL assigned to the method is “ {Context path}/hello".
Building a request URL as a character string
First, the method to build a request URL using a character string is explained.
<form action="${pageContext.request.contextPath}/hello"> <!-- (2) --> <!-- ... --> </form>
Sr. No. Description Fetch context path assigned to Web application from pageContext(implicit object of JSP)(${pageContext.request.contextPath}), add servlet path (/helloin the example above) assigned to the Controller method that has been called, after the context path.Tip
<c:url>offered by JSTL<spring:url>offered by Spring Frameworkare available as JSP tag libraries which build URL. A request URL can also be built using these JSP tag libraries.
When it is necessary to build a request URL dynamically, a URL is preferably built by using these JSP tag libraries.
Building a request URL by using EL function added from Spring Framework 4.1
Next, a method to build a request URL using EL function (spring:mvcUrl) added from Spring Framework 4.1 is described.
If spring:mvcUrl function is used, a request URL can be built by linking with meta information of Controller method (method signature and annotation etc).
<form action="${spring:mvcUrl('HC#hello').build()}"> <!-- (3) --> <!-- ... --> </form>
Sr. No. Description Specify a request mapping name assigned to the Controller method which has been called, in the
spring:mvcUrlfunction argument.An object of class (
MvcUriComponentsBuilder.MethodArgumentBuilder) which builds a request URL is returned fromspring:mvcUrlfunction.MvcUriComponentsBuilder.MethodArgumentBuilderclass offers following methods
argmethodbuildmethodbuildAndExpandmethodwhich play roles described below respectively.
argmethod specifies the value to be passed to argument of Controller method.buildmethod generates a request URL.buildAndExpandmethod generates a request URL after specifying a value embedded in dynamic part (path variable etc) which has not been declared as an argument of Controller method.In the example above, since a request URL is static, a request URL is generated only by calling
buildmethod. When the request URL is dynamic (a URL wherein a path variable and a query string exists),argmethod andbuildAndExpandmethod must be called.Refer to “Spring Framework Reference Documentation(Building URIs to Controllers and methods from views)” for the basic usage of
argmethod andbuildAndExpandmethod.Note
Regarding request mapping name
In the default implementation (
org.springframework.web.servlet.mvc.method.RequestMappingInfoHandlerMethodMappingNamingStrategyimplementation), the request mapping name is represented as “Class name in upper case (short name of class) +"#"+ method name”.Request mapping name must not be duplicated. When the name is duplicated, a unique name must be specified in
nameattribute of@RequestMappingannotation.When a request mapping name assigned to Controller method is to be verified, settings given below should be added to
logback.xml.<logger name="org.springframework.web.servlet.mvc.method.annotation.RequestMappingHandlerMapping"> <level value="trace" /> </logger>If the program is rebooted after applying the settings given above, the log shown below is output.
date:2014-12-09 18:34:29 thread:RMI TCP Connection(2)-127.0.0.1 X-Track: level:TRACE logger:o.s.w.s.m.m.a.RequestMappingHandlerMapping message:Mapping name=HC#hello
3.4.3.1.6. Binding form object to HTML form
Use JSP tag library provided by Spring Framework to bind form object to HTML form and to display the values stored in form object.
Bind using <form:form> tag provided by Spring Framework.
<form:form action="${pageContext.request.contextPath}/sample/hello" modelAttribute="sampleForm"> <%-- (1) --%> Id : <form:input path="id" /> <%-- (2) --%> </form:form>
Sr. No. Description Specify attribute name of form object stored in ModelinmodelAttributeattribute of<form:form>tag.Specify name of property to bind in the pathattribute of<form:xxx>tag.xxxpart changes along with each input element.
Note
For the details of <form:form> , <form:xxx> tag refer to Using Spring’s form tag library.
3.4.3.1.7. Displaying input validation errors
To display the contents of input validation error, use JSP tag library provided by Spring Framework.
<form:errors> tag provided by Spring Framework.<form:form action="${pageContext.request.contextPath}/sample/hello" modelAttribute="sampleForm"> Id : <form:input path="id" /><form:errors path="id" /><%-- (1) --%> </form:form>
Sr. No. Description pathattribute of<form:errors>tag.
3.4.3.1.8. Displaying message of processing result
To display the message notifying the output of processing the request, use JSP tag library provided in common components.
<t:messagesPanel> tag provided in common components.<div class="messages"> <h2>Message pattern</h2> <t:messagesPanel /> <%-- (1) --%> </div>
Sr. No. Description resultMessages” are output.
3.4.3.1.9. Displaying codelist
To display the codelist (provided in common components), use JSP tag library provided by Spring Framework.
java.util.Map interface.Display codelist in select box.
<form:select path="orderStatus"> <form:option value="" label="--Select--" /> <form:options items="${CL_ORDERSTATUS}" /> <%-- (1) --%> </form:select>
Sr. No. Description Codelist ( java.util.Mapinterface) is stored with name ("CL_ORDERSTATUS") as attribute name. Therefore, in JSP, codelist (java.util.Mapinterface) can be accessed using EL expression. Codelist can be displayed in select box by passing the object ofMapinterface toitemsattribute of<form:options>.
Label part is displayed on the screen for the value selected in select box.
Order Status : ${f:h(CL_ORDERSTATUS[orderForm.orderStatus])}
Sr. No. Description In the same way as in case of creating select box, Codelist ( java.util.Mapinterface) is stored with name ("CL_ORDERSTATUS") as attribute name. If value selected in select box is specified as key of the fetchedMapinterface, it is possible to display the code name.
3.4.3.1.10. Displaying fixed text content
<spring:message> tag provided by Spring Framework.- properties
# (1) label.orderStatus=Order status
- jsp
<spring:message code="label.orderStatus" text="Order Status" /> : <%-- (2) --%> ${f:h(CL_ORDERSTATUS[orderForm.orderStatus])}
Sr. No. Description Define the string of label in properties file. If key in the properties file is specified in codeattribute of<spring:message>, string corresponding to the key is displayed.
Note
The value specified in text attribute is displayed when property value could not be acquired.
3.4.3.1.11. Switching display according to conditions
When display is to be switched according to some value in model, use JSP tag library provided by JSTL.
Switch display using <c:if> tag or <c:choose> provided by JSP tag library of JSTL.
Switching display by using <c:if>.
<c:if test="${orderForm.orderStatus != 'complete'}"> <%-- (1) --%> <%-- ... --%> </c:if>
Sr. No. Description Put the condition for entering the branch in testattribute of<c:if>. In this example, when order status is not'complete', the contents of the branch will be displayed.
Switching display using <c:choose>.
<c:choose> <c:when test="${customer.type == 'premium'}"> <%-- (1) --%> <%-- ... --%> </c:when> <c:when test="${customer.type == 'general'}"> <%-- ... --%> </c:when> <c:otherwise> <%-- (2) --%> <%-- ... --%> </c:otherwise> </c:choose>
Sr. No. Description Put the condition for entering the branch in testattribute of<c:when>. In this example, when customer type is'premium', the contents of the branch will be displayed. When condition specified intestattribute isfalse, next<c:when>tag is processed.When result of testattribute of all<c:when>tags isfalse,<c:otherwise>tag is evaluated.
Note
Refer to CHAPTER 5 Conditional Actions of JavaServer Pages Standard Tag Library(Version 1.2)for details.
3.4.3.1.12. Repeated display of collection elements
To repeat display of collection stored in model, use JSP tag library provided by JSTL.
Repeated display can be done using <c:forEach> provided by JSP tag library of JSTL.
<table> <tr> <th>No</th> <th>Name</th> </tr> <c:forEach var="customer" items="${customers}" varStatus="status"> <%-- (1) --%> <tr> <td>${status.count}</td> <%-- (2) --%> <td>${f:h(customer.name)}</td> <%-- (3) --%> </tr> </c:forEach> </table>
Sr. No. Description By specifying the collection object in itemsattribute of<c:forEach>tag,<c:forEach>tag is repeatedly executed to iterate over the collection. While iterating over the collection, if the current element is to be referred inside<c:forEach>tag, it can be done by specifying a variable name for the current element invarattribute.By specifying a variable name in varStatusattribute, current position (count) of iteration in<c:forEach>tag can be fetched. Refer to JavaDocofjavax.servlet.jsp.jstl.core.LoopTagStatusfor attributes other than count.This is the value acquired from the object stored in variable specified by varattribute of<c:forEach>tag.
Note
Refer to CHAPTER 6 Iterator Actions of JavaServer Pages Standard Tag Library(Version 1.2)for details.
3.4.3.1.13. Displaying link for pagination
To display links of pagination on the screen while displaying the list, use JSP tag library provided in common components.
Display the link for pagination using <t:pagination> provided in common components.
Refer to Pagination for details.
3.4.3.1.14. Switching display according to authority
To switch display according to authority of the user who has logged in, use JSP tag library provided by Spring Security.
Switch display using <sec:authorize> provided by Spring Security.
Refer to Authorization for details.
3.4.3.2. Implementing JavaScript
When it is necessary to control screen items (controls of hide/display, activate/deactivate, etc.) after screen rendering, control items using JavaScript.
Todo
TBD
Details will be included in the coming versions.
3.4.3.3. Implementing style sheet
id attribute to identify the items uniquely and class attribute which indicates classification of elements.Note
When form is created using <form:xxx>, id attribute will be set automatically. Application developer should specify class attribute.
3.4.4. Implementing common logic
3.4.4.1. Implementing common logic to be executed before and after calling controller
Here, common logic indicates processes which are required to be executed before and after execution the controller.
3.4.4.1.1. Implementing Servlet Filter
MDC in order to output the log of IP address of client.- java
public class ClientInfoPutFilter extends OncePerRequestFilter { // (1) private static final String ATTRIBUTE_NAME = "X-Forwarded-For"; protected final void doFilterInternal(HttpServletRequest request, HttpServletResponse response, FilterChain filterChain) throws ServletException, IOException { String remoteIp = request.getHeader(ATTRIBUTE_NAME); if (remoteIp == null) { remoteIp = request.getRemoteAddr(); } MDC.put(ATTRIBUTE_NAME, remoteIp); try { filterChain.doFilter(request, response); } finally { MDC.remove(ATTRIBUTE_NAME); } } }
- web.xml
<filter> <!-- (2) --> <filter-name>clientInfoPutFilter</filter-name> <filter-class>x.y.z.ClientInfoPutFilter</filter-class> </filter> <filter-mapping> <!-- (3) --> <filter-name>clientInfoPutFilter</filter-name> <url-pattern>/*</url-pattern> </filter-mapping>
Sr. No. Description In sample, it is guaranteed that it is executed only once for similar requests by creating the Servlet Filter as subclass of org.springframework.web.filter.OncePerRequestFilterprovided by Spring Framework.Register the created Servlet Filter in web.xml.Specify URL pattern to apply the registered Servlet Filter.
Servlet Filter can also be defined as Bean of Spring Framework.
- web.xml
<filter> <filter-name>clientInfoPutFilter</filter-name> <filter-class>org.springframework.web.filter.DelegatingFilterProxy</filter-class> <!-- (1) --> </filter> <filter-mapping> <filter-name>clientInfoPutFilter</filter-name> <url-pattern>/*</url-pattern> </filter-mapping>
- applicationContext.xml
<bean id="clientInfoPutFilter" class="x.y.z.ClientInfoPutFilter" /> <!-- (2) -->
Sr. No. Description In sample, process is delegated to Servlet Filter defined in step (2) by specifying org.springframework.web.filter.DelegatingFilterProxyprovided by Spring Framework in Servlet Filter class.Add the Servlet Filter class to Bean definition file ( applicationContext.xml). At this time,idattribute of bean definition should be assigned with the filter name (value specified in<filter-name>tag) specified inweb.xml.
3.4.4.1.2. Implementing HandlerInterceptor
HandlerInterceptor can execute the process keeping in mind the following 3 points.
- Before executing handler method of controllerImplemented as
HandlerInterceptor#preHandlemethod. - After successfully executing handler method of controllerImplemented as
HandlerInterceptor#postHandlemethod. - After completion of handler method of controller (executed irrespective of Normal / Abnormal)Implemented as
HandlerInterceptor#afterCompletionmethod.
public class SuccessLoggingInterceptor extends HandlerInterceptorAdapter { // (1) private static final Logger logger = LoggerFactory .getLogger(SuccessLoggingInterceptor.class); @Override public void postHandle(HttpServletRequest request, HttpServletResponse response, Object handler, ModelAndView modelAndView) throws Exception { HandlerMethod handlerMethod = (HandlerMethod) handler; Method m = handlerMethod.getMethod(); logger.info("[SUCCESS CONTROLLER] {}.{}", new Object[] { m.getDeclaringClass().getSimpleName(), m.getName()}); } }
- spring-mvc.xml
<mvc:interceptors> <!-- ... --> <mvc:interceptor> <mvc:mapping path="/**" /> <!-- (2) --> <mvc:exclude-mapping path="/resources/**" /> <!-- (3) --> <mvc:exclude-mapping path="/**/*.html" /> <bean class="x.y.z.SuccessLoggingInterceptor" /> <!-- (4) --> </mvc:interceptor> <!-- ... --> </mvc:interceptors>
Sr. No. Description In sample, HandlerInterceptor is created as the subclass of org.springframework.web.servlet.handler.HandlerInterceptorAdapterprovided by Spring Framework. SinceHandlerInterceptorAdapterprovides blank implementation ofHandlerInterceptorinterface, it is not required to implement unnecessary methods in the subclass.Specify the pattern of path, where the created HandlerInterceptor is to be applied. Specify the pattern of path, where the created HandlerInterceptor need not be applied. Add the created HandlerInterceptor to <mvc:interceptors>tag ofspring-mvc.xml.
3.4.4.2. Implementing common processes of controller
Here, common process indicates the process that should be commonly implemented in all the controllers.
3.4.4.2.1. Implementing HandlerMethodArgumentResolver
When an object that is not supported by default in Spring Framework is to be passed as controller argument, HandlerMethodArgumentResolver is to be implemented in order to enable controller to be able to receive the argument.
- JavaBean
public class CommonParameters implements Serializable { // (1) private String param1; private String param2; private String param3; // .... }
- HandlerMethodArgumentResolver
public class CommonParametersMethodArgumentResolver implements HandlerMethodArgumentResolver { // (2) @Override public boolean supportsParameter(MethodParameter parameter) { return CommonParameters.class.equals(parameter.getParameterType()); // (3) } @Override public Object resolveArgument(MethodParameter parameter, ModelAndViewContainer mavContainer, NativeWebRequest webRequest, WebDataBinderFactory binderFactory) throws Exception { CommonParameters params = new CommonParameters(); // (4) params.setParam1(webRequest.getParameter("param1")); params.setParam2(webRequest.getParameter("param2")); params.setParam3(webRequest.getParameter("param3")); return params; }
- Controller
@RequestMapping(value = "home") public String home(CommonParameters commonParams) { // (5) logger.debug("param1 : {}",commonParams.getParam1()); logger.debug("param2 : {}",commonParams.getParam2()); logger.debug("param3 : {}",commonParams.getParam3()); // ... return "sample/home"; }
- spring-mvc.xml
<mvc:annotation-driven> <mvc:argument-resolvers> <!-- ... --> <bean class="x.y.z.CommonParametersMethodArgumentResolver" /> <!-- (6) --> <!-- ... --> </mvc:argument-resolvers> </mvc:annotation-driven>
Sr. No. Description JavaBean that retains common parameters. Implement org.springframework.web.method.support.HandlerMethodArgumentResolverinterface.Determine parameter type. For example, when type of JavaBean that retains common parameters is specified as argument of controller, resolveArgument method of this class is called. Fetch the values of request parameters, set the parameters and return the JavaBean that retains the value of common parameters. Add the created HandlerMethodArgumentResolver to <mvc:argument-resolvers>tag ofspring-mvc.xml.
Note
When parameters are to be passed commonly to handler methods of all controllers, it is effective to convert the parameters to JavaBean using HandlerMethodArgumentResolver. Parameters referred here are not restricted to request parameters.
3.4.4.2.2. Implementing “@ControllerAdvice”
In a class with @ControllerAdvice annotation,
implement common processes which are to be executed in multiple Controllers.
When a class with @ControllerAdvice annotation is created, processes implemented using
- method with
@InitBinder - method with
@ExceptionHandler - method with
@ModelAttribute
can be applied to multiple Controllers.
Tip
@ControllerAdvice annotation is a mechanism added from Spring Framework 3.2;
however, since the processing was applied to all Controllers, it could only implement common processes of entire application.
From Spring Framework 4.0, it has been improved in such a way that controller can be specified flexibly for applying common processes. With this improvement, it is possible to implement a common process in various granularities.
Methods to specify Controller (methods to specify attributes) for applying common processes are described below.
| Sr. No. | Attribute | Description and example of specification |
|---|---|---|
(1)
|
annotations |
Specify annotation. Common processes are applied for the Controllers with specified annotations. An example of specifications is given below. @ControllerAdvice(annotations = LoginFormModelAttributeSetter.LoginFormModelAttribute.class)
public class LoginFormModelAttributeSetter {
@Target(ElementType.TYPE)
@Retention(RetentionPolicy.RUNTIME)
public static @interface LoginFormModelAttribute {}
// ...
}
@LoginFormModelAttribute
@Controller
public class WelcomeController {
// ...
}
@LoginFormModelAttribute
@Controller
public class LoginController {
// ...
}
In the above example, |
(2)
|
assignableTypes |
Specify a class or an instance. Common processes are applied for the Controllers which can be assigned (can be casted) to the specified class or interface. When using this attribute, it is recommended to adopt a style that specifies a marker interface to indicate that it is a Controller using common process, in attribute value. When this style is adopted, only the marker interface for common processes to be used needs to be implemented at Controller side. An example of specifications is given below. @ControllerAdvice(assignableTypes = ISODateInitBinder.ISODateApplicable.class)
public class ISODateInitBinder {
public static interface ISODateApplicable {}
// ...
}
@Controller
public class SampleController implements ISODateApplicable {
// ...
}
In the above example, |
(3)
|
basePackageClasses |
Specify a class or an interface. Common processes are applied for the Controllers under the package of specified class or interface. When using this attribute, it is recommended to adopt a style that specifies,
in attribute value. An example to specify the same is given below. package com.example.app
@ControllerAdvice(basePackageClasses = AppGlobalExceptionHandler.class)
public class AppGlobalExceptionHandler {
// ...
}
package com.example.app.sample
@Controller
public class SampleController {
    // ...
}
In the above example, package com.example.app.common
@ControllerAdvice(basePackageClasses = AppPackage.class)
public class AppGlobalExceptionHandler {
// ...
}
package com.example.app

public interface AppPackage {
}
When package level of class with |
(4)
|
basePackages |
Specify the package name. Common processes are applied for the Controllers under the specified package. An example of specifying the same is given below. @ControllerAdvice(basePackages = "com.example.app")
public class AppGlobalExceptionHandler {
// ...
}
|
(5)
|
value |
Alias to The operation is same as when @ControllerAdvice("com.example.app")
public class AppGlobalExceptionHandler {
// ...
}
|
Tip
basePackageClasses attribute / basePackages attribute / value attribute are the attributes
to specify base package that stores the Controller for applying common processes. However,
when basePackageClasses attribute is used,
- It is possible to prevent specifying the package that does not exist.
- It is possible to get linked and change the package name on IDE.
Therefore, it is known as Type-safe specification method.
@InitBinder method is given below."yyyy/MM/dd" .@ControllerAdvice // (1) @Order(0) // (2) public class SampleControllerAdvice { // (3) @InitBinder public void initBinder(WebDataBinder binder) { SimpleDateFormat dateFormat = new SimpleDateFormat("yyyy/MM/dd"); dateFormat.setLenient(false); binder.registerCustomEditor(Date.class, new CustomDateEditor(dateFormat, true)); } }
Sr. No. Description It indicates that it is Bean of ControllerAdvice by assigning the @ControllerAdviceannotation.Specify priority for common processes by assigning the @Orderannotation. It should be specified when multiple ControllerAdvice have ordering for example there are dependencies between them. Otherwise it is not necessary.Implement @InitBindermethod.@InitBindermethod is applied to all Controllers.
@ExceptionHandler method is given below.org.springframework.dao.PessimisticLockingFailureException.// (1) @ExceptionHandler(PessimisticLockingFailureException.class) public String handlePessimisticLockingFailureException( PessimisticLockingFailureException e) { return "error/lockError"; }
Sr. No. Description Implement @ExceptionHandlermethod.@ExceptionHandlermethod is applied to all Controllers.
@ModelAttribute method is given below.Model.- ControllerAdvice
// (1)
@ModelAttribute
public CommonParameters setUpCommonParameters(
        @RequestParam(value = "param1", defaultValue="def1") String param1,
        @RequestParam(value = "param2", defaultValue="def2") String param2,
        @RequestParam(value = "param3", defaultValue="def3") String param3) {
    CommonParameters params = new CommonParameters();
    params.setParam1(param1);
    params.setParam2(param2);
    params.setParam3(param3);
    return params;
}
- Controller
@RequestMapping(value = "home")
public String home(@ModelAttribute CommonParameters commonParams) { // (2)
    logger.debug("param1 : {}",commonParams.getParam1());
    logger.debug("param2 : {}",commonParams.getParam2());
    logger.debug("param3 : {}",commonParams.getParam3());
    // ...
    return "sample/home";
}
Sr. No. Description Implement @ModelAttributemethod.@ModelAttributemethod is applied to all Controllers.Object created by @ModelAttributemethod is passed.
3.4.5. Prevention of double submission
Measures should be taken to prevent double submission as the same process gets executed multiple times by clicking Send button multiple times or refreshing (refresh using F5 button) the Finish screen.
For the problems occurring when countermeasures are not taken and details of implementation method, refer to Double Submit Protection .
3.4.6. Usage of session
@SessionAttributes annotation to the controller class.@SessionAttributes annotation should be studied since model (form object, domain object etc.)@SessionAttributes annotation should be determined after confirming the warning signs of using the session.For details of session usage policy and implementation at the time of session usage, refer to Session Management .