5.17. File Upload
Table of contents
5.17.1. Overview
Note
In this chapter, File Upload functionality supported by Servlet 3.0 is used; hence, Servlet version 3.0 or above is a prerequisite here.
Note
File Upload functionality of Servlet 3.0 may likely result into garbling of multi byte characters of file names or request parameters on some application server.
When the Application Server wherein problems are likely to occur is to be used, using Commons FileUpload can help in avoiding such problems. For settings to use Commons FileUpload, refer to “File upload using Commons FileUpload”.
Application server for which a occurrence of problem is confirmed at the time of version 5.0.1.RELEASE is as given below.
- WebLogic 12.1.3
- JBoss EAP 6.4.0.GA
Warning
If implementation of file upload of an application server to be used depends on implementation of Apache Commons FileUpload, security vulnerabilities reported in CVE-2014-0050 may occur. Hence ensure that there are no such vulnerabilities in the application server to be used.
In case of using Tomcat, it is necessary to use version 7.0.52 or above for series 7.0, and version 8.0.3 or above for series 8.0. A file upload function of Servlet 3.0 should be used since problems do not occur while using Tomcat 7/8 as an Application Server.
5.17.1.1. Basic flow of upload process
Basic flow of uploading files using File Upload functionality supported by Servlet 3.0, and classes of Spring Web, is as shown below.
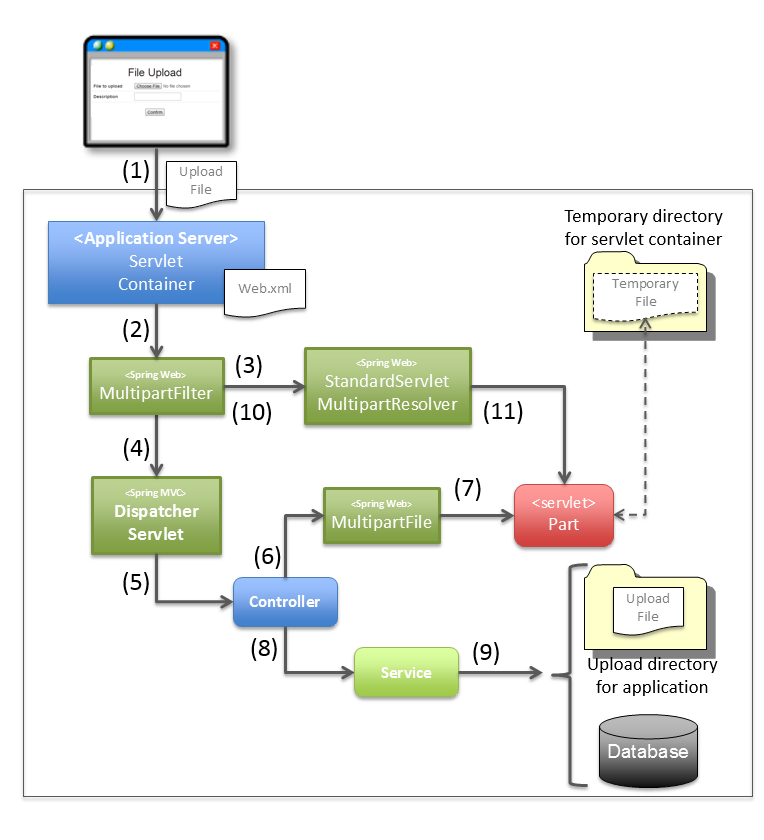
Sr. No. Description multipart/form-datarequest and callsorg.springframework.web.multipart.support.MultipartFilter.MultipartFiltercalls the method oforg.springframework.web.multipart.support.StandardServletMultipartResolverto enable File Upload functionality of Servlet 3.0 in Spring MVC.StandardServletMultipartResolvergeneratesorg.springframework.web.multipart.MultipartFileobject that wraps the API (javax.servlet.http.Part) introduced through Servlet 3.0.DispatcherServletfromMultipartFilter.DispatcherServletcalls handler method of Controller.MultipartFileobject generated in (3) is bound to Controller argument or form object.MultipartFileobject and fetch contents of uploaded file and meta information (file name etc.).MultipartFilecalls a method ofPartobject introduced from Servlet 3.0, fetches contents of uploaded file and meta information (file name etc.) and returns to Controller.MultipartFileobject as an argument of Service method.MultipartFiltercallsStandardServletMultipartResolverand deletes temporary file used by file upload function of Servlet 3.0.StandardServletMultipartResolvercalls a method ofPartobject introducted from Servlet 3.0 and deletes the temporary file stored in the disc.Note
Controller performs the process for
MultipartFileobject of Spring Web; hence implementation which is dependent on the File Upload API provided by Servlet 3.0 can be excluded.
5.17.1.2. About classes provided by Spring Web
Classes provided by Spring Web for uploading a file are as follows:
MultipartFileclass of File Upload functionality introduced through Servlet 3.0.Process is delegated to thePartobject introduced through Servlet 3.0.
multipart/form-datarequest.It plays a role in generatingMultipartFileobject corresponding to implementation of File Upload functionality.
MultipartResolverclass for File Upload functionality introduced through Servlet 3.0.
Tip
In this guideline, it is a prerequisite to use File Upload functionality implemented from Servlet 3.0. However, Spring Web also provides an implementation class for “Apache Commons FileUpload”. The difference in implementation of upload processes is absorbed by
MultipartResolverandMultipartFileobjects; hence it does not affect Controller implementation.
5.17.2. How to use
5.17.2.1. Application settings
5.17.2.1.1. Settings to enable Servlet 3.0 upload functionality
Perform the following settings to enable upload functionality of Servlet 3.0.
web.xml
 <web-app xmlns="http://java.sun.com/xml/ns/javaee"
     xmlns:xsi="http://www.w3.org/2001/XMLSchema-instance"
     xsi:schemaLocation="http://java.sun.com/xml/ns/javaee http://java.sun.com/xml/ns/javaee/web-app_3_0.xsd"
     version="3.0"> <!-- (1) (2) -->

     <servlet>
         <servlet-class>
             org.springframework.web.servlet.DispatcherServlet
         </servlet-class>
         <!-- omitted -->
         <multipart-config> <!-- (3) -->
             <max-file-size>5242880</max-file-size> <!-- (4) -->
             <max-request-size>27262976</max-request-size> <!-- (5) -->
              <file-size-threshold>0</file-size-threshold> <!-- (6) -->
         </multipart-config>
     </servlet>

     <!-- omitted -->

 </web-app>
Sr. No. Description xsi:schemaLocationattribute of<web-app>element.3.0or above in theversionattribute of<web-app>element.<multipart-config>element to<servlet>element of the Servlet using the File Upload functionality.org.springframework.web.multipart.MultipartExceptionoccurs.In the above example, a file size of 5MB is specified.multipart/form-datarequest.If not specified, -1 (no limit) is set by default.If it exceeds the specified value, exceptionorg.springframework.web.multipart.MultipartExceptionoccurs.Value to be set in this parameter should be calculated by the following formula.(“maximum file size of 1 file to be uploaded” * “Number of files allowed to be uploaded simultaneously” ) + “Data size of other form fields” + “Meta information size of multipart/form-data request”In the above example, parameter value of 26MB is specified.Its breakup is, 25MB (5MB * 5 files) and 1MB (number of bytes of meta information + number of bytes of form fields).<max-file-size>and<max-request-size>are considered invalid; hence default value (0) is being specified explicitly.Warning
In order to increase the resistance against Dos attack,
max-file-sizeandmax-request-sizeshould be specified without fail.For Dos attack, refer to Dos attack with respect to upload functionality.
Note
Uploaded file is by default output as temporary file. However, its output can be controlled using the configuration value of
<file-size-threshold>element, which is the child element of<multipart-config>.<!-- omitted --> <multipart-config> <!-- omitted --> <file-size-threshold>32768</file-size-threshold> <!-- (7) --> </multipart-config> <!-- omitted -->
Sr. No. Description Warning
This parameter shows a trade-off relationship as indicated by the following points. Hence, configuration value corresponding to system characteristics should be specified..
- Increasing the configuration value improves processing performance as, processing gets completed within available memory. However, there is a high possibility that
OutOfMemoryErrormay occur due to Dos attack.- If configuration value is reduced, memory utilization can be controlled to the minimum, thereby avoiding the possibility of
OutOfMemoryErrordue to Dos attack etc. However, there is a high possibility of performance degradation since the frequency of disk IO generation is high.To change output directory of temporary files, specify directory path in
<location>element, which is the child element of<multipart-config>.<!-- omitted --> <multipart-config> <location>/tmp</location> <!-- (8) --> <!-- omitted --> </multipart-config> <!-- omitted -->
Sr. No. Description /tmpis specified.Warning
The directory specified in
<location>element is the one used by the application server (servlet container) and cannot be accessed from application.When the files uploaded as application are to be saved as temporary files, they should be output to a directory other than the directory specified in
<location>element.
5.17.2.1.2. Servlet Filter settings
The operation when the maximum size allowed in file upload exceeds the limit at the time of multipart/form-data request, varies depending on the application server. MultipartException generated when maximum size exceeds the limit depending on the application server is likely to be not detected and exception handling settings described later will be invalid.
MiltipartFilter, MiltipartFilter setting is described as a prerequisite in this guideline.web.xml
<!-- (1) -->
<filter>
    <filter-name>MultipartFilter</filter-name>
    <filter-class>org.springframework.web.multipart.support.MultipartFilter</filter-class>
</filter>
<!-- (2) -->
<filter-mapping>
    <filter-name>MultipartFilter</filter-name>
    <url-pattern>/*</url-pattern>
</filter-mapping>
Sr. No. Description MultipartFilteras the Servlet Filter.MultipartFilter.Warning
Precautions while using Spring Security
When security countermeasures are to be carried out by using Spring Security, they should be defined prior to
springSecurityFilterChain. Further, when request parameters are accessed by a project-specific Servlet Filter, MultipartFilter should be defined before that Servlet Filter.However, when defined before
springSecurityFilterChain, unauthenticated or unauthorized users may be allowed to upload the file (create temporary file). Although a method to avoid this operation has been given in Spring Security Reference -Cross Site Request Forgery (CSRF)-, it is not recommended to be applied in this guideline since it poses a security risk.Warning
Precautions when maximum size limit for file upload is exceeded
When allowable size limit for file upload has been exceeded, an ‘Over the size limit” error may get detected before fetching a CSRF token in some of the application servers like WebLogic and CSRF token check is not performed.
Note
Default calling of MultipartResolver
If
MultipartFilteris used,org.springframework.web.multipart.support.StandardServletMultipartResolveris called by default.StandardServletMultipartResolvershould be able to generates uploaded file asorg.springframework.web.multipart.MultipartFileand receive as property of Controller argument and form object.
5.17.2.1.3. Settings for exception handling
Add the exception handling definition of MultipartException which occurs when a request for file or multipart with non-permissible size is sent.
MultipartException is an exception caused due to file size specified by the client; hence it is recommended to handle it as a client error (HTTP response code=4xx).MultipartException differ depending upon whether MultipartFilter is used or not.MultipartFilter, exception handling is carried out by using the <error-page> functionality of servlet container.web.xml
<error-page>
    <!-- (1) -->
    <exception-type>org.springframework.web.multipart.MultipartException</exception-type>
    <!-- (2) -->
    <location>/WEB-INF/views/common/error/fileUploadError.jsp</location>
</error-page>
Sr. No. Description MultipartExceptionas the exception class for handling.MultipartExceptionoccurs.In the above example,"/WEB-INF/views/common/error/fileUploadError.jsp"is specified.
fileUploadError.jsp
<%-- (3) --%>
<% response.setStatus(HttpServletResponse.SC_BAD_REQUEST); %>
<!DOCTYPE html>
<html>

    <!-- omitted -->

</html>
Sr. No. Description HttpServletResponse.In the above request,"400"(Bad Request) is set.When not set explicitly, the HTTP status code is considered as"500"(Internal Server Error).
MultipartFilter, carry out exception handling by using SystemExceptionResolver.spring-mvc.xml
<bean class="org.terasoluna.gfw.web.exception.SystemExceptionResolver">
    <!-- omitted -->
    <property name="exceptionMappings">
        <map>
            <!-- omitted -->
            <!-- (4) -->
            <entry key="MultipartException"
                   value="common/error/fileUploadError" />

        </map>
    </property>
    <property name="statusCodes">
        <map>
            <!-- omitted -->
            <!-- (5) -->
            <entry key="common/error/fileUploadError" value="400" />
        </map>
    </property>
    <!-- omitted -->
</bean>
Sr. No. Description exceptionMappingsofSystemExceptionResolver, add the definition for View (JSP) which is displayed whenMultipartExceptionoccurs.In the above example,"common/error/fileUploadError"is specified.MultipartExceptionoccurs.In the above example,"400"(Bad Request) is specified.By specifying client error (HTTP response code = 4xx),the level of log which is output by the class (HandlerExceptionResolverLoggingInterceptor) provided by the exception handling functionality of common library isWARNand notERROR.
MultipartException.applicationContext.xml
<bean id="exceptionCodeResolver"
    class="org.terasoluna.gfw.common.exception.SimpleMappingExceptionCodeResolver">
    <property name="exceptionMappings">
        <map>
            <!-- (6) -->
            <entry key="MultipartException" value="e.xx.fw.6001" />
            <!-- omitted -->
        </map>
    </property>
    <property name="defaultExceptionCode" value="e.xx.fw.9001" />
    <!-- omitted -->
</bean>
Sr. No. Description exceptionMappingsofSimpleMappingExceptionCodeResolver, add the exception code to be applied whenMultipartExceptionoccurs.In the above example,"e.xx.fw.6001"is specified.When it is not defined individually, exception code specified indefaultExceptionCodeis applied.
5.17.2.2. Uploading a single file
The explanation about uploading a single file is given below.
org.springframework.web.multipart.MultipartFile object to the form object and the other is by receiving it directly as Controller argument. However, this guideline recommends the first method wherein it is received after it is bound with the form object.How to receive a single file by binding it to form object is explained below.
5.17.2.2.1. Implementing form
public class FileUploadForm implements Serializable {

    // omitted

    private MultipartFile file; // (1)

    @NotNull
    @Size(min = 0, max = 100)
    private String description;

    // omitted getter/setter methods.

}
Sr. No. Description org.springframework.web.multipart.MultipartFilein form object.
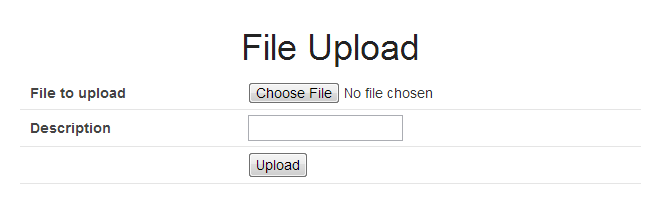
5.17.2.2.2. Implementing JSP
<form:form action="${pageContext.request.contextPath}/article/upload" method="post" modelAttribute="fileUploadForm" enctype="multipart/form-data"> <!-- (1) (2) --> <table> <tr> <th width="35%">File to upload</th> <td width="65%"> <form:input type="file" path="file" /> <!-- (3) --> <form:errors path="file" /> </td> </tr> <tr> <th width="35%">Description</th> <td width="65%"> <form:input path="description" /> <form:errors path="description" /> </td> </tr> <tr> <td> </td> <td><form:button>Upload</form:button></td> </tr> </table> </form:form>
Sr. No. Description "multipart/form-data"in the enctype attribute of<form:form>element.<form:form>element.In the above example,"fileUploadForm"is specified."file"in type attribute of<form:input>element and specifyMultipartFileproperty name in path attribute.In the above example, the uploaded file is stored in"file"property ofFileUploadFormobject.
5.17.2.2.3. Implementing Controller
@RequestMapping("article")
@Controller
public class ArticleController {

    @Value("${upload.allowableFileSize}")
    private int uploadAllowableFileSize;

    // omitted

    // (1)
    @ModelAttribute
    public FileUploadForm setFileUploadForm() {
        return new FileUploadForm();
    }

    // (2)
    @RequestMapping(value = "upload", method = RequestMethod.GET, params = "form")
    public String uploadForm() {
        return "article/uploadForm";
    }

    // (3)
    @RequestMapping(value = "upload", method = RequestMethod.POST)
    public String upload(@Validated FileUploadForm form,
            BindingResult result, RedirectAttributes redirectAttributes) {

        if (result.hasErrors()) {
            return "article/uploadForm";
        }

        MultipartFile uploadFile = form.getFile();

        // (4)
        if (!StringUtils.hasLength(uploadFile.getOriginalFilename())) {
            result.rejectValue(uploadFile.getName(), "e.xx.at.6002");
            return "article/uploadForm";
        }

        // (5)
        if (uploadFile.isEmpty()) {
            result.rejectValue(uploadFile.getName(), "e.xx.at.6003");
            return "article/uploadForm";
        }

        // (6)
        if (uploadAllowableFileSize < uploadFile.getSize()) {
            result.rejectValue(uploadFile.getName(), "e.xx.at.6004",
                    new Object[] { uploadAllowableFileSize }, null);
            return "article/uploadForm";
        }

        // (7)
        // omit processing of upload.

        // (8)
        redirectAttributes.addFlashAttribute(ResultMessages.success().add(
                "i.xx.at.0001"));

        // (9)
        return "redirect:/article/upload?complete";
    }

    @RequestMapping(value = "upload", method = RequestMethod.GET, params = "complete")
    public String uploadComplete() {
        return "article/uploadComplete";
    }

        // omitted

}
Sr. No. Description Model.In the above example, the attribute name for storing form object inModelis"fileUploadForm".MultipartFile#getOriginalFilenamemethod and decide on the basis of whether file name is specified or not.In the above example, input validation error is thrown if the files are not selected.MultipartFile#isEmptymethod to check for presence of contents.In the above example, input validation error is thrown if an empty file is selected.MultipartFile#getSizemethod and check whether the size is within the allowable range.In the above example, input validation error is thrown if the file size exceeds the allowable range.Note
Preventing duplicate upload
When uploading files, it is recommended to perform transaction token check and screen transition based on PRG pattern. With this, upload of same files caused due to double submission can be prevented.
For more details on how to prevent double submission, refer to Double Submit Protection.
Note
About MultipartFile
Methods to operate the uploaded file are provided in MultipartFile. For details on using each method, refer to JavaDoc of MultipartFile class.
5.17.2.3. Bean Validation of file upload
Note
It is recommended to use Bean Validation since this makes maintenance of Controller processes easier.
5.17.2.3.1. Implementing validation to verify that the file is selected
// (1)
@Target({ ElementType.METHOD, ElementType.FIELD, ElementType.ANNOTATION_TYPE })
@Retention(RetentionPolicy.RUNTIME)
@Constraint(validatedBy = UploadFileRequiredValidator.class)
public @interface UploadFileRequired {
            String message() default "{com.examples.upload.UploadFileRequired.message}";
    Class<?>[] groups() default {};
    Class<? extends Payload>[] payload() default {};

    @Target({ ElementType.METHOD, ElementType.FIELD, ElementType.ANNOTATION_TYPE })
    @Retention(RetentionPolicy.RUNTIME)
    @Documented
    @interface List {
        UploadFileRequired[] value();
    }

}
// (2) public class UploadFileRequiredValidator implements ConstraintValidator<UploadFileRequired, MultipartFile> { @Override public void initialize(UploadFileRequired constraint) { } @Override public boolean isValid(MultipartFile multipartFile, ConstraintValidatorContext context) { return multipartFile != null && StringUtils.hasLength(multipartFile.getOriginalFilename()); } }
Sr. No. Description
5.17.2.3.2. Implementing validation to verify that the file is not empty
// (3)
@Target({ ElementType.METHOD, ElementType.FIELD, ElementType.ANNOTATION_TYPE })
@Retention(RetentionPolicy.RUNTIME)
@Constraint(validatedBy = UploadFileNotEmptyValidator.class)
public @interface UploadFileNotEmpty {
    String message() default "{com.examples.upload.UploadFileNotEmpty.message}";
    Class<?>[] groups() default {};
    Class<? extends Payload>[] payload() default {};

    @Target({ ElementType.METHOD, ElementType.FIELD, ElementType.ANNOTATION_TYPE })
    @Retention(RetentionPolicy.RUNTIME)
    @Documented
    @interface List {
        UploadFileNotEmpty[] value();
    }

}
// (4) public class UploadFileNotEmptyValidator implements ConstraintValidator<UploadFileNotEmpty, MultipartFile> { @Override public void initialize(UploadFileNotEmpty constraint) { } @Override public boolean isValid(MultipartFile multipartFile, ConstraintValidatorContext context) { if (multipartFile == null || !StringUtils.hasLength(multipartFile.getOriginalFilename())) { return true; } return !multipartFile.isEmpty(); } }
Sr. No. Description
5.17.2.3.3. Implementing validation to verify that file size is within allowable range
// (5)
@Target({ ElementType.METHOD, ElementType.FIELD, ElementType.ANNOTATION_TYPE })
@Retention(RetentionPolicy.RUNTIME)
@Constraint(validatedBy = UploadFileMaxSizeValidator.class)
public @interface UploadFileMaxSize {
    String message() default "{com.examples.upload.UploadFileMaxSize.message}";
    long value() default (1024 * 1024);
    Class<?>[] groups() default {};
    Class<? extends Payload>[] payload() default {};

    @Target({ ElementType.METHOD, ElementType.FIELD, ElementType.ANNOTATION_TYPE })
    @Retention(RetentionPolicy.RUNTIME)
    @Documented
    @interface List {
        UploadFileMaxSize[] value();
    }

}
// (6) public class UploadFileMaxSizeValidator implements ConstraintValidator<UploadFileMaxSize, MultipartFile> { private UploadFileMaxSize constraint; @Override public void initialize(UploadFileMaxSize constraint) { this.constraint = constraint; } @Override public boolean isValid(MultipartFile multipartFile, ConstraintValidatorContext context) { if (constraint.value() < 0 || multipartFile == null) { return true; } return multipartFile.getSize() <= constraint.value(); } }
Sr. No. Description
5.17.2.3.4. Implementing form
public class FileUploadForm implements Serializable {

    // omitted

    // (7)
    @UploadFileRequired
    @UploadFileNotEmpty
    @UploadFileMaxSize
    private MultipartFile file;

    @NotNull
    @Size(min = 0, max = 100)
    private String description;

    // omitted getter/setter methods.

}
Sr. No. Description MultipartFilefield for validating uploaded file.
5.17.2.3.5. Implementing Controller
@RequestMapping(value = "upload", method = RequestMethod.POST)
public String uploadFile(@Validated FileUploadForm form,
        BindingResult result, RedirectAttributes redirectAttributes) {

    // (8)
    if (result.hasErrors()) {
        return "article/uploadForm";
    }

    MultipartFile uploadFile = form.getFile();

    // omit processing of upload.

    redirectAttributes.addFlashAttribute(ResultMessages.success().add(
            "i.xx.at.0001"));

    return "redirect:/article/upload";
}
Sr. No. Description BindingResult.
5.17.2.4. Uploading multiple files
This section explains about simultaneously uploading multiple files.
In order to upload multiple files simultaneously, it is necessary to receive org.springframework.web.multipart.MultipartFile object by binding it to the form object.
The explanation that has already been covered under single file upload has been omitted to avoid duplication.
5.17.2.4.1. Implementing form
// (1)
public class FileUploadForm implements Serializable {

    // omitted

    @UploadFileRequired
    @UploadFileNotEmpty
    @UploadFileMaxSize
    private MultipartFile file;

    @NotNull
    @Size(min = 0, max = 100)
    private String description;

    // omitted getter/setter methods.

}
public class FilesUploadForm implements Serializable { // omitted @Valid // (2) private List<FileUploadForm> fileUploadForms; // (3) // omitted getter/setter methods. }
Sr. No. Description @Validannotation.Note
When only files are to be uploaded,
MultipartFileobject can also be defined as List property; however, for input validation of uploaded files using Bean Validation, there is better compatibility if the object that maintains information of each file, is defined as List property.
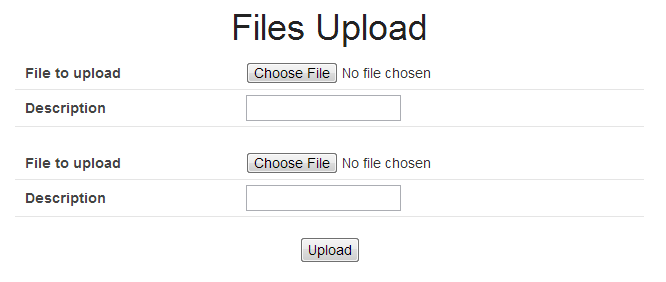
5.17.2.4.2. Implementing JSP
<form:form
  action="${pageContext.request.contextPath}/article/uploadFiles" method="post"
  modelAttribute="filesUploadForm" enctype="multipart/form-data">
  <table>
    <tr>
      <th width="35%">File to upload</th>
      <td width="65%">
        <form:input type="file" path="fileUploadForms[0].file" /> <!-- (1) -->
        <form:errors path="fileUploadForms[0].file" />
      </td>
    </tr>
    <tr>
      <th width="35%">Description</th>
      <td width="65%">
        <form:input path="fileUploadForms[0].description" />
        <form:errors  path="fileUploadForms[0].description" />
      </td>
    </tr>
  </table>
  <table>
    <tr>
      <th width="35%">File to upload</th>
      <td width="65%">
        <form:input type="file" path="fileUploadForms[1].file" /> <!-- (1) -->
        <form:errors path="fileUploadForms[1].file" />
      </td>
    </tr>
    <tr>
      <th width="35%">Description</th>
      <td width="65%">
        <form:input path="fileUploadForms[1].description" />
        <form:errors path="fileUploadForms[1].description" />
      </td>
    </tr>
  </table>
  <div>
    <form:button>Upload</form:button>
  </div>
</form:form>
Sr. No. Description []. Start position begins with0.
5.17.2.4.3. Implementing Controller
@RequestMapping(value = "uploadFiles", method = RequestMethod.POST)
public String uploadFiles(@Validated FilesUploadForm form,
        BindingResult result, RedirectAttributes redirectAttributes) {

    if (result.hasErrors()) {
        return "article/uploadForm";
    }

    // (1)
    for (FileUploadForm fileUploadForm : form.getFileUploadForms()) {

        MultipartFile uploadFile = fileUploadForm.getFile();

        // omit processing of upload.

    }

    redirectAttributes.addFlashAttribute(ResultMessages.success().add(
            "i.xx.at.0001"));

    return "redirect:/article/upload?complete";
}
:header-rows: 1 :widths: 10 90¶ Sr. No. Description MultipartFilefrom the object that maintains information of each file (uploaded file itself and related form fields) and implement upload process.The above example does not cover any specific implementation; however process to store the file on a shared disk or database is performed.
5.17.2.5. Uploading multiple files using the “multiple” attribute of HTML5
The method to simultaneously upload multiple files using “multiple” attribute of input tag supported by HTML5, is explained below.
The explanation that has already been covered under single file upload and multiple file upload has been omitted.
5.17.2.5.1. Implementing form
When uploading multiple files simultaneously using “multiple” attribute of HTML5 input tag, it is necessary to receive collection of org.springframework.web.multipart.MultipartFile object by binding it to form object.
// (1)
public class FilesUploadForm implements Serializable {

    // omitted

    // (2)
    @UploadFileNotEmpty
    private List<MultipartFile> files;

    // omitted getter/setter methods.

}
Sr. No. Description MultipartFileclass as list.In the above example, the annotation to verify that the file is not empty, is specified as input validation.Principally, a file size check or other mandatory checks are also required; however, they have been omitted in the above example.
5.17.2.5.2. Implementing Validator
When carrying out input validation for multiple MultipartFile objects stored in collection, it is necessary to implement Validator for Collection.
The section explains about creating Validator for Collection using the Validator created for single file.
// (1)
public class UploadFileNotEmptyForCollectionValidator implements
    ConstraintValidator<UploadFileNotEmpty, Collection<MultipartFile>> {

    // (2)
    private final UploadFileNotEmptyValidator validator =
        new UploadFileNotEmptyValidator();

    // (3)
    @Override
    public void initialize(UploadFileNotEmpty constraintAnnotation) {
        validator.initialize(constraintAnnotation);
    }

    // (4)
    @Override
    public boolean isValid(Collection<MultipartFile> values,
            ConstraintValidatorContext context) {
        for (MultipartFile file : values) {
            if (!validator.isValid(file, context)) {
                return false;
            }
        }
        return true;
    }

}
Sr. No. Description Collection<MultipartFile>as the type of value to be verified.
Sr. No. Description @Constraintannotation.With this, the class created in step (1) is executed when validating the property with@UploadFileNotEmptyannotation.
5.17.2.5.3. Implementing JSP
<form:form
  action="${pageContext.request.contextPath}/article/uploadFiles" method="post"
  modelAttribute="filesUploadForm2" enctype="multipart/form-data">
  <table>
    <tr>
      <th width="35%">File to upload</th>
      <td width="65%">
        <form:input type="file" path="files" multiple="multiple" /> <!-- (1) -->
        <form:errors path="files" />
      </td>
    </tr>
  </table>
  <div>
    <form:button>Upload</form:button>
  </div>
</form:form>
Sr. No. Description
5.17.2.5.4. Implementing Controller
@RequestMapping(value = "uploadFiles", method = RequestMethod.POST)
public String uploadFiles(@Validated FilesUploadForm form,
        BindingResult result, RedirectAttributes redirectAttributes) {
    if (result.hasErrors()) {
        return "article/uploadForm";
    }

    // (1)
    for (MultipartFile file : form.getFiles()) {

        // omit processing of upload.

    }

    redirectAttributes.addFlashAttribute(ResultMessages.success().add(
            "i.xx.at.0001"));

    return "redirect:/article/upload?complete";
}
Sr. No. Description MultipartFileobjects from form object.The above example does not cover any specific implementation; however process to store the file on a shared disk or database is performed.
5.17.2.6. Temporary upload
Temporary upload is required when a file is to be uploaded midway through screen transitions like upload result confirmation screen etc.
Note
Contents of file stored in
MultipartFileobject may be deleted once the upload request is completed. Therefore, when the file contents are to be handled across requests, these contents and meta information (file name etc.) maintained inMultipartFileobject need to be saved in a file or form.The contents of file stored in
MultipartFileobject are deleted when step (3) of the following processing flow is completed.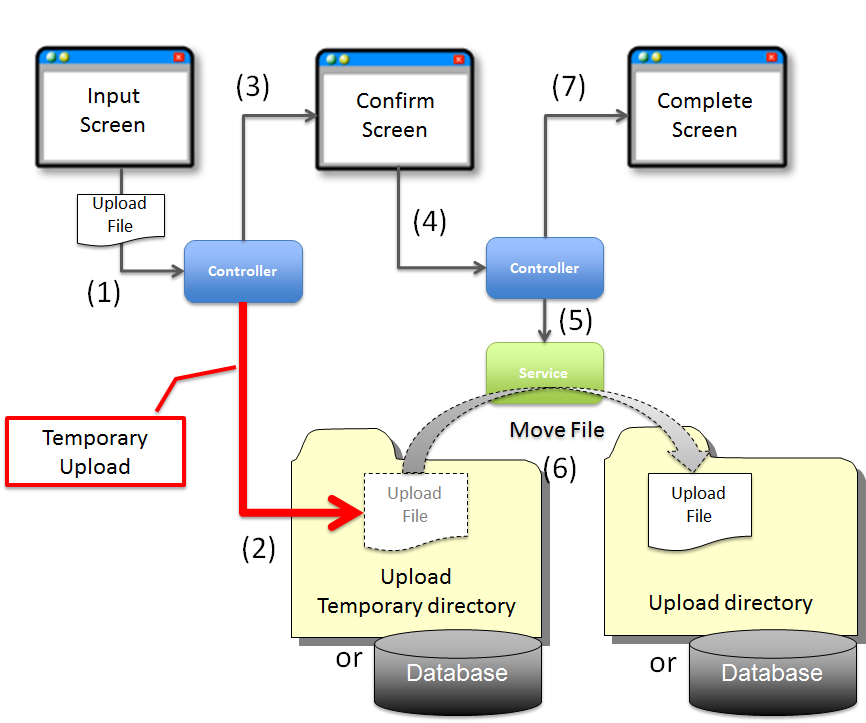
Sr. No. Description Note
Temporary upload process is the responsibility of application layer; hence it is executed by Controller or Helper class.
5.17.2.6.1. Implementing Controller
Example for temporarily saving the uploaded file in a temporary directory, is shown below.
@Component
public class UploadHelper {

    // (2)
    @Value("${app.upload.temporaryDirectory}")
    private File uploadTemporaryDirectory;

    // (1)
    public String saveTemporaryFile(MultipartFile multipartFile)
        throws IOException {

        String uploadTemporaryFileId = UUID.randomUUID().toString();
        File uploadTemporaryFile =
            new File(uploadTemporaryDirectory, uploadTemporaryFileId);

        // (2)
        FileUtils.copyInputStreamToFile(multipartFile.getInputStream(),
                uploadTemporaryFile);

        return uploadTemporaryFileId;
    }

}
Sr. No. Description org.apache.commons.io.FileUtilsclass.// omitted @Inject UploadHelper uploadHelper; @RequestMapping(value = "upload", method = RequestMethod.POST, params = "confirm") public String uploadConfirm(@Validated FileUploadForm form, BindingResult result) throws IOException { if (result.hasErrors()) { return "article/uploadForm"; } // (3) String uploadTemporaryFileId = uploadHelper.saveTemporaryFile(form .getFile()); // (4) form.setUploadTemporaryFileId(uploadTemporaryFileId); form.setFileName(form.getFile().getOriginalFilename()); return "article/uploadConfirm"; } .. tabularcolumns:: |p{0.10\linewidth}|p{0.90\linewidth}| .. list-table:: :header-rows: 1 :widths: 10 90 * - Sr. No. - Description * - | (3) - | Call the Helper method to temporarily save the uploaded file. | In the above example, ID by which the temporarily saved file is identified, is returned as the return value of Helper method. * - | (4) - | Save the meta information of uploaded file (ID by which the file is identified, file name etc.) in form object. | In the above example, name of the uploaded file and ID by which the temporarily saved file is identified, are stored in form object.Note
Directory of temporary directories should be fetched from external properties as it may differ with the environment in which the application is deployed. For details on external properties, refer to Properties Management.
Warning
In the above example, it is a file saved temporarily on the local disk of application server. However, when the application server is clustered, it needs to be saved in the database or on a shared disk. As a result, it is necessary to design a storage destination by considering even the non-functional requirements.
Transaction management is necessary in case of saving the file to the database. As a result, the process to save it to the database will be delegated to Service method.
5.17.3. How to extend
5.17.3.1. Housekeeping of unnecessary files at the time of temporary upload
- When there is interruption in screen operations after temporary upload
- When system error occurs during the screen operations after temporary upload
- When server stops during the screen operations after temporary upload etc …
Warning
A mechanism should be provided to delete unnecessary files as the disk may run out of space if such files are left to pile up.
This guideline explains about deleting unnecessary files using the “Task Scheduler” functionality provided by Spring Framework. For details on “Task Scheduler”, refer to the official website “Task Execution and Scheduling”.
Note
Although this guideline explains about how to use “Task Scheduler” functionality provided by Spring Framework; its usage is not mandatory. In an actual project, the infrastructure team may provide batch application (Shell application) to delete unnecessary files. In such cases, it is recommended to delete unnecessary files using the batch application created by infrastructure team.
5.17.3.1.1. Implementing component class to delete unnecessary files
Implement a component class to delete unnecessary files.
package com.examples.common.upload;

import java.io.File;
import java.util.Collection;
import java.util.Date;

import javax.inject.Inject;

import org.apache.commons.io.FileUtils;
import org.apache.commons.io.filefilter.FileFilterUtils;
import org.apache.commons.io.filefilter.IOFileFilter;
import org.springframework.beans.factory.annotation.Value;
import org.terasoluna.gfw.common.date.jodatime.JodaTimeDateFactory;

    // (1)
    public class UnnecessaryFilesCleaner {

    @Inject
    JodaTimeDateFactory dateFactory;

    @Value("${app.upload.temporaryFileSavedPeriodMinutes}")
    private int savedPeriodMinutes;

    @Value("${app.upload.temporaryDirectory}")
    private File targetDirectory;

    // (2)
    public void cleanup() {

        // calculate cutoff date.
        Date cutoffDate = dateFactory.newDateTime().minusMinutes(
                savedPeriodMinutes).toDate();

        // collect target files.
        IOFileFilter fileFilter = FileFilterUtils.ageFileFilter(cutoffDate);
        Collection<File> targetFiles = FileUtils.listFiles(targetDirectory,
                fileFilter, null);

        if (targetFiles.isEmpty()) {
            return;
        }

        // delete files.
        for (File targetFile : targetFiles) {
            FileUtils.deleteQuietly(targetFile);
        }

    }

}
Sr. No. Description Note
Directory path in which files to be deleted are stored or the time criteria for deletion etc. may differ depending upon the environment in which application is to be deployed. Hence they should be fetched from external properties. For details on external properties, refer to Properties Management.
5.17.3.1.2. Scheduling settings of the process for deleting unnecessary files
Carry out bean registration and task schedule settings for the POJO class that deletes unnecessary files.
applicationContext.xml
<!-- omitted -->

<!-- (3) -->
<bean id="uploadTemporaryFileCleaner"
    class="com.examples.common.upload.UnnecessaryFilesCleaner" />

<!-- (4) -->
<task:scheduler id="fileCleanupTaskScheduler" />

<!-- (5) -->
<task:scheduled-tasks scheduler="fileCleanupTaskScheduler">
    <!-- (6)(7)(8) -->
    <task:scheduled ref="uploadTemporaryFileCleaner"
                    method="cleanup"
                    cron="${app.upload.temporaryFilesCleaner.cron}"/>
</task:scheduled-tasks>

<!-- omitted -->
Sr. No. Description "uploadTemporaryFileCleaner"ID.pool-sizeattribute.refattribute, specify the bean that executes the process of deleting unnecessary files.In the above example, the bean registered in step (3) is specified.methodattribute, specify the name of method executing the process of deleting unnecessary files.In the above example, cleanup method of bean registered in step (3) is specified.cronattribute, specify execution time of the process to delete unnecessary files.In the above example, cron definition is fetched from external properties.Note
Specify the configuration value of
cronattribute in “seconds minutes hour month year day” format.Example:
0 */15 * * * *: Executed in 0 minute, 15 minutes, 30 minutes and 45 minutes every hour.0 0 * * * *: Executed in 0 minute every hour.0 0 9-17 * * MON-FRI: Executed in 0 minute every hour from 9:00~17:00 on weekdays.For details on specified value of cron, refer to CronSequenceGenerator - JavaDoc.
Execution time should be fetched from external properties as it may differ depending on the environment in which the application is to be deployed. For details on external properties, refer to Properties Management.
Tip
In the above example, cron is used as a trigger for executing tasks. However, other triggers namely fixed-delay and fixed-rate are also set by default and should be selectively used as per requirement.
When the default triggers do not satisfy the requirements, an independent trigger can be set by specifying the bean implementing
org.springframework.scheduling.Triggerin trigger attribute.
5.17.4. Appendix
5.17.4.2. File upload using Commons FileUpload
If File Upload functionality of Servlet 3.0 is only used partially on Application Server, it may likely result into garbling of multi byte characters of file names or request parameters.
For example: If File Upload functionality of Servlet 3.0 is used on WebLogic 12.1.3, it has been confirmed that multi byte characters of fields to be sent along with file are garbled. Note that it has been corrected in WebLogic 12.2.1.
This problem can be avoided using Commons FileUpload. Therefore, this guideline describes about file upload using Commons FileUpload as a temporary measure for the specific environment where problems are likely to occur. Using Commons FileUpload is not recommended where problems are not likely.
Perform the following settings when using Commons FileUpload.
xxx-web/pom.xml
<!-- (1) -->
<dependency>
    <groupId>commons-fileupload</groupId>
    <artifactId>commons-fileupload</artifactId>
</dependency>
Sr. No.
|
Description
|
|---|---|
(1)
|
Add dependency to
commons-fileupload.No need to specify the version in
pom.xml as it is defined depending on Spring IO Platform. |
Warning
In case of using Apache Commons FileUpload, security vulnerabilities reported in CVE-2014-0050 are likely to occur. Confirm that there are no vulnerabilities in the version of Apache Commons FileUpload to be used.
When using Apache Commons FileUpload, version 1.3.1 or above should be used.
Further, if a version stored in Spring IO Platform is used, the vulnerabilities reported in CVE-2014-0050 do not occur.
xxx-web/src/main/resources/META-INF/spring/applicationContext.xml
<!-- (1) -->
<bean id="filterMultipartResolver"
    class="org.springframework.web.multipart.commons.CommonsMultipartResolver">
    <property name="maxUploadSize" value="10240000" /><!-- (2) -->
</bean>

<!-- ... -->
Sr. No.
|
Description
|
|---|---|
(1)
|
Perform bean definition of
CommonsMultipartResolver with MultipartResolver implemented using Commons FileUpload.Specify
"filterMultipartResolver" in bean ID. |
(2)
|
Set maximum size allowed in file upload.
In case of Commons FileUpload, it should be noted that the maximum value is the entire size of request including header.
Moreover, as the default value is -1 (unlimited), make sure to set a value. For other properties, refer to JavaDoc.
|
Warning
In case of using Commons Fileupload, MultipartResolver should be defined in applicationContext.xml and not in spring-mvc.xml.
It should be deleted if defined in spring-mvc.xml.
xxx-web/src/main/webapp/WEB-INF/web.xml
<web-app xmlns="http://java.sun.com/xml/ns/javaee"
    xmlns:xsi="http://www.w3.org/2001/XMLSchema-instance"
    xsi:schemaLocation="http://java.sun.com/xml/ns/javaee http://java.sun.com/xml/ns/javaee/web-app_3_0.xsd"
    version="3.0">

    <servlet>
        <servlet-class>org.springframework.web.servlet.DispatcherServlet</servlet-class>
        <!-- omitted -->
        <!-- (1) -->
        <!-- <multipart-config>...</multipart-config> -->
    </servlet>

    <!-- (2) -->
    <filter>
        <filter-name>MultipartFilter</filter-name>
        <filter-class>org.springframework.web.multipart.support.MultipartFilter</filter-class>
    </filter>
    <filter-mapping>
        <filter-name>MultipartFilter</filter-name>
        <url-pattern>/*</url-pattern>
    </filter-mapping>

    <!-- omitted -->

</web-app>
| Sr.No. | Description |
|---|---|
(1)
|
When using Commons FileUpload, an upload function of Servlet 3.0 should be disabled.
If
<multipart-config> element is present in DispatcherServlet definition, make sure to delete the same. |
(2)
|
When using Commons Fileupload,
MultipartFilter must be defined to enable security countermeasures which use Spring Security.MultipartFiltermapping should be defined before defining springSecurityFilterChain (Servlet Filter of Spring Security). |
Tip
MultipartFilteris a mechanism to perform the file upload process by fetching MultipartResolverregistered with bean ID "filterMultipartResolver" from DI container (applicationContext.xml).