5.19. Screen Layout using Tiles
Caution
This version is already obsolete. Please check the latest guideline.
Table of contents
5.19.1. Overview
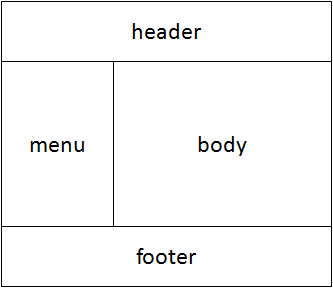
- To eliminate layout errors by designer
- To reduce redundant codes
- To change oversized layouts easily
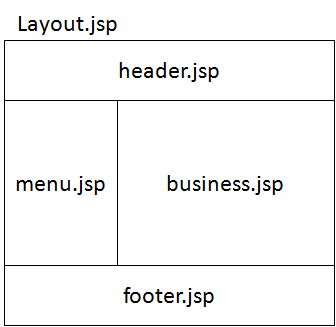
Therefore, after configuring the screen layout using Tiles, only the JSP file corresponding to business process (business.jsp) may be created for each screen.
Note
In some cases, it is better to avoid using Tiles. For example, using Tiles in an error screen is not recommended due to the following reasons.
- If an error occurs due to Tiles during error screen display, analyzing the errors becomes difficult. (In case of double failure)
- Tiles Template is not necessarily always used to display screens in the JSP set by the <error-pages> tag of web.xml.
5.19.2. How to use
5.19.2.1. pom.xml setting
<dependency>
    <groupId>org.terasoluna.gfw</groupId>
    <artifactId>terasoluna-gfw-recommended-web-dependencies</artifactId><!-- (1) -->
    <type>pom</type><!-- (2) -->
</dependency>
| Sr. No. | Description |
|---|---|
(1)
|
Add terasoluna-gfw-recommended-web-dependencies defined for the group of web related libraries, to dependency.
|
(2)
|
Dependencies such as terasoluna-gfw-recommended-web-dependencies are defined only in pom file; hence
<type>pom</type> needs to be specified. |
Note
It is assumed that pom.xml has the following terasoluna-gfw-parent settings.
<parent>
    <groupId>org.terasoluna.gfw</groupId>
    <artifactId>terasoluna-gfw-parent</artifactId>
    <version>x.y.z</version>
</parent>
Therefore, the
<version>of terasoluna-gfw-recommended-web-dependencies need not be specified.
5.19.2.2. Integration of Spring MVC and Tiles
org.springframework.web.servlet.view.tiles3.TilesViewResolver for integrating Spring MVC and Tiles.How to configure is shown below.
Defining Bean (ViewResolver, TilesConfigurer)
- spring-mvc.xml
<mvc:view-resolvers>
    <mvc:tiles /> <!-- (1) -->
    <mvc:jsp prefix="/WEB-INF/views/" /> <!-- (2) -->
</mvc:view-resolvers>

<!-- (3) -->
<mvc:tiles-configurer>
    <mvc:definitions location="/WEB-INF/tiles/tiles-definitions.xml" />
</mvc:tiles-configurer>
Sr. No. Description Define
TilesViewResolverusing<mvc:tiles>element added from Spring Framework 4.1.By defining it above
<mvc:jsp>element, first resolveViewby referring to Tiles definition file (tiles-definitions.xml). If View name returned from Controller matches withnameattribute pattern ofdefinitionelement in Tiles definition file,Viewis resolved byTilesViewResolver.Define
InternalResourceViewResolverfor JSP using<mvc:jsp>element added from Spring Framework 4.1.By defining it below
<mvc:tiles>element, resolveViewusing “InternalResourceViewResolverfor JSP” only for the View names that could not be resolved usingTilesViewResolver. If a JSP file corresponding to View name exists under/WEB-INF/views/,Viewis resolved byInternalResourceViewResolverfor JSP.Read Tiles definition file using
<mvc:tiles-configurer>element added from Spring Framework 4.1.Specify Tiles definition file in
locationattribute of<mvc:definitions>element.Tip
<mvc:view-resolvers>element is an XML element added from Spring Framework 4.1. If<mvc:view-resolvers>element is used, it is possible to defineViewResolverin a simple way.Example of definition when
<bean>element is used in a conventional way is given below.<bean id="tilesViewResolver" class="org.springframework.web.servlet.view.tiles3.TilesViewResolver"> <property name="order" value="1" /> </bean> <bean id="tilesConfigurer" class="org.springframework.web.servlet.view.tiles3.TilesConfigurer"> <property name="definitions"> <list> <value>/WEB-INF/tiles/tiles-definitions.xml</value> </list> </property> </bean> <bean id="viewResolver" class="org.springframework.web.servlet.view.InternalResourceViewResolver"> <property name="prefix" value="/WEB-INF/views/" /> <property name="suffix" value=".jsp" /> <property name="order" value="2" /> </bean>In
orderproperty, specify a value that is lesser thanInternalResourceViewResolverto ensure that it gets a high priority.
Tiles Definition
- tiles-definitions.xml
<?xml version="1.0" encoding="UTF-8" ?>
<!DOCTYPE tiles-definitions PUBLIC
   "-//Apache Software Foundation//DTD Tiles Configuration 3.0//EN"
   "http://tiles.apache.org/dtds/tiles-config_3_0.dtd"> <!-- (1) -->

<tiles-definitions>
    <definition name="layouts"
        template="/WEB-INF/views/layout/template.jsp"> <!-- (2) -->
        <put-attribute name="header"
            value="/WEB-INF/views/layout/header.jsp" /> <!-- (3) -->
        <put-attribute name="footer"
            value="/WEB-INF/views/layout/footer.jsp" /> <!-- (4) -->
    </definition>

    <definition name="*/*" extends="layouts"> <!-- (5) -->
        <put-attribute name="title" value="title.{1}.{2}" /> <!-- (6) -->
        <put-attribute name="body" value="/WEB-INF/views/{1}/{2}.jsp" /> <!-- (7) -->
    </definition>
</tiles-definitions>
Sr. No. Description Note
For the screens where Tiles is not to be applied (error screen etc.), it is necessary to set a file structure that excludes use of Tiles. In Blank project, /WEB-INF/views/common/error/xxxError.jsp format is used so that InternalResourceViewResolver can be used (and so that it does not change to the “*/*” format) on error screen.
- application-messages.properties
title.staff.createForm = Create Staff InformationNote
For details on message properties file, refer to Message Management.
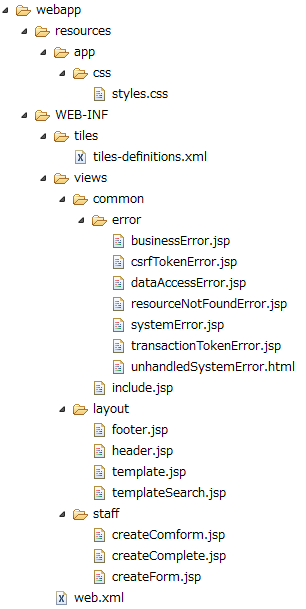
Following is the file structure when Tiles is set.
- tiles File Path
Custom tag settings
Custom tag (TLD) needs to be set to use Tiles.
- /WEB-INF/views/common/include.jsp
<%@ page session="false"%>
<%@ taglib uri="http://java.sun.com/jsp/jstl/core" prefix="c"%>
<%@ taglib uri="http://java.sun.com/jsp/jstl/fmt" prefix="fmt"%>
<%@ taglib uri="http://www.springframework.org/tags" prefix="spring"%>
<%@ taglib uri="http://www.springframework.org/tags/form" prefix="form"%>
<%@ taglib uri="http://www.springframework.org/security/tags" prefix="sec"%>
<%@ taglib uri="http://terasoluna.org/functions" prefix="f"%>
<%@ taglib uri="http://terasoluna.org/tags" prefix="t"%>
<%@ taglib uri="http://tiles.apache.org/tags-tiles" prefix="tiles"%> <!-- (1) -->
<%@ taglib uri="http://tiles.apache.org/tags-tiles-extras" prefix="tilesx"%> <!-- (2) -->
Sr. No. Description
For details about custom tags of Tiles, refer to Here.
Tip
- web.xml
<jsp-config>
    <jsp-property-group>
        <url-pattern>*.jsp</url-pattern>
        <el-ignored>false</el-ignored>
        <page-encoding>UTF-8</page-encoding>
        <scripting-invalid>false</scripting-invalid>
        <include-prelude>/WEB-INF/views/common/include.jsp</include-prelude> <!-- (1) -->
    </jsp-property-group>
</jsp-config>
Sr. No. Description Note
Custom tag can also be set in template.jsp. However, it is recommended to create custom tag definition in common jsp include file. For details, refer to Creating common JSP for include.
Creating layout
Create jsp (template) that forms frame of a layout and jsp to be embedded in the layout.
- template.jsp
<!DOCTYPE html>
<!--[if lt IE 7]> <html class="no-js lt-ie9 lt-ie8 lt-ie7"> <![endif]-->
<!--[if IE 7]>    <html class="no-js lt-ie9 lt-ie8"> <![endif]-->
<!--[if IE 8]>    <html class="no-js lt-ie9"> <![endif]-->
<!--[if gt IE 8]><!-->
<html class="no-js">
<!--<![endif]-->
<head>
<meta charset="utf-8" />
<meta http-equiv="X-UA-Compatible" content="IE=edge,chrome=1" />
<meta name="viewport" content="width=device-width" />
<link rel="stylesheet"
    href="${pageContext.request.contextPath}/resources/app/css/styles.css"
    type="text/css" media="screen, projection">
<script type="text/javascript">

</script> <!-- (1) -->
<c:set var="titleKey"> <!-- (2) -->
    <tiles:insertAttribute name="title" ignore="true" />
</c:set>
<title><spring:message code="${titleKey}" text="Create Staff Information" /></title><!-- (3) -->
</head>
<body>
    <div id="header">
        <tiles:insertAttribute name="header" /> <!-- (4) -->
    </div>
    <div id="body">
        <tiles:insertAttribute name="body" /> <!-- (5) -->
    </div>
    <div id="footer">
        <tiles:insertAttribute name="footer" /> <!-- (6) -->
    </div>
</body>
</html>
Sr. No. Description titlespecified in step (6) of tiles-definitions.xml and set it totitleKey.titleKeycannot be fetched, display the title defined in text attribute.
- header.jsp
<h1>
    <a href="${pageContext.request.contextPath}">Staff Management
        System</a>
</h1>
createForm.jsp(example of body section)
The developer is able to focus only on the body section and describe the same without having to mention the extra source code for header and footer.
<h2>Create Staff Information</h2>
<table>
    <tr>
        <td>Staff First Name</td>
        <td><input type="text" /></td>
    </tr>
    <tr>
        <td>Staff Family Name</td>
        <td><input type="text" /></td>
    </tr>
    <tr>
        <td rowspan="5">Staff Authorities</td>
        <td><input type="checkbox" name="sa" value="01" /> Staff
            Management</td>
    </tr>
    <tr>
        <td><input type="checkbox" name="sa" value="02" /> Master
            Management</td>
    </tr>
    <tr>
        <td><input type="checkbox" name="sa" value="03" /> Stock
            Management</td>
    </tr>
    <tr>
        <td><input type="checkbox" name="sa" value="04" /> Order
            Management</td>
    </tr>
    <tr>
        <td><input type="checkbox" name="sa" value="05" /> Show Shopping
            Management</td>
    </tr>
</table>

<input type="submit" value="cancel" />
<input type="submit" value="confirm" />
- footer.jsp
<p style="text-align: center; background: #e5eCf9;">Copyright © 20XX CompanyName</p>
Creating Controller
While creating Controller, when the request is <contextPath>/staff/create?form,
perform the settings such that “staff/createForm” is returned from the Controller.
- StaffCreateController.java
@RequestMapping(value = "create", method = RequestMethod.GET, params = "form")
public String createForm() {
    return "staff/createForm"; // (1)
}
Sr. No. Description
Creating screen
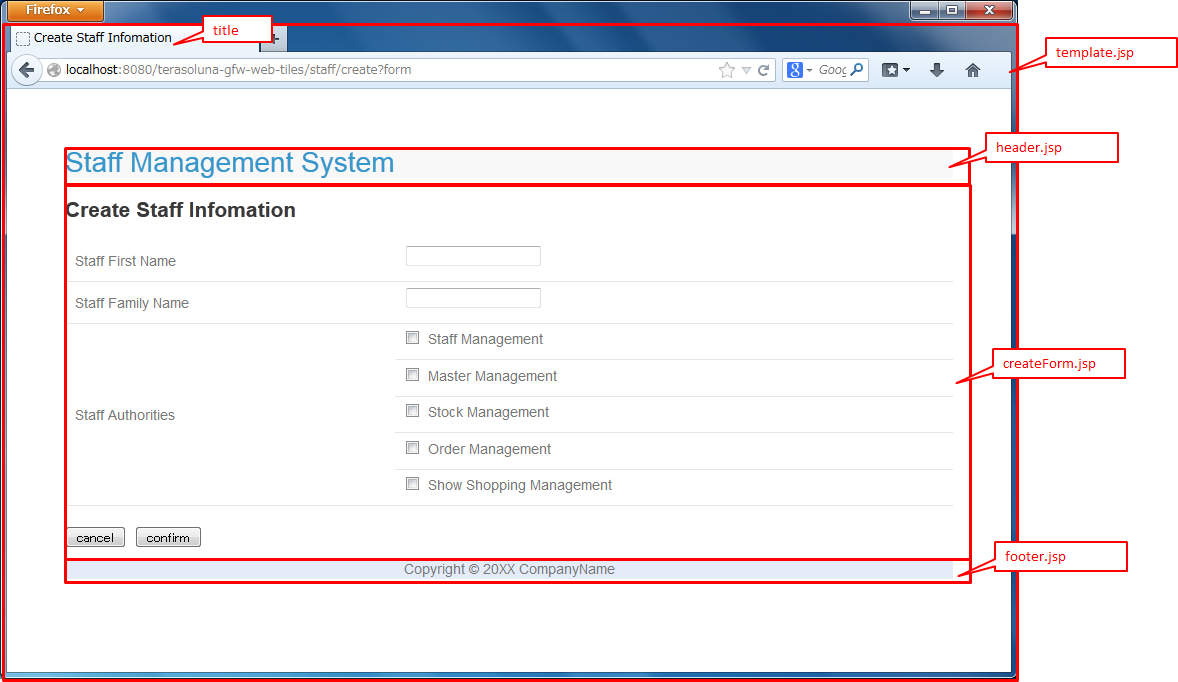
When <contextPath>/staff/create?form is called in request,
Tiles construct the layout and create screen, as shown below.
<definition name="layouts"
    template="/WEB-INF/views/layout/template.jsp"> <!-- (1) -->
    <put-attribute name="header"
        value="/WEB-INF/views/layout/header.jsp" /> <!-- (2) -->
    <put-attribute name="footer"
        value="/WEB-INF/views/layout/footer.jsp" /> <!-- (3) -->
</definition>

<definition name="*/*" extends="layouts">
  <put-attribute name="title" value="title.{1}.{2}" /> <!-- (4) -->
  <put-attribute name="body"
    value="/WEB-INF/views/{1}/{2}.jsp" /> <!-- (5) -->
</definition>
Sr. No. Description headerwithin the template /WEB-INF/views/layout/template.jsp.footerwithin the template /WEB-INF/views/layout/template.jsp.title.staff.createFormas key, fetch the value from properties incorporated in spring-mvc where staff is {1} and createForm is {2}.bodywithin template/WEB-INF/views/layout/template.jsp with staff as {1} and createForm as {2}.
As a result, it is output to the browser by combining header.jsp, createForm.jsp and footer.jsp in the above template.jsp.
5.19.3. How to extend
5.19.3.1. Setting multiple layouts
Tiles Definition
- tiles-definitions.xml
 <?xml version="1.0" encoding="UTF-8" ?>
 <!DOCTYPE tiles-definitions PUBLIC
    "-//Apache Software Foundation//DTD Tiles Configuration 3.0//EN"
    "http://tiles.apache.org/dtds/tiles-config_3_0.dtd">

 <tiles-definitions>
     <definition name="layoutsOfSearch"
         template="/WEB-INF/views/layout/templateSearch.jsp"> <!-- (1) -->
         <put-attribute name="header"
             value="/WEB-INF/views/layout/header.jsp" />
         <put-attribute name="menu"
             value="/WEB-INF/views/layout/menu.jsp" />
         <put-attribute name="footer"
             value="/WEB-INF/views/layout/footer.jsp" />
     </definition>

     <definition name="*/search*" extends="layoutsOfSearch"> <!-- (2) -->
         <put-attribute name="title" value="title.{1}.search{2}" /> <!-- (3) -->
         <put-attribute name="body" value="/WEB-INF/views/{1}/search{2}.jsp" /> <!-- (4) -->
     </definition>

     <definition name="layouts"
         template="/WEB-INF/views/layout/template.jsp">
         <put-attribute name="header"
             value="/WEB-INF/views/layout/header.jsp" />
         <put-attribute name="footer"
             value="/WEB-INF/views/layout/footer.jsp" />
     </definition>

     <definition name="*/*" extends="layouts">
         <put-attribute name="title" value="title.{1}.{2}" />
         <put-attribute name="body" value="/WEB-INF/views/{1}/{2}.jsp" />
     </definition>
 </tiles-definitions>
Sr. No. Description Note
When multiple requests correspond to name attribute patterns of definition tag, the verification is done sequentially from the top and the very first pattern that matches with the request is applied. In the above case, as the request for staff search screen corresponds to multiple patterns, the layout is defined at the top.
- application-messages.properties
title.staff.createForm = Create Staff Information
title.staff.searchStaff = Search Staff Information # (1)
Sr. No. Description
Creating layout
Create the jsp (template) that forms the frame of the layout and jsp to be embedded in layout.
- templateSearch.jsp
<!DOCTYPE html>
<!--[if lt IE 7]> <html class="no-js lt-ie9 lt-ie8 lt-ie7"> <![endif]-->
<!--[if IE 7]>    <html class="no-js lt-ie9 lt-ie8"> <![endif]-->
<!--[if IE 8]>    <html class="no-js lt-ie9"> <![endif]-->
<!--[if gt IE 8]><!-->
<html class="no-js">
<!--<![endif]-->
<head>
<meta charset="utf-8" />
<meta http-equiv="X-UA-Compatible" content="IE=edge,chrome=1" />
<meta name="viewport" content="width=device-width" />
<link rel="stylesheet"
    href="${pageContext.request.contextPath}/resources/app/css/styles.css"
    type="text/css" media="screen, projection">
<script type="text/javascript">

</script>
<c:set var="titleKey">
    <tiles:insertAttribute name="title" ignore="true" />
</c:set>
<title><spring:message code="${titleKey}" text="Search Staff Information" /></title>
</head>
<body>
    <div id="header">
        <tiles:insertAttribute name="header" />
    </div>
    <div id="menu">
        <tiles:insertAttribute name="menu" /> <!-- (1) -->
    </div>
    <div id="body">
        <tiles:insertAttribute name="body" />
    </div>
    <div id="footer">
        <tiles:insertAttribute name="footer" />
    </div>
</body>
</html>
Sr. No. Description
- styles.css
div#menu { /* (1) */
    float: left;
    width: 20%;
}

div#searchBody { /* (2) */
    float: right;
    width: 80%;
}

div#footer { /* (3) */
    clear: both;
}
Sr. No. Description
header.jsp
Same as How to use.
menu.jsp
<table>
    <tr>
        <td><a href="${pageContext.request.contextPath}/staff/create?form">Create Staff Information</a></td>
    </tr>
    <tr>
        <td><a href="${pageContext.request.contextPath}/staff/search">Search Staff Information</a></td>
    </tr>
</table>
- searchStaff.jsp (example of body section)
<h2>Search Staff Information</h2>
<table>
    <tr>
        <td>Staff First Name</td>
        <td><input type="text" /></td>
    </tr>
    <tr>
        <td>Staff Family Name</td>
        <td><input type="text" /></td>
    </tr>
    <tr>
        <td rowspan="5">Staff Authorities</td>
        <td><input type="checkbox" name="sa" value="01" /> Staff
            Management</td>
    </tr>
    <tr>
        <td><input type="checkbox" name="sa" value="02" /> Master
            Management</td>
    </tr>
    <tr>
        <td><input type="checkbox" name="sa" value="03" /> Stock
            Management</td>
    </tr>
    <tr>
        <td><input type="checkbox" name="sa" value="04" /> Order
            Management</td>
    </tr>
    <tr>
        <td><input type="checkbox" name="sa" value="05" /> Show Shopping
            Management</td>
    </tr>
</table>

<input type="submit" value="Search" />
footer.jsp
Same as How to use.
Creating Controller
While creating Controller, if the request is <contextPath>/staff/search, set such that
“staff/searchStaff” is returned from the Controller.
- StaffSearchController.java
@RequestMapping(value = "search", method = RequestMethod.GET)
public String createForm() {
    return "staff/searchStaff"; // (1)
}
Sr. No. Description
Creating screen
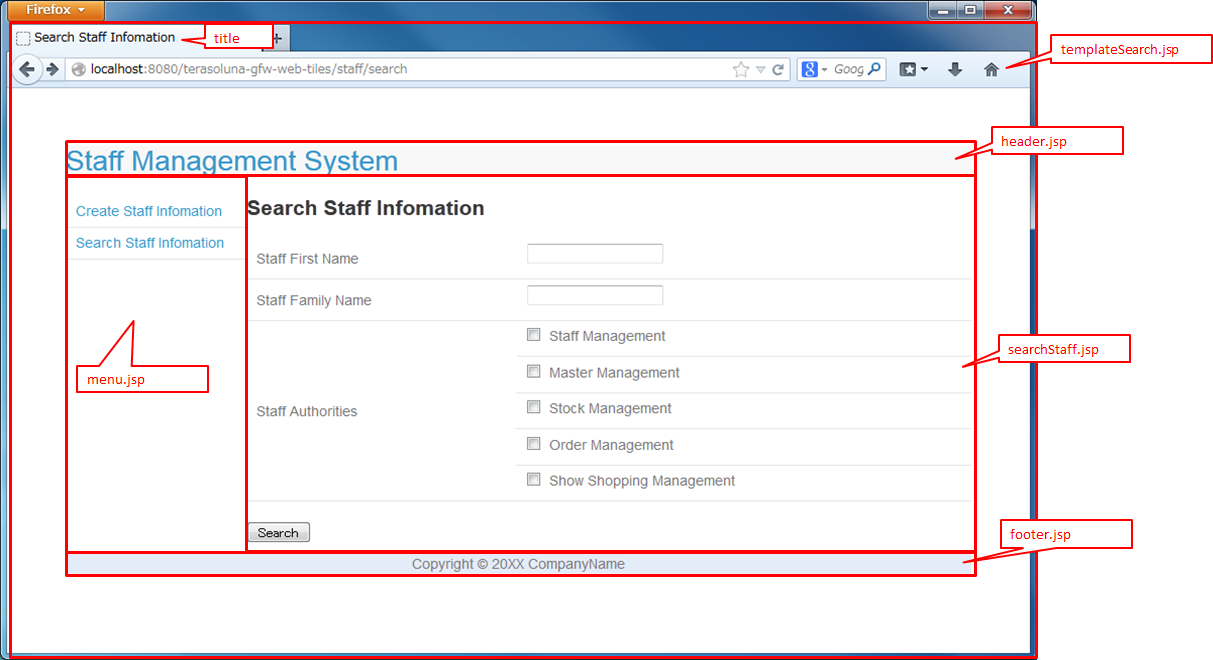
When <contextPath>/staff/search is called in request,
screen is generated through another layout as shown below.
<definition name="layoutsOfSearch"
    template="/WEB-INF/views/layout/templateSearch.jsp"> <!-- (1) -->
    <put-attribute name="header"
        value="/WEB-INF/views/layout/header.jsp" /> <!-- (2) -->
    <put-attribute name="menu"
        value="/WEB-INF/views/layout/menu.jsp" /> <!-- (3) -->
    <put-attribute name="footer"
        value="/WEB-INF/views/layout/footer.jsp" /> <!-- (4) -->
</definition>

<definition name="*/search*" extends="layoutsOfSearch"> <!-- (5) -->
    <put-attribute name="title" value="title.{1}.search{2}" /> <!-- (6) -->
    <put-attribute name="body" value="/WEB-INF/views/{1}/search{2}.jsp" /> <!-- (7) -->
</definition>
Sr. No. Description headerwithin the template /WEB-INF/views/layout/templateSearch.jsp.menuwithin the template /WEB-INF/views/layout/templateSearch.jsp.footerwithin the template /WEB-INF/views/layout/templateSearch.jsp.title.staff.searchStaffas key, fetch the value from properties incorporated in spring-mvc, where staff is {1} and searchStaff is “search{2}”.bodywithin the template/WEB-INF/views/layout/templateSearch.jsp where staff is {1} and searchStaff is “search{2}”.
As a result, it is output to the browser by combining header.jsp, menu.jsp, searchStaff.jsp and footer.jsp in the above templateSearch.jsp file.
